Time and Attendance (Part 8/31): Pay agreements Delimitation

Often there are differences between employees within an organization like additional bonuses should be triggered if something happens or an extra pay type should be triggered for all working hours for some users. There are so many different ways of giving payment it is some times overwhelming. I believe that this is where the AX solution shines. You can create any type of delimitation rule to solve any issue.

By using pay agreements delimitation you can create common pay agreements that can fit the entire organization, but keep a good record of what you are doing as these can grow to be pretty big. This is how I do it. If someone has an input on the matter. Please share! 🙂

The reason why I like to create one pay agreement for the entire or atleast the majority of the organization is that often there are some common denominators and these might be changed now and again. So if you have one pay agreement you only have to change this once and not replecate it to the entire organization. I would love to see the opportunity of adding multiple pay agreements to a user in the future.

I’d thought I would go through each of the parameters and give an example to what it can be used for, but you have to open your mind to the possibilities here. Often combinations of more then one delimitation can be used for the wanted effect.

There is a button on the form called Delimitations which get even more Advanced. I’ll go in to those in another post at the end of this series.

AX2012_TR_PayAgreementsLinesDetails

Factor:
Use this to add more or less than one pr. each working hour. I had a case where they needed to add 25% more hourly pay if the user worked flex hours. I used this on the Flex+ type with 0,25 of the standard hourly pay type.

Times:
If the times only apply durring a sertant time span. I don’t use these and let the profiles controll the triggering.

Criteria:
This is often used if you only want to trigger the pay type from, to or between between a given interval. For instance a bonus is paid if the worker works more then 12 hours. You can easily create a stair case modeling of pay types by using this delimiter.

Date Interval:
If you have pay types triggered differently between certaint periods like summer or winter you can use this. This is not for Public holidays or Things like that. That is what the “special” day is used for.

Seniority:
The seniority is calculated based on the seniority date on the employees time and attendance settings. The seniority date can differ from the hire date and is not a manditory field, so make sure to fill this out before you use this feature.

Be sure to use the right seniority date field as there are two associated with a user.

AX2012_TR_SenioritySetting


Round off:
Pretty common stuff, but I have never used it. In Norway we normally don’t round off untill the payment is done.

Count unit:
These are measures that are counted within a period. Meaning it is set to zero at the start of each period. If the count unit is between the min and max values the pay type is triggered. This is mostly used to limit the amount of transactions within a period.
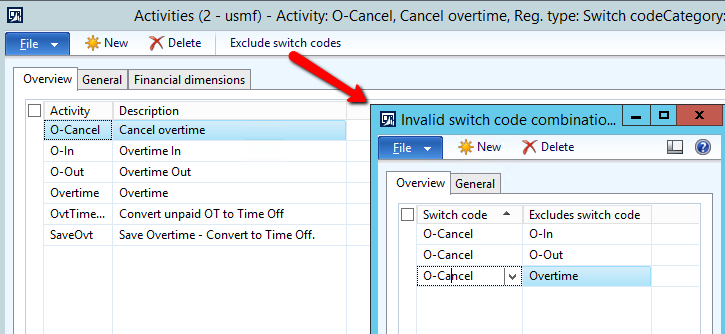
Switch code:
This was mentioned in the Profiles setup as well. These are codes that are triggered by the users and can be used to switch to a secondary profile type. It can also be used to select what type of pay type to be triggered. I use this often for building up a “time-off” account (as opposed to using flex time) when the user should not have overtime but is outside the normal working hours. I then put this delimiter on the overtime records to get this to trigger. Often used in conjunction with a “Count unit” and a secondary factor if for example they get 1,25 for each overtime hour worked, but only up to 5 hours pr. week.


Delimitation delimitations? Yes… All the other parameters are in fact delimitations, but this group has got it’s own header called just that. 😉

Operations:
I use this A LOT! This is the manufacturing operations. If a user should get a premium for each hour he does an certaint operation, then this is triggered. Customers love this as this is normaly solved by using extra time sheets, and with this it just works by it self.

Project ID and activity:
I guess this could be used for standardized internal projects or if a customer pays extra for a special Project, but if a type of Project Activity or category should give a premium as standard across multiple projects; then the “Advanced delimitations” must be used.
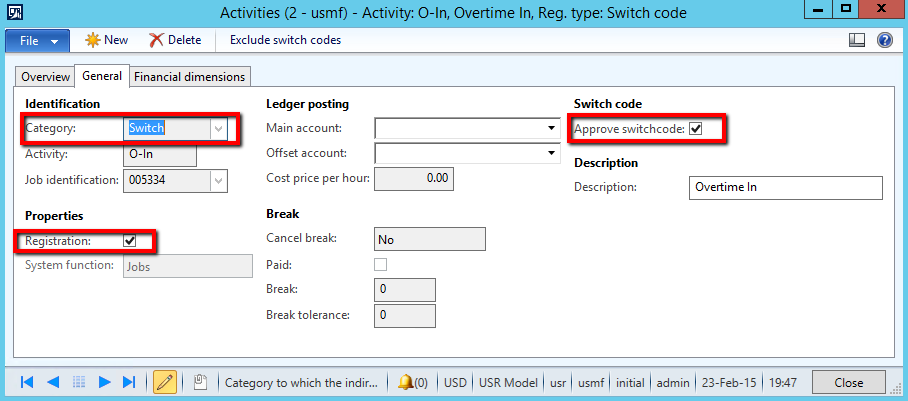
Activity:
This is the indirect activities of type “Jobs”. For instance some companies does not pay for union meetings.
I had a customer who would not allow contractors to have their time be posted to the systems waiting job. So they said that for all Contractors the Activity: “System job” should deduct 1:1 hour pay. This really increased the accuracy for their time registrations!

Absence code:
I use this a lot because some rules for payment of absence types often only apply to some types of workers. I use this as opposed to use the pay type settings directly on the absence code. I often use the “Advanced delimitations” for this as I can then trigger on a group level.

On Call Activity:
These are indirect activities of the type On Call. I use these for the Forman or Team leader permiums to be triggered if someone not normally in this position has to fill in during absence. The On Call is active for all working hours within the profile. I also use this when a person triggers his own permiums like emergency call outs, but then often with a fixed quantity.
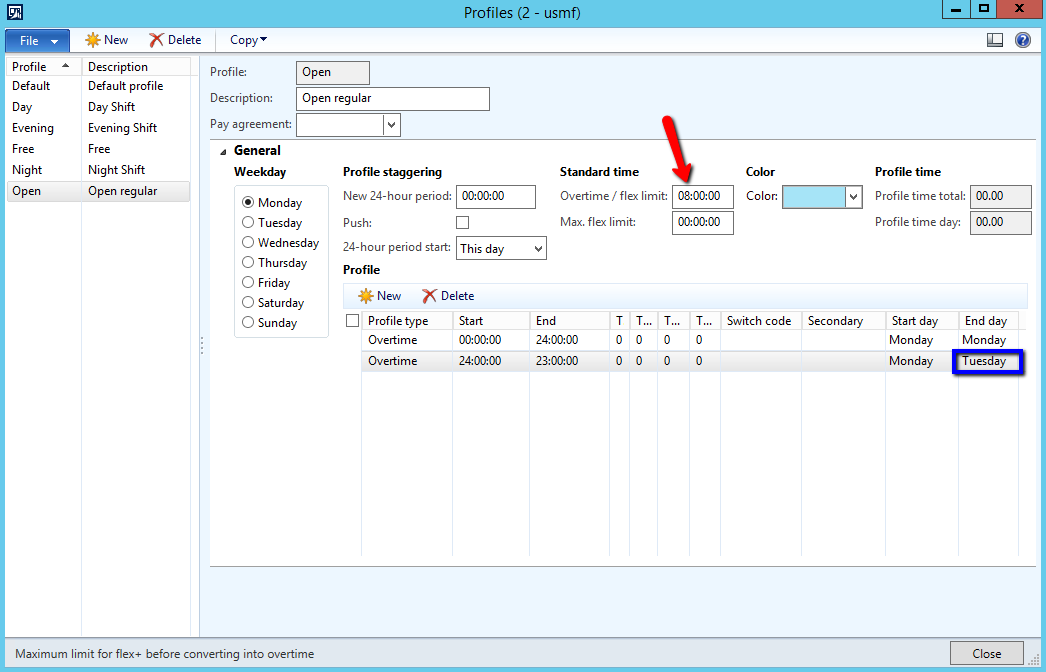
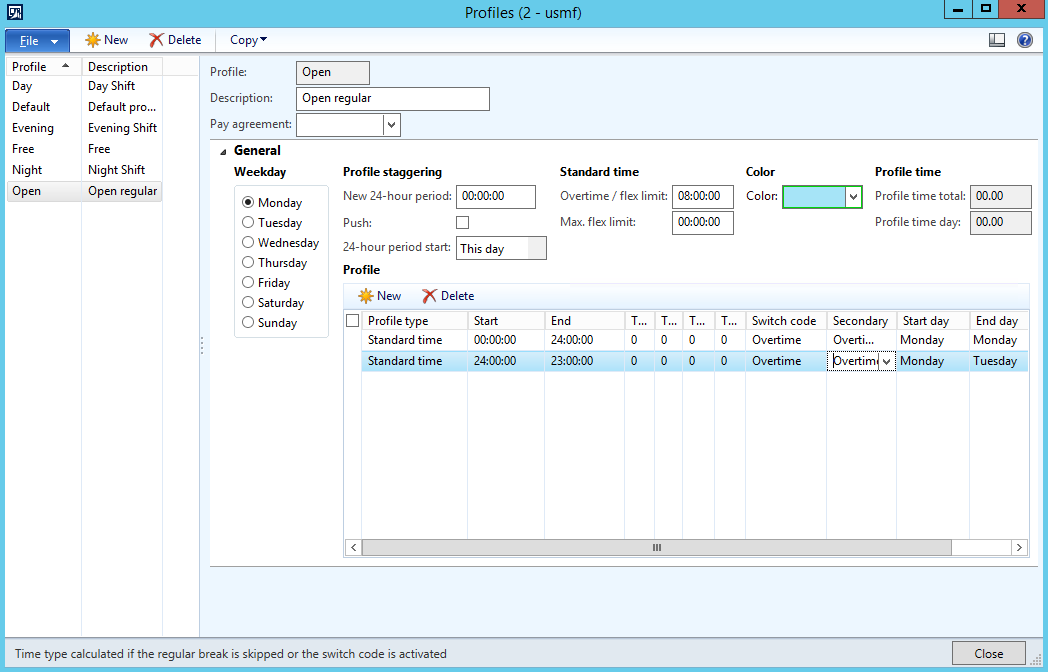
Profile:
I use this to trigger shift premiums for night or evening shifts. I often use “Advanced delimitations” if more then one profile triggers the same pay type.

Skill (with leveling):
Skills are set on the individual employee. I use this for Premiums related to a skill some times.

Certifications:
I use this for individual separation and multiple grouping of employees. You can also use skill for this purpose. The difference is that skill is leveled, and certifications can expire. I separate the worker types and special Premiums for this. So a user can for instance be a part of the manufacturer, hard laborer and forman, while another might not have the forman or hard laborer active. Both on the same pay agreement, but different terms.

Special day:
In the profile calander you can determin special days. This does not need to trigger the “special pay agreement day type”, but could be a special Tuesday for some reason… Thus giving a special premium for that particular day.


Invert sign:
This gives a negativ amount of the pay type triggered.

Cancel payment:
If this checkbox is active the system post the cost, but does not create a pay transaction. So this is just for a costing perspective. As I don’t use the costing in time and attendance this doesn’t apply to my setup.

Hour rate / Piece work:
You can select both or one or the other.

Profile type:
I use this activly as I differenciate between 100% or 50% overtime payment in my profiles. You can also create your own type of profile types. I have had an example where the users working Friday after lunch got 1,25. In that case I used a special profile type of the type work and added a paytype with 0,25 extra for each of the hours worked on this profile type.

Time and Attendance (Part 09/31): Employee setup

Time and Attendance (Part 7/31): Pay agreements

Pay agreements are the settings for what pay types should be generated based on the registrations, profile and calculation parameters.

Pay types:
First you have to create the Pay Types that are to be exported. If the ID in AX differs from ID in the external payroll system you can enter External Pay Type to translate the paytype to the correct type. You can also have to pay types in AX become have the same External pay type.
AX2012_TR_Paytypes

Pay agreements:
The pay agreements are a header/line type of configuration. I try to keep as few pay agreements as possible. Preferably only one. I rather use delimitations to restrict for each employee grouping within the same pay agreement. The reason for this is that if you need to apply a new rule for everyone you just need to do it once.

You need to put in a valid period in the header to be able to use the pay agreement.

AX2012_TR_PayAgreement

Pay agreement lines:
Keep in mind that the registered time and the profile limit the range of the payment type. So entering records should be taking in to account and cover all the different profiles. In the example below the pay type 1201 is generated for all standard time being triggered.

AX2012_TR_PayAgreementLines

There is a section for filtering each wage type. The relation between these and transactions from the profile calculation is set in the calculation parameters. Keep in mind that as a part of the standard configuration; overtime also triggers standard time. If you don’t want to do this, you can change this in the calculation paramters (Human Resources > Setup > Time and attendance > Calculation parameters).

The pay agreement lines has a day by day setup as well as a “Special day” for types like Public holidays and so on.

Pay agreement lines delimitations:

AX2012_TR_PayAgreementsLinesDetails

As you can see there is a wide range of delimitations you can do and I’ll run through what I normally do in my next blogpost.

Time and Attendance (Part 08/31): Pay agreements Delimitation

Time and Attendance (Part 6/31): Indirect activities

Human Resources > Setup > Time and attendance > Indirect activity categories
Indirect Activities is used for all other job types that does not involve absence, manufacturing execution or project.

There are four types of indirect activities:

  • Job
  • Break
  • Switch code
  • On Call

You can only have one type of activity within each category.

Job Activities:
There are some job activities created by the configuration wizard. These are the system specific jobs that are connected to a system function other then the type “Jobs”.

The system jobs are:

  • Jobs
  • Clock in
  • Clock out
  • Start assistance
  • Stop assistance
  • Change pilot
  • Submit registrations
  • Clear
  • System waiting
  • Stop break
  • Info
  • Switch bundle mode

If you are missing any of the system tasks, you might want to create these in the indirect activities Group called “System” later on.

For miscelaneous jobs you might want to prefer using a internal costing project to get a better functionality and more diverse costing opportunities.

Break activities:
You can either create default breaks in the profiles, but you can also set it up, so the users them selves can select when they take a break and how long it should be.

You can create different types of break activities that will holt the cost allocation to the operation beeing executed on.

AX2012_TR_Break_settings

You can choose if the break is a paid break and to set a timer for the activity. If the user does not punch a cancel break activity within a given time frame (with tolerance settings) the break will turn in to an unpaid break activity.

Switch code activities:
Switch codes are used to toggle different types of pay agreements and profile types in the profile.

I use these to mostly toggle overtime and toggle flex vs. overtime for flexi time users.

If you have a special type of pay account build up as well you can use this parameter to toggle this on or off.

A switch code can also cancel or exclude another switch code, so for the overtime scenario you will also want a cancel overtime activity that negate the overtime switch codes.

AX2012_TR_Switch_codes

On Call:
The on Call activity is a special activity that is called once for each shift (the time between clock in and clock out).

If the user triggers this at any time durring a shift, the entire work time will be “marked” with this On Call activity.

So you can use this as a to trigger where the user gets a special added pay type to each working hour.

I use this for triggering self-managed bonuses. For example if a worker needs to go to jobb in the middle of the night because a machine has stopped or something.

Time and Attendance (Part 07/31): Pay agreements

Time and Attendance (Part 5/31): Absence setup

Absence registration can be done by the time registration users them selves. If the clock-in or clock-out does not match the expected user profile, the user is prompted with an absence dialogue and can register either the reason why they are late or the reason why they are early.

To configure this go to Human Resources > Setup > Time and attendance > Groups > Absence Groups.

AX2012 Absence Groups

Create the groups with payroll in mind. For instance paid, unpaid, vacation and so on. This can make the payroll setup easier later.

After creating groups you need to create the codes

AX2012 Absence Code

Make it available for the time registration user:
The setup for absence codes are the reasons for why the employee is not present. Not all the codes are natural to have in the terminal Interface. To make them available. Tick the “Registration” checkbox under Time and attendance fasttab.

Add colors to the terminal dialogue buttons by selecting the text and background color. You can make it even prettier by adding an iconId to the Icon Box. You can find an overview of the standard icons for AX by going to the Developer Interface (CTRL + D) and go to Tools and Embedded Resources.

AX2012_Embedded_resources

Find the iconID by browsing the list and add it to the field in the Absence code form.

Continued or not:
The parameter “Continue absence” determens if the absence code should be active untill next clock-in by the user (Checkbox:true) or only untill the next expected clock in stated in the profile (Checkbox:false).

Post paytypes:
If you want to make the absence post a paytype to payroll you can add a paytype to the record as well. You can do it here if it is the rule for all employees. If they differ for some employees you can do this in the pay agreement setup later.
You can toggle if the absence is a standard day or only hour by hour. This will also affect the pay transfer. If set to day this will only transfer 1 for each day.

Try clocking outside the expected times and see the nice interface pop up.

Time and Attendance (Part 06/31): Indirect activities

Time and Attendance (Part 4/31): Profile setup

You create profiles to determin the users actual working times (Human Resources > Setup > Time and attendance > Time profiles > Profiles). You can do this in so many different ways that it is could be a dauntfull task to attack. I’ve got my own way of doing it and I’ll show you my way and some other methods of creating this. There is a lot to say here, but jump to: “Create a standard profile” and do that to quickly get started or read all to become a wiz.

Note: Name these based on function or department (Production, Administration, 50%, Day Shift, Night Shift, Flex daytime…) and not on users(eg. Jhonny, Frank, 105, FRS…).

Profile types:
You can configure the profile types at Human Resources > Setup > Time and attendance > Time profiles > Profile types. Durring the wizard execution we got some standard profile types, but to get the full functionality you will need atleast:

  • Break
  • Clock in
  • Clock out
  • Overtime
  • Paid Break
  • Standard Time
  • Flex +
  • Flex –

Create a standard profile
A standard profile has expected clock-in and clock-out records and could looks like this:

Standard Profile

Before 07:00 the user gets Ovetime. After 07:00 they have standard time untill a paid break for 15 minutes at 09:00 and a break at 12:00 for 30 minutes. The clock out is at 15:30 and time after this is overtime. The profile has tolerances for 5 minutes before and after clock-in/out making the rounding within the clock-in/out times.

After creating one day, you can copy this to the rest of the days in the week by using the copy function.

Note: Always check the “Profile time day:” to see the total work hours for that day

Microsoft has some great information and examples on this on MSDN: Click here

Profiles that need overtime approval
As I don’t want the system to automatically give the users overtime if they register before or after clock-in/out because this has a great economic impact. I use switch codes and secondary profile type to introduce a approval step for this action. The user can clock in early, but they have to enter a switch code to get the overtime. The switch codes are set up with the approval parameter active.

AX2012_Approve_switchcode

This is a standard setup for the profile that I use.

AX2012_Default_Profile

Note: The final record goes past 24:00 on to Tuesday because a user can then work past 24:00 and still get paid. The calculation is for the profile date and it only looks at the day it is activated. It does not look at the next day after 24:00.

Create a profile without clock-in/out constraints
The simplest profile type is the one without clock in or out times. This solution is pretty quick to set up and covers anyone who clocks in at any time of the day. It is mostly used for “Contractors” (external workers/hired help) and part time workers that is paid hour by hour. It will not prompt the user for absence codes.

Note: This type require users to register in and out from breaks.

AX2012_Profile_Open

Notice that the lines are chronological, and since the first line lasts untill 24:00 the second line last untill 23:00, but on the day after. This way anyone can clock in durring the entre day from 00:00 to 23:59 and work untill 23:00 the next day without any issues. It is important to check the “Profile time day:” to controll this.

Same type with approval for overtime:

AX2012_Profile_Open_Overtime

Flex time profiles:
We will cover is in Flexi time section later.

Prepair for work planner:
While creating profiles. Select a color for the profile. Try grouping them logically, so you can look at the color and kind of an impression on the type of profile.

My standards are:

  • Green for day shifts
  • Amber/orange for evening shifts
  • Red for night shift
  • Grey for generic profiles
  • Yellow for reduced times
  • White for free or NA
  • Blue for flex profiles

Time and Attendance (Part 3/31): The Basic consepts

Concept2

When I planned this series I thought it would be a light and high level, but this specific post is a bit deeper. As with all modules in AX it is important to know what is going on under the bonnet to fully understand the processes and opportunities. So let me try to sum it all up for you. You might want to go back to this as a reference post for all the other posts later on.

concept3

Data input:
Time and attendance uses jobs to that it registeres in raw registrations at the time of input from the user. It creates multiple jobs for each production operation depending on the settings, a job for each project and project activity, a job for each indirect activity and absence code and absence group.

Calculating work times:
When the person doing the calculation/approval opens the profile day for control of the hours the system creates the time journal header and time journal transactions based on the raw registrations. The journal can be changed. It can also be reverted back to it’s original transactions by importing the raw registration transactions again. The system require absence to be identified at calculation.

Calculating parameters and Pay agreements:
The pay agreements are used to set the base for what pay types that will be generated.
After the work times are calculated and approved it runs through the calculation paramters where the profile types corrosponding with the raw registrations generate pay agreement types based on the calculation parameter settings and pay agreements.

AX2012_TR_Calculation_Parameters

Transfer:
After calculating and approving the user will transfer the journals. This results in the lines being removed from the view of the user and pay types being locked in. These can later be exported to an external payroll system and the pay type transactions will be flagged as exported.

At the time of transfer the production orders and projects will get hours amended in the time journals posted as descrepencies in new route cards/Job Cards and Hour journals.

And that’s the basic process for time registration in AX.

Time and Attendance (Part 04/31): Profile setup

Time and attendance (Part 2/31): General parameters

My standard setup is the following:

AX2012_TA_Parm_1

I leave the “auto insert flex/absence” option blank because this normally sat to the person calculating the hours.

Password and Badge Id I some times use. This is set up on the employee settings (Human Resources > Common > Workers > Time registration workers | Employment > Time Registration).

AX2012_TA_Usersettings1

If password is active you have to enter a password at login, but you can keep it empty and only enter a password for supervisors for instance.

If the employee number sequence is not good for the login purpose, I use the badge ID for authentication.

The reason to use centihours for “time presentation” is because this is the same as in manufacturing routes. If not the 60-minute hours would be a better Choice.

The workers go back to the same work as the day before and working with the same teams (if used), so the “permanent teams” and “restart at clock-in” is active.

Job table sync is online, released orders are dropped to the shop floor instantly.

The registration error mode is sat to prohibit because discrepencies has to be controlled. If a user has a record posted at a time after the time stamp time the system will prohibit the user action.

Get time from server, so the system doesn’t use the local computer time.

Barcode settings has to have a barcode type that has enought caracters.

Max work minutes are set and automatic clock out is set to limit the time registered if the user forget to clock out.

If no input is done the terminal resets.

Inventory adjustment journals should have a special journal name, so you know what is posted from the shop floor.

Also set the Payroll file name and path.

AX2012_TA_Parm_2

Time and Attendance (Part 03/31): The Basic concepts

Time and Attendance (Part 1/31): Get started

Time and attendance is a very flexible solution for registering attendance and absence as well as manufacturing execution and realtime project feedback. attendance screen This is a pretty big setup job if done correctly, so the next couple of days I’ll be posting the way to set up the Time and Attendance module. You can however get started right away! Following these steps will get you to start registering time clocking in and out. The setup is done by entering Human resources > Setup > Time and Attendace.

  • First you need to run the configuration wizard under Wizards. This will create the required setting like system jobs in indirect activities (clock in/out, wait time, abort pause and more), terminal configurations and profile types.
  • Go to profiles and set up a profile single. This define the workers actual working times. You do not need to enter anything in to the profiles, but you need atleast to create a blank one for setting the required parameters on a user.
  • Under Groups: Create a profile group, calculation group and approval group.
  • Go to the employees, go to the Time and attendance pane and activate the user from the Time and attendance pane. Fill inn all the required Fields.

You can now clock in and out using the employeeId. Start the registration form under Home > Common > Time and attendance > Clock in/out (Punch clock) This is the bare minimum to actually start registering attendance. Cool thing is… If you’re only looking for the attendance part of the solution you can start punching time and do the rest of the setup later.

Time and Attendance (Part 02/31): General parameters

AX HTML 5 client showed at WPC

During the AX session with Christian Pedersen the new AX HTML client was showcased and it looks amazing!

The video is titled “Creating amazing success with Microsoft Dynamics AX”. At 54:00 the new interface is showed.

There will be “tracks” of business processes that quickly takes the user to the required forms and reports, but you can still access all the area pages that you know from the existing desktop client.

There will be personalization options with themes and grid size.

All in all it looks fantastic, and I can’t wait until it is released.

I also think this will be available for the 2012 R3 as well, and not just the paradigm shift for the AX7 release.

New E-mail feature in CU7

New E-mail feature in CU7

In AX 2012 R2 CU7 Microsoft introduced a more refined way of working with emailing documents to customers.
The feature introduce the possibility of using email addresses on the customer primary contact, a certain title on a customer contact or a email with a corresponding purpose to send a given document to.

Here is how you do it: (View the numbers in the image above)

1. On the customer General Tab
2. Click on Print Management
3. On the preferred document: right click on the Original document and choose override or right click the type and add a copy.
4. Click the arrow on the Destination option and select Printer setup.
5. When email is selected you can choose the edit button on the recipient (TO or CC) and select the options shown.
6. The solution will select the email addresse with the given purpose in these field.

Have a DAXing good day!