Time and attendance Terminal auto start

As there are many time and attendance solutions that have specialized terminal equipment available, the Dynamics AX solutions might seem like a step back in user friendliness. A way to improve the experience for end users is to launch the terminal window directly when the terminal is turned on, so they don’t need to launch the window separately.

Dynamics 365 for Operations

For Dynamics 365 for Operations it is easy to just launch the URL with the right attributes in the browser to full screen. Use either mi=JmgRegistrationJobQueue for the job card terminal or mi=JmgRegistrationTouch for the job card device and add &limitednav=true on the end to restrict navigation access.
Go to the terminal setup (Production control > Setup > Manufacturing Execution > Configure job card Terminal or Configure job card for Devices) and add the user to log in directly. On the terminal you can turn off the “prompt for production area” to further limit the interaction.
Put the shortcut in the windows “Start up” folder. An example of the shortcut could be:

chrome.exe --start-fullscreen --app=https://[yourURL]/&cmp=[Company]&mi=JmgRegistrationTouch&limitednav=true

Dynamics AX 2012

When it comes to AX 2012 you can do this by using the .axc files in combination with an XML file to launch directly to the terminal window. I have even been able to do this in a Citrix environment.

Just use the ax32.exe startupCmd command and prompt an XML. Read Janet Blakes bloggpost to do this.

AX7 T&A: Document groups

When working on the Job card terminal or Job card device you are able to access attachments to the orders you’re working on. This is done by clicking the attachment button/menu item.

AX7_TA_DocGroupJCTAttachment
Job card terminal attachments button.
AX7_TA_DocGroupJCDAttachment.png
Job card device Attachment/Instructions button

This is done by configuring the Document Groups (Production Control > Setup > Document Groups).

Simply add a new record, select the document types and add the users who will view the different documents.

AX7_TA_DocumentGroupsYou might want to create different Document groups for different individuals if they are supposed to read different instructions or documents.

Selecting “Reading required” in the document types section will prompt the user with a dialogue when starting the production.

All done!

The system will now look on the production order as well as on the item to aggregate the attachments!

When opening the attachments in the job card forms you will get this nice view:

AX7_TA_DocGroupJCDDialogue.png
Attachment lookup with preview! Looks nice!


Go to the AX 7 – Time and Attendance guide page

AX7 T&A: Teams and assistant

In a dynamic factory setting where human resources go back and forth between different jobs, roles and machines it is important to track each resource to get a good overview of the costing. Some times people go around helping each other on tasks and also work as a team throughout the entire day or for a longer period of time.

When many workers work together on multiple production orders within a period, you can task one of the persons to be responsible to register time for all users. This is done by creating a “team”.

Creating a team

In a team you have the pilot and the team members. The pilot is responsible for the terminal registrations for all the team members. This is done by simply changing jobs as usual. The team members use the “assistance” functionality to join a team. Simply click Assistant and select another signed in worker to start a team.

AX7_TA_JobCardTerminalAssistance.png


Managing your team

An overview of current teams can be shown in the Teams form (Time and attendance > Inquiries and reports > Teams)

Teams can not be “nested”, meaning that a team can not be a part of another team. Not because of the functionality. The tree view is clearly there to illustrate a multi level hierarchy. There just isn’t any way for a team pilot to assist another team pilot. You would have to hack it to do so, and then I don’t know what happens to cost calculations.

The team pilot, Bill Malone in the example above, will change jobs and the cost of the team members (Dana and Christina) will be assigned to the jobs that the pilot is working on.

Before the pilot checks out for the day, and still is pilot, he will get a message saying he has to change pilot before checking out.

The pilot then uses the “Assistant” function as well, but since he/she is a pilot, the menu will say: Change pilot.

AX7_TA_JobCardTerminalChangePilot.png

After selecting one of the team members to be pilot, the user will be demoted to team member. A dialogue shows to confirm this.


Setup: System jobs needed

If you try to work with assistance and you get a message about missing jobs, it is because your system is not ready.

AX7_TA_AssistanceError.png

Go to the Indirect Activities (Time and attendance > Setup > Indirect Activity Categories), enter the “System” group and add the required jobs like this:

AX7_TA_ChangePilotJob

Add jobs for the following system functions:

  • Start assistance
  • Stop assistance
  • Change pilot

Remember to check the “registration” to be able to use it in time and attendance.

Smart use of this feature for shifts/hand off

A smart way to use this feature is if you have a resource that handles many jobs at once and do a shift change. I have a customer that has a production line where many (40-100) jobs can be active at once from about 1000 released jobs.

Instead of the shift coming on has to register to all the jobs and select them from the enormous list of jobs, he/she uses this feature for a hand-off.

This is what you do:

  1. The shift coming on signs in and registers as assistant on the one working on all the jobs.
  2. The shift going home registers the person coming on as pilot and checks out.

The jobs are then handed over. A great time saver.

Go to the AX 7 – Time and Attendance guide page

AX7 T&A: Supervisor options

The idea behind the supervisor option is that the shop floor supervisor shouldn’t have to retreat to their office to do the most frequent tasks. This includes reprioritize work, control worker attendance, report absence and change feedback as well as report on manufacturing execution tasks themselves.

When authenticating on the time and attendance registration form, the supervisor will be prompted with a supervisor dialogue where they can quickly jump to the desired task.

AX7_TA_SupervisorOptions.png

The supervisor can change between different resource, groups and production units to do Job registrations.

Change Feedback

The “Change feedback” option gives an overview for feedback from the selected resources.

AX7_TA_ChangeFeedbackOverview.png

You can select multiple records and click the “Update Feedback” button. This launches the feedback wizard form which I normally don’t use because you can not access the picking list. This is a simple way to perform feedback.

AX7_TA_ChangeFeedback.png

After the supervisor has updated the feedback and clicks “Finish” the journals and jobb is updated.

This is a great feature as it allows the supervisor to reactivate jobs that has been reported as completed, but should have been reported as stopped. Earlier this gave a lot of headache because you would have to go into the AOT to fix it or create a job that could do this for you.

Attendance

The supervisor can quickly access the Attendance form (which you also can do from the terminal directly) from the supervisor options to report absence or check the worker attendance.

After selecting a calculation group,

AX7_TA_AttendanceGroup.png

the supervisor will see the attendance overview.

AX7_TA_AttendanceOverview.png

Here the supervisor can print the attendance form, clock out a selection of workers or register attendance directly.

Clicking on register attendance for a worker the supervisor is presented with a absence registration form with a start/end date and time based on the planned work profile and can input an absence code.

AX7_TA_AttendanceRegisterAbsence.png

This is done without even leaving the shop floor. When the forman is going to calculate the absence registered will be used and he/she won’t be bothered with roaming the workforce to find out who knows why anyone wasn’t clocked in that day.

Edit job list

“Editing job list” is used to reprioritize the sorting of the jobs on the terminal for the resource.

AX7_TA_EditJobList.png

Selecting a job the supervisor can move it up, down or to a specific sequence number. It is also possible to move the work to another resource as long as it is within the route operations requirements.

Making the job High priority will force the resource to work on this job next. It will be the only job that the resource can start working on and will be notified if he/she tries to start another job.

There are also a lot of other information like capacity overviews, materials and general information about the production order and/or job.

Activation

To activate this feature for the terminal user. Go to Human Resources > Workers > Workers | Employment > Time Registration > Supervisor Option and set it to “Yes”.

AX7_TA_EmployeeSupervisor


Go to the AX 7 – Time and Attendance guide page

AX7 T&A: Payroll statistical groups

Payroll employees are continuously hammered with questions like: How many vacation days do I have left? What is my flex account balance? How many overtime hours do I have so far this period? What is the balance of “this” account?
These data are often presented to the worker on the payroll report or payment slip and at that time often spark a debate with a bunch of employees all at once.

Putting continuously updated account balance information in to the hands of the worker is pretty important as it frees up a lot of time for the payroll employees. Some, but not all, of this info is presented as default in the time and attendance (Paytime, Overtime, Absence and flex). However, you may want to present the worker with other account balances, like vacation for instance.
The way you do this is by grouping together different payroll types in to “Payroll statistical groups”.

The Payroll Statistical Group also has other usages like weighing average balances within a period and I’ll go in to that in a later post, but today we’re just looking at showing balances to end users.

It is a set of accounts that you group together to show a balance, and you can choose if it should show only for the current period (Paytime, Overtime, Bonus that are paid regularly) or the total account balance (Flex and Vacation). The groups are then presented to the worker in a list that you can access in the time and attendance registration form called “Balance”.

AX7_TA_JobCardTerminalBalancesMenuItem.png

Note: The flex account and overtime are displayed in the users status window, but can also be added to this list. Also on the balance overview list you’ll find your standard payment

AX7_TA_JobCardTerminalBalances.png

To set this up you must first set up the entity that group your accounts for a summed balance. Go to Human Resources > Setup > Time and attendance > Payroll > Payroll Statistics.

Create the summary groups for your accounts. “Transfer” means that the account balance for previous periods are accumulated in the view.

AX7_TA_PayrollStatGroup.png

Go to “Setup” and add your accounts.

AX7_TA_PayrollStatGroupSetup.png

Now choose what balances you want the workers to view in the time and attendance registration form in Statistical balance setup (Time and attendance > Setup > Payroll > Statistical balance setup)

AX7_TA_StatisticalBalanceSetup.png

That is it! Now you can present any kind of account balances to an employee and ease off many questions to the HR/payroll department.

Go to the AX 7 – Time and Attendance guide page

AX7 T&A: Manufacturing execution setup

A core component in Time and attendance is Manufacturing Execution (MES). The setup for this is now located in the Production Control module (Production Control > Setup > Manufacturing Execution)

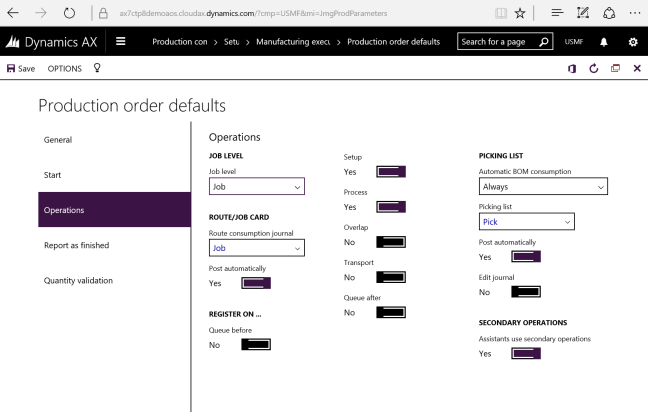
The Manufacturing Execution parameters is only a subset of parameters presented in the Time and Attendance general parameters. The interesting parts are in the Production parameters (Production Control > Setup > Manufacturing Execution > Production order defaults)

AX7_TA_MESParm1

You can control the parameters by site or generic throughout the company.

Parameter usage defines the level of how detailed you want to control this. You can set it to site, but then you would have to define a parameter set for each site.

Bundle type decide how you want to split your work when working on several jobs at the same time. (I might post something on that later on)

Time can be posted automatically to route or jobb journals. If not activated, then it will wait to post until the Transfer action is performed in the approval process.

You can assign cost for manufacturing based on the pay types generated or by the Cost Category.

Financial Dimensions can be inherited from the jobs or worker or as a hierarchy where the one overrides the other.

Productions post journals (Route and Picking lists) at three different stages:

  • Production start
  • Operation feedback
  • Report as finished (Also posts a finishing journal)

The next three options in the right side menu (Start, Operations, Report as Finished) is for setting different posting setups for each step.

IMPORTANT!
Be sure to not set the solution up so it automatically pulls estimated route as well as actual transactions and duplicate or even worse triple posting of estimated items. Use either “Always” for only ONE of the three posting actions or Route group/Flushing principle for two of them.

All of these steps need a quantity to trigger automatic consumption of items, so you must start with a quantity if you want it to handle picking to be created or posted at start.

AX7_TA_MESParm2

On Start you can also decide if you want the solution to mark the production order as started and if you want to include a quantity as well.

You can select if you want to show the picking list journal before it is posted. This opens up a form with items suggested based on the qty started and the terminal user can edit it on the fly when posting.
AX7_TA_MESParm3

On Operations you also decide what level you want to report on. You can select either Operations(Route) or Jobs.

You can on this level, as well as on Start let the user to be able to edit the picking list journal by ticking Edit journal under the Picking list section.

AX7_TA_MESParm4

On Report as Finished you can select if you want to update the status of the production order and if you want to Accept errors.
Accept errors doesn’t accept any error like missing inventory and so on, but are in relation to jobs being reported as finished and the consumption of all estimated quantities.

It is a good idea to have unique journal types for feedback from Manufacturing Execution to be able to quickly differentiate between what is manually created and automatically created from MES.

AX7_TA_MESParm5

The final menu item is Quantity validation which is used to make sure that you start and report the correct amount. In some cases I use this, but in many cases this is left as it is shown in the screenshot above. You can base the validation based on previous jobs or the estimated quantity.


When all this is looked over you will be able to get cracking on using manufacturing execution.

Releasing a production order with route will make the jobs available in Manufacturing Execution.

Start the Job card terminal form (Production Control > Manufacturing Execution > Job card terminal) and have at it!


Go to the AX 7 – Time and Attendance guide page

AX7 T&A: Profile group profile relations

We have noe looked at how to manually do shift planning by using the Work planner interface to work with the profile calendar table. If you want to automate the shift process, you can do so as well. The profile group can be associated with a setup that automatically assign a profile based on the clock in time.

Go to your Profile groups (Time and attendance > Setup > Time profile > Profile group)

AX7_TA_ProfileGroups2.png

and click the Profile relation menu item.

AX7_TA_ProfileGroupRelations.png

Add your profile and the time intervals that the clock in time should trigger at.

You can also create regular shift variations. Like for instance in high demand season (01.03..31.08) we run three shift, but in low season we run only two.

AX7_TA_ProfileGroupRelationsSeasonal.png
Example of a season variable profile relation setup.


Go to the AX 7 – Time and Attendance guide page

AX7 T&A: Work planner

Work planner is an excellent tools to handle your workers profiles over time and work efficiently with the profile calendar. It basically is a visual representation and painting tool (Yes…) of your profile calendar and the reason why you want to have some logical coloring of your profile settings.

This solution was in CTP8, but was deprecated in the RTW! However it is still in there in the code. It is just the menu item that is not included. Find the JmgWorkPlanner form and add create a menu item so you can call it from the browser.

My customers use it to do shift planning and make those off-weekly-work-profiles work (like someone having half day two days a week, but not the same days next week and free every third Friday after a full moon and such). To set this up you need to add a color to you profile. Check out my earlier post on time profile configuration for more info.

Using the Work planner:
You find the Work planner at Time & Attendance > Work planner.

When the form opens it gathers all the data from the profile calendar and creates an overview in the form.

Right area of the form:
There are two panes:

  • “Period” is one row per user
  • “Profile Group” has a section for all and a section with rows per profile group.

You can filter based on calculation group and/or approval group. The Display options are layered and shows the profiles in the way the profile calendar is queried from the Time Journal creation. You can activate them at will by clicking the check boxes. “Overlay” will show the profile group and all, Standard profile is the default profile on the workers employee settings and then you have “planned absence”.
The absence can be shown and you can pick the color it shows in the grid.

One layer overrides the other:
1. Absence
2. Profile calendar: User
3. Profile calendar: Group
4. Profile calendar: All
5. Default Profile

Left area of the form:
Here you can pick the date interval for the form and clicking “show weekends” gives a grey color on Saturdays and Sundays. The Profiles are listed and shows in the color as set on the profile. You can filter down the profiles by using the profile group. These will then show only the profiles in the profiles relations for this group.

Select one of the profiles in the list by clicking it and then draw these profiles on the dates for each user or group/all based on the pane you’re on.

Check the clear profile and draw if you want to delete/remove.

This slideshow requires JavaScript.

The Profile group pane looks like this:

AX7_TA_WorkPlannerGroupLevel.png

After you’ve finished you’re work planning. Click “Save” in the top menu and the profile calendar is updated with the new data.

Have fun!

AX7_TA_WorkPlannerFun.png


Go to the AX 7 – Time and Attendance guide page

AX7 T&A: Profile calendar

The profile calendar is used to make planned changes to the default profile that is used for calculation. When doing the profile calculation the system checks the Profile calendar to override the default profile and this is loaded as the profile for that journal. So you can predetermine the profile that the user is going to have at calculation by creating a record in the profile calendar table. You can set this up for special work days that deviate from the standard work hours, but it is also a very nice tool to handle complex profiles where the profile changes from week to week. Go to Time and Attendance > Time Profiles > Profile Calendar to add new records.

AX7_TA_ProfileCalendar.png

You can do changes for entire profile groups or for all workers as well by changing the Profile calendar code column to Group or All. Use special day column to trigger the special day in the pay agreement. For instance if a Monday is Christmas Day and if someone comes in and does work, they will get the special day Pay agreement instead of a Monday.

Since one record is only referred to one day it takes a while to input a whole week manually. You can easily create this by using the Compose function.

AX7_TA_ProfileCalendarCompose.png

You can also copy an interval for instance if one week is day-shift and one week is night-shift, then this fortnight can be multiplied as many times as you want. You do this by using the Copy interval function.

AX7_TA_CopyIntercval.png

There is a great graphical tool for handling profile calendar which is called job planner. I will look into that next.

Go to the AX 7 – Time and Attendance guide page

AX7 T&A: Flex time administration

All the menu items for handling flex for a worker is located on the workers form (Human Resources > Workers > Workers)

AX7_TA_FlexTimeUser

Flex: Recalculate the workers flex balance.

Opening flex balance: You can set the Opening Flex balance of a worker if the worker already had some time built up at implementation or as a transfer from another company.

Flex balance: Shows an overview of the workers flex account balance chronologically through time. A new record is put in to this table each time the user has a flex transaction at calculation and the flex balance is recalculated.

AX7_TA_FlexBalance.png

You can do adjustments manually by clicking Flex correction

AX7_TA_FlexOverviewAdjustment1.png

You can also post payroll transactions in the same correction. A good example is that you can replace overtime with flex time.

This flex correction can also be performed by the system.
The balance for a worker can exceed the limits of the Flex group settings.

AX7_TA_FlexBalanceAdjustSetting.png

Some just want to report on the issue and make sure that the users get back within the limits them selves or you can run the flex correction job to reduce or increase the balance for the user like the manual example above.
Based on the flex group settings you can replace these with pay types for each flex time unit adjusted. This is configured in the flex group.

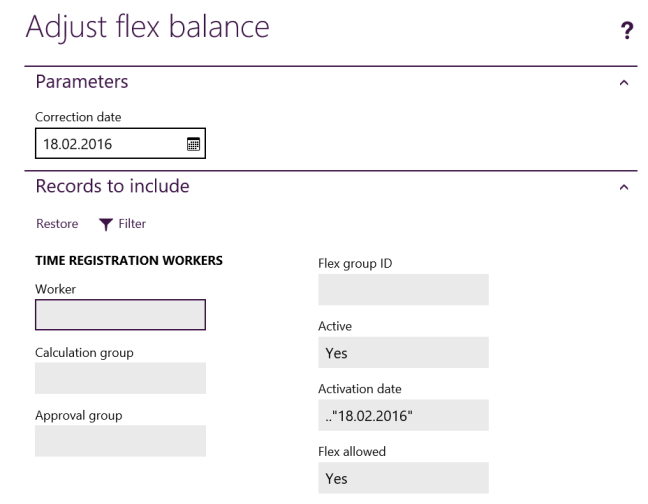
The periodic job is found at Time and Attendance > Manage flex time > Adjust flex balance.

AX7_TA_AdjustFlexBalance.png

The system looks at the Correction date and adjusts the Flex balance to the Max or Min flex time allowed in the flex profile the worker is associated with.

Worker account balance:
The worker can check their flex account balance in the Job card terminal in the Status fact box.

AX7_TA_FlexBalanceJobCardTerminal.png


Go to the AX 7 – Time and Attendance guide page