Time and Attendance (Special): Adding new menu items

As the JobRegistration form is pretty special and is über configurable, you have to do some magic to add new menu items to it.
Don’t just go ahead and add new buttons directly to the form it self as this can mess it up. You should to add the new buttons to the configuration tool so you can select them and handle them as any other configurable button.

Here’s the quick guide:

  • Add new element to Enum.JmgSignInButtonFunction
  • Add functions to Class.JmgRegistrationForm
Example for a menu item for printing labels:
AX2012_TA_Code_JmgRegForm
  • Create a new menu item that is to run the action
    (Remember to find a smashing icon to go with it)
  • In Class.jmgMESClientSelection
    • Add the enum element to case switch in buttonFunction2MenuItemStr
    • Add the new menu item in the case switch buttonFunction2MenuItemType
    • Add the method string return in menuItemStr2MethodName

Thank you Dag Arild for helping on this one.

Dynamic resource planning

The resources in AX 2012 have properties that can be used to differentiate them from each other making for a much better and precise resource planning.

The different choices when selecting Resource requirements are:

  • Resource Type
  • Resource Group
  • Resource
  • Capabilities

Then you have the properties only related to human resources/personell:
To add these to a person, go to the worker card > Competencies and development > Competencies

  • Skill
  • Courses
  • Certificate
  • Title (Added on the worker card > profile)

Setting it up:
Resource type, Resource group and resource speak for it self.

Capabilities are new to AX 2012 and is a great functionality. This property can be shared between all types of resources. There is also a capabilities map to view resources and I encourage my customers to use this widely throughout their production planning to increase precision.

To set this up go to: Organization management > Common > Resources > Resource capabilities

AX 2012 Prod Resource Capabilities

A capability is connected to a Resource. It can contain an expiration date if a resource should loose the capability at a certain date.

Level can be defined on the route operations resource requirements and works so that a resource can have higher og equal level to the requirement, but not lower. Example of use can be a physical restriction capability (like weight/length/width…) where an Assembly station can not exceed the limits given on the operation.

Keep in mind that production planning always select the resource first by alpha numeric order. Priority can be used to break this and select a resource that is most suited. Example of use can be where two human resources can perform two tasks, but one is better than the other at one capability and the second is better at another capability. This really elevate resource planning within a resource group to find the best suited resource for the job.

You can also set the capabilities for a resource:
AX_2012_Prod_Resource_Capabilities_setting

HR competencies:
There are four types associated with human resources. These competencies can be tracked through goal oriented management and you can create a road map and track progression.

Title is used for multiple purposes. One of them is purchase requisition monetary approval limit. So be aware of this when using this.
AX_2012_Prod_HR_Title

The three  other is found under Competencies and development.

AX_2012_Prod_HR_competencies

Skill has the ability to have levels like capabilities. Only higher or equal skill level apply. You can create the rating type Your self like (Good | Normal | Bad), (Very high | High | Normal | Low) and so on. These can also be approved, but that is not required to be included as a viable resource.

AX_2012_Prod_Skill

Certificates have the great feature that they can expire. You can track expiration on them through reports and make sure that your resources have the right papers to perform their job. If the certificate expire the resource will not be available for planning.

AX_2012_Prod_Certificate

Courses is a pretty big feature in HR, but let me just scratch the top here. You can create courses that the employees can attend. They can also apply for participation through enterprise portal. After completing a coarse they will get a record entry in the courses table. You can also add them manually.

AX_2012_Prod_Course


To use this in a route.
Just find the property under the resource requirements on the operation.

AX_2012_Prod_Resource_requirements


So don’t get stuck in the old ways of joining a route operation directly to a resource or resource group. Expand your vision and get creative.

Time and attendance (Part 20/31): Advanced pay agreement delimitation

You want to create as much automation in creating payment lines as you possible can and in some cases it does get quite complicated.
As covered earlier in “Time and Attendance (Part 8/31): Pay agreements Delimitation” you can do standard delimitations on one or a combinantion of several different types of parameters like profile settings, job settings, employee compatancies, time and attendance parameters and more. But in some cases you need more then one or an and/or scenario of delimitations or in some cases you want to use other parameters from the referenced post like the absence group or Project type. That is where the Advanced delimitations come in to play. Using this there are virtualy no limitations to the configurations you can do.

You can find the “delimitations” setup under the pay agreement lines form at the top.

AX2012_TA_Advanced_Delimitations_button

There are eight different types of classes for delimitations available and you can create you own or update these if needed.

  • Certificates
  • Skils
  • Absence codes
  • Aktivities
  • Profile table
  • Activities in Projects
  • Projects
  • Operations

You can create combinations of multiple delimitation classes for one pay agreement line.

First pick the class you want in the overview grid.

Then in the conditions at the bottom of the screen you create your own little set of Advanced conditions. The example I’ve created here is based on the Absence class.

AX2012_TA_Advanced_delimitations_conditions

Pick from any of the transactional data or the referenced post, so there are A LOT of options here.

AX2012_TA_Advanced_Delimitations_Proj_Example

Time and attendance (Part 19/31): Electronic timecard setup

Timecards are used to manualy enter time and to let the users change their raw registrations.

It can be entered in three ways:

  • From/to timestamps
  • Elapsed time
  • Net time

You can also select if the from and to dates should be shown if work normaly goes on for several days.

Setup for the timecard is done at Human Resources > Setup > Time and Attendance > Time and Attendance parameters | Display options > Electronic timecard.

AX2012_TA_Timecard_options

Activate the user:
Check the timecard checkbox on the workers time and attendance settings under employment.

AX2012_TA_Timecard_activate

Now the user can use the timecard features.

Time and Attendance (Part 18/31): Switch codes

Switch codes are used for swapping different pay types in pay agreements. Most often used to switch between flex and overtime or no pay (break) and overtime or some pay account build up.

A switch code is set up as an indirect activity in a group marked with the switch code type. This is found at: Human Resources > Setup > Time and Attendance > Indirect Activities

Switch codes can be used together like overtime before and overtime after profile time. You can also set them up to cancel one or more other switch codes. For instance if the user has descided to apply overtime to his work after regular profile hours, but then descide that he wants to do a flexi or work account build-up. In that case the user register a “build-up switch code” which cancel the earlyer registered overtime switch code.

Time and Attendance (Part 16/31): Planned absence

For long term absence and vacation planning I would recommend doing the absence registration as early as possible.
To create absence for a worker you can click the menu item as showd below:
AX2012_TA_Absence_Registration_menus

You can view, delete and create new absence for the user in this form.

AX2012_TA_Absence_registrations_overview

Create new and select the from and to date as well as a absence group and/or code.
Ticking the “Interrupt” check box will cancel the absence the next time the worker clocks in canceling the rest of the absence. If the absence is interrupted the Interrupted flag will be tagged making this absence not active anymore.

Bulk creation:
You can also do quick and bulk updates of absence. This is good for doing vacation planning.
Go to Human Resources > Periodic > Time and Attendance > Create planned absence

AX2012_TA_Create_absence

Select the from and to date for the intervals and select the absence job. REMEMBER TO SELECT THE WORKERS by clikcing “Select”.
Ticking the “Interrupt” check box will cancel the absence the next time the worker clocks in canceling the rest of the absence.
Ticking the “Compose” check box will create one line for each day for the durration of the absence.

Messed up?
If you some how create absence for to many users (forget to limit the filter) there aren’t a way to see absence for all users as a menu item. Then you would need to open the JmgAbsenceCalendar table and work in that one.

AX2012_TA_Absence_Edit

You can arrange the absence to be automaticaly transfered to Human resources Absence journals by ticking the check box in the time and attendance general parameters. Make sure you have an open absence journal to make sure that the data has a place to go. Go to: Human Resources >  Periodic > Absence > Create absence journals to create these tables.

The planned absence will be filled as absence for standard work time for users when applicated.

Time and Attendance (Part 15/31): Profile group Profile relations

Profile relations:
The profile relations can be used to dynamicaly change between profiles based on the time when the user clocks in. I use this for shift workers and also where they don’t have flexi hours but can work either from 5, 6 or 7.

ProfileRelationShift

ProfileRelationFlexAlternative

The profile relations override the standard profile for the user.

Time and Attendance (Part 14/31): Profile calendar

The profile calendar is used to make planned changes to the default profile that is used for calculation. When doing the profile calculation the system checks the Profile calendar to override the default profile and this is loaded as the profile for that journal. So you can predetermin the profile that the user is going to have at calculation by creating a record in the profile calendar table. You can set this up for special work days that deviate from the standard work hours, but it is also a very nice tool to handle complex profiles where the profile changes from week to week. Go to Human Resources > Setup > Time and Attendance > Time Profiles > Profile Calendar to add new records.

AX2012_TA_Profile_Calendar_2

You can do changes for entire profile groups or for all workers as well by changing the Profile calendar code collumn to Group or All. Use special day collumn to trgger the special day in the pay agreement. For instance if a Monday is Christmas Day and if someone comes in and does work, they will get the special day pay instead of a simple Monday.

There is a great graphical tool for handling profile calendar which is called job planner. I will look into that later.

Time and Attendance (Part 13/31): Approval

After calculation is done the next step is to do an approval. This is found at Human Resources > Common > Time and attendance > Approve. All the time registration workers are members of an approval group and this should preferably be grouped at a management or executive level.
The approval process is very much like the calculation process and the approver can also perform the calculation steps on the approval form. Smaller companies might only use this level of control and skip the calculation process all together.

The approval action is:

  • Controll if the correct pay agreement is set or change this to another type or override it.
  • Create and approve manual premiums
  • Perform the Transfer of the time registrations to payroll, projects and Production. (This might be a step of its own)

AX2012_TA_Approval

You can click the approve checkbox on the time registration journal line to perform an approval for one single worker or click Update > Approve in the top menu to do it for the entire approval group. If some lines are not calculated the calculation action is automatically performed.

After the Update > Approve action is performed you can also filter out the journals with errors in them to by clicking Display errors in the top menu.

Override of the pay agreements can be done. Check Part 12, Calculation for more information on overriding.

Premiums:
The Premium transactions can be created manually or could be generated from a pay agreement.
You want to create as much automation in creating payment lines, but it’s not always possible. So for that rare event that creates some type of special payment this kept track of manualy and then entered in here. You could add it in the payroll system, but I believe that everything should be created from AX Time and attendance. Nothing should be added in the payroll system.

AX2012_TA_Approval_Premium_lines

Transfer:
When the time registration journals are approved the next step is to transfer. This action transfers the changes in time journal lines to the perspective production orders and create the Project time journals as well as create the payroll pay type transactions.

You can click the transfer check box on the time journal header for one worker or click Update > Transfer in the top menu to perform the action for all the workers in the approval group. If journals are not calculated or approved yet, these actions will be performed as well. Clicking the transfer check box (or any of the calculate or approval check box) after it has been checked will reverse the previous actions.

When transfer is performed the lines of the journal dissapear from the form. No worries. You can view them by clicking Inquiry > Transferred registrations in the top menu.

AX2012_TA_Approval_TransferReg

You can also check the pay types generated by clicking Inquiry > Pay items.
The Pay items are created, but not yet transfered to the Payroll system. This is done in a separate action. When transferred the pay items are checked with the “transferred to pay” flag.

AX2012_TA_Approval_Pay_Items


Time and Attendance (12/31): Calculating

Time registration workers are grouped to calculation groups. These should (in my opinion) be grouped as low as forman or team leder level. Offcause every user has to have this (also formen and team leaders), so I normally illustrate this as a hierarchy even though it is a flat table.

The calculation action is:

  • Define the work profile
  • Approve switch codes (for instance Overtime)
  • Define missing or redefine absence reasons

You can configure the group with a password which the user is prompted at opening the form with a specific group if you need to restrict access.

Start the Calculation form by going to Human resources > Common > Time and Attendance > Calculate.

AX_2012_TA_Calculate_login

You can do this week by week for a single user or day by day for the entire calculation group. Select the week or the day at login. I like doing this on a day by day for entire group. Probably since this is the way it has been done before. The week view is new in AX 2012. Click the day field to go into the day mode or keep the week setting to go to week mode.

Calculate

Once the form is opened AX looks through the raw registrations and create these time journals.

You can look through the lines and do amendments to them if you want. There are different icons for indirect activities, Project and production tasks. You can go back to the original raw registrations data. If all fails. Delete the journal header. Go to the next day and go back.

You can run calculation for everyone in the list by clicking Update > Calculate from the menu or click the calculate check box on the line.

If you run the calculation for everyone you can click the “Display errors” to only display the records that didn’t go through.

If the line goes in to an error you can view the error message by clicking the error pane.

Calculation error

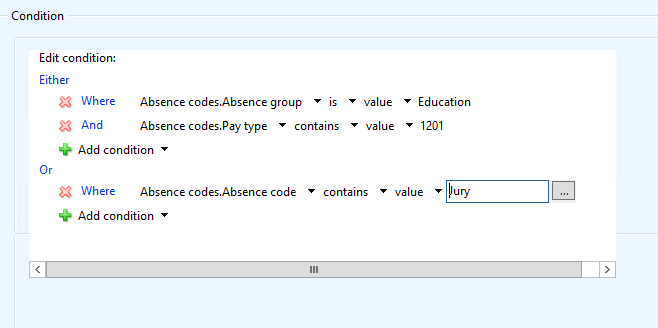
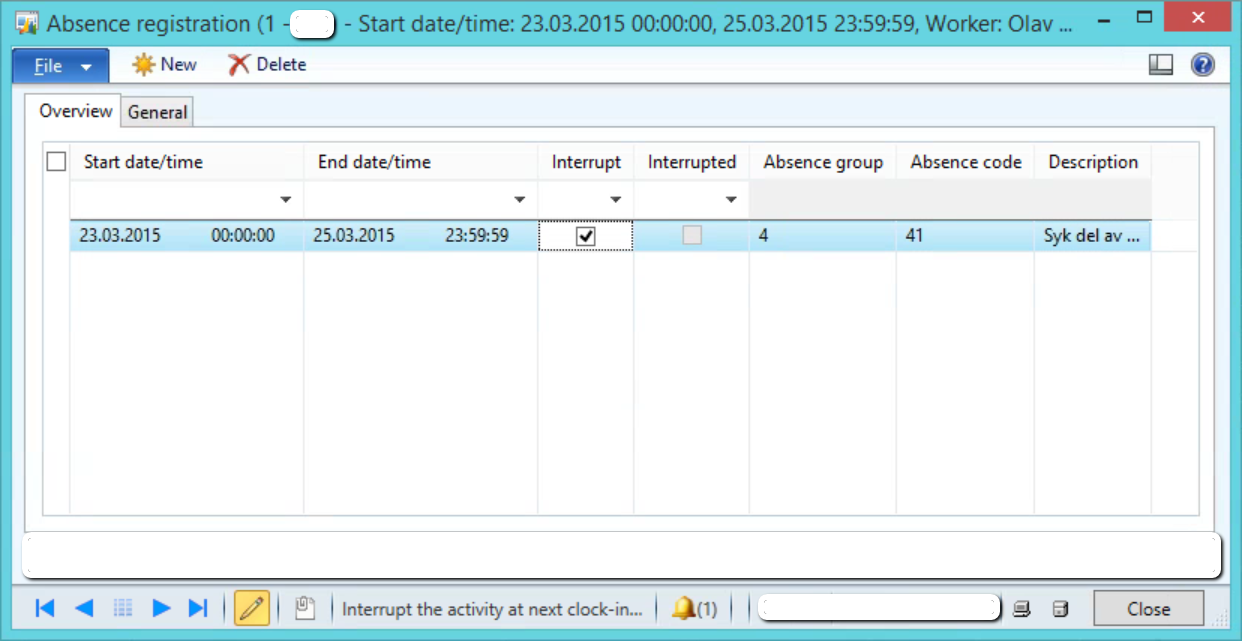
If absence is missing you can go to the absence tab and define the absence. You have to go there. You can not to this direcly on the line below.

Define absence

Another common error I’ve run in to is if you’ve edited the lines you might have chronological issues. Especially if you have transactions going on till the next day. Profile day has to be the same day as you calculate and not the next day even if the job starts the next day. Check the times and dates on the lines to get the right. You can not be on different types of jobs (Indirect, Project, Production) at the same time.

When the calculation is completed you can go and check the times that are calculated.

Control times

Approving absence is often alot of going back and forth, so I normally do an amendment on the form to not go through all the panes. An amendment by a developer might look better, but this takes about 30 seconds to do.
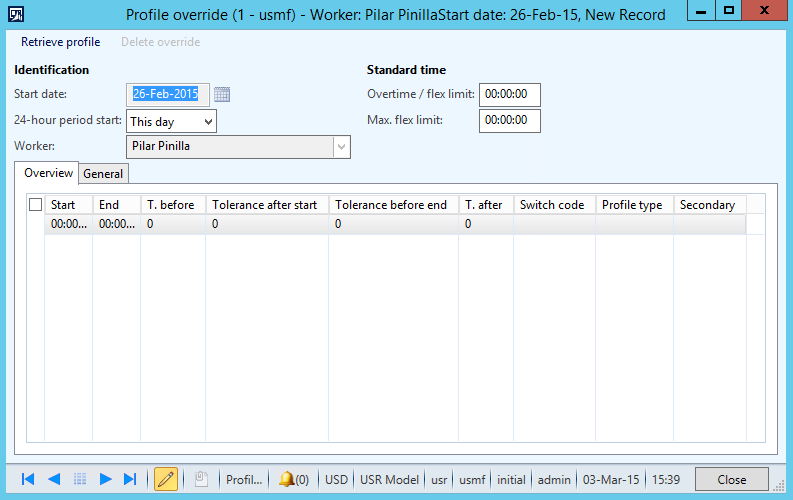
Calculate amended

Override profile:

You can change the profile for any worker before you calculate and you can even override the profile for a unique day if there is a “once-in-a-blue-moon” event.

By clicking Override and Profile you can change the profile for that particular user for that day.

AX2012_TA_Calculate_Override_profile

You can load the existing profile as a template by clicking “Retrieve profile” and start changing that one or create each line from scratch. You create this the same way you would a standard profile.

After the override is done the line will have the “Override profile” flag activated.

Remove the ovverride by clicking Delete override in the Profile override window.

Overtime allocation:

You can allocate the overtime for each of the jobs that has been worked on durring the day. Select the percentage of overtime hours to each job.AX2012_TA_Overtime_allocation

Clock in/out:
You can also do clock out workers from the calculation form. You can do a selection of the users that are not yet clocked out and do a clock out for each user.
The clock out time that the user get is the one sat in the profile, even if the clock out happen at a earlier time.

Time and Attendance (Part 13/31): Approval