AX7 – Default dashboard

The default dashboard is what you end up on when you click the Dynamics AX icon in the top right corner or go to Common > Common > Default dashboard.

AX7_DefaultDashboard.PNG

It has a banner on top that is set for configurable for each company with the company name printed on it.

There are three subsections: Left, middle (biggest) and right.


The left section contains a calendar with todays date circled and your session date showing. By selecting a date you’re prompted with a dialogue to change session dates.

AX7_SessionDate

Below the calendar are two groups with your menu favorites and recent menu items showing.


The center section is a view of the Work spaces. Each work space has a very nice little picture next to it to make it easier to find what you want.

AX7_DiffWorkSpaces.PNG


The right section has a list of your work tasks.

I believe that this is a configurable dashboard and can be configured. But I like the ease of use and overview it gives.

AX7 – The Menu

Microsoft is redesigning the menus. The Hamburger-menu is now the key to open all menu items.

From the top in the main menu you’ll see All workspaces, Favorites and Recent. The latter (Recent) being a welcome addition as this is kind of a “free” favorites menu that you don’t have to maintain.

Under that you’ll see all the grouping that you’re confortable with like Accounts Payable or General ledger.

The new menus in Microsoft Dynamics AX “7” has been transformed and is moving away from the old static paradigme with Common, Journals, Reports, Inquiries, Periodic, Setup and is redesigning them to fit more with actual processes within the different “Modules”/Top menus. Grouping and dividing the old menu items into new menu groupings like multiple setup menus.

AX7_Menu_AP.PNG

Even if it is all moved around I found it very simple to work with and if I ever missed something or wondered where it had all gone; I simply used the metadata search in the top of the menu which works perfectly.

AX7_Menu_Metadata

Sweet!

AX7 – What’s new manufacturing

Disclaimer: The information is gathered from a pre released version of AX7 and might be subject for change before final release.

It has been stated that the next AX version will be equal to AX 2012 R3 when it comes to features, but there are some new knick knacks you should be aware of.

Mainly it’s the new user interface that offers some very nice new opportunities to interact with the existing data model. There are some new features as well.

Workspaces

Workspaces are the new dashboard experience that Microsoft is introducing. It is basically a combination of different elements. The consist of PowerView reports, Tiles (Replace cues), A list of some tables with their own action menus and a set of links/functions.
Together it is a very powerfull tool when used correctly.

Production floor management workspace is created for the manufacturing shop floor manager or formen. A one-stop-shop for all their needs from releasing, prioritizing, managing the workers, managing feedback and so on.

AX7_ProdContrWorkspace

The visual impression is pretty nice and it gives new possibilities to combine insight and action.

AX7_ProdContrWorkspace2.PNG

General improvements to the UI

It is no surprise that the new interface is totally transformed and it takes some getting used to, but when you can grasp the new combination of forms and processes that it supports it is pretty obvious that Microsoft has been listening to their customers to gear the solution towards actual processes.

AX7_ReleaseToProduction.PNG

Like this beauty above which you are presented when clicking the “Production orders to release”-tile in the Workspace.

In a glance it shows the critical on-hand which is crucial when releasing jobs to the manufacturing floor.

Also they have moved away from the constraints of the menu structure (Common, Reports, Journals…) as well. Like accessing Manufacturing Execution.

AX7_ProductionControlMenu

Talking about Manufacturing execution…

Job Card Device and Terminal = Shop Floor Terminal

The job registration form is still present, but now it is called “Job card Terminal“. The new interface called “Job Card Device” is an alternative to the Shop Floor Control Job registration form and is actually very similar to the Windows New UI app that they developed.

AX7_JobCardDevice

The interface is snappy and very intuitive!
Production related buttons on the left side and actions related to the user on the right side. It works just like the Job card Terminal and is handling time and attendance with absence, work times, breaks and so on. Nifty!

Looking forward to implementing this!

Time and Attendance (Part 26/31): Manufacturing Execution setup

A core component in Shop Floor Control was, as the name suggested, handling Manufacturing Execution (MES). The setup for this is now located in the Production Control module (Production Control > Setup > Manufacturing Execution)

The Manufacturing Execution parameters is mainly a subset of parameters presented in the Time and Attendance general parameters. The interesting parts are in the Production parameters (Production Control > Setup > Manufacturing Execution > Production Parameters)

AX2012_TA_ProductionControl

You can control the parameters by site or generic throughout the company.

Bundle type decide how you want to split your work when working on several jobs at the same time. (I might post something on that later on)

Time can be posted automatically to route or jobb journals. If not activated, then it will wait to post until the “Transfer” is performed in the approval process.

You can assign cost for manufacturing based on the pay types generated or by the Cost Category.

Financial Dimensions can be inherited from the jobs or worker or as a hierarchy where the one overrides the other.

Productions post journals (Route and Picking lists) at three different stages:

  • Production start
  • Operation feedback
  • Report as finished (Also posts a finishing journal)

The next three options in the right side menu (Start, Operations, Report as Finished) is for setting different posting setups for each step.

IMPORTANT!
Be sure to not set the solution up so it automatically pulls estimated route as well as actual transactions and duplicate or even worse triple posting of estimated items. Use either “Always” for only ONE of the three posting actions or Route group/Flushing principle for two of them.

All of these steps need a quantity to trigger automatic consumption of items, so you must start with a quantity if you want it to handle picking to be created or posted at start.

AX2012_TA_ProductionControlStart

On Start you can also decide if you want the solution to mark the production order as started and if you want to include a quantity as well.

You can select if you want to show the picking list journal before it is posted. This opens up a form with items suggested based on the qty started and the terminal user can edit it on the fly when posting.

AX2012_TA_ProductionControlOperations.PNG

On Operations you also decide what level you want to report on. You can select either Operations(Route) or Jobs.

You can on this level, as well as on “Start” let the user to be able to edit the picking list journal by ticking “Edit journal” under the “Picking list” section.

AX2012_TA_ProductionControlFinish.PNG

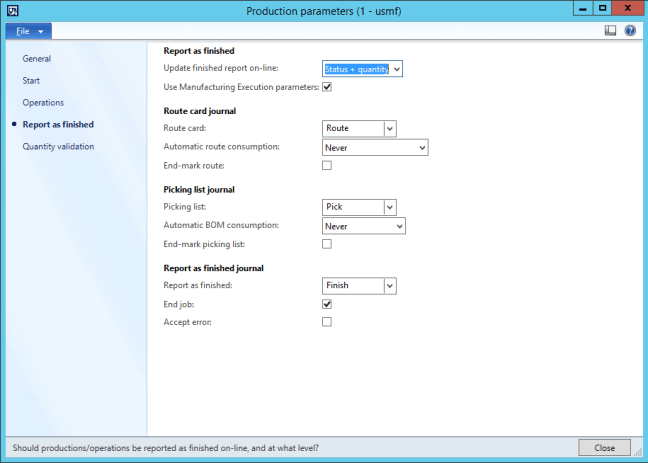
On Report as Finished you can select if you want to update the status of the production order and if you want to Accept errors.
Accept errors doesn’t accept any error like missing inventory and so on, but are in relation to jobs being reported as finished and the consumption of all estimated quantities.

It is a good idea to have unique journal types for feedback from Manufacturing Execution to be able to quickly differentiate between what is manually created and automatically created from MES.

AX2012_TA_ProductionControlQtyCtrl.PNG

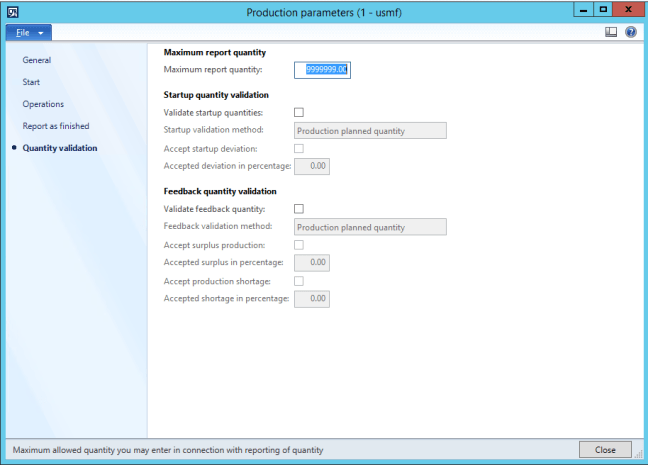
The final menu item is Quantity validation which is used to make sure that you start and report the correct amount. In some cases I use this, but in many cases this is left as it is shown in the screenshot above. You can base the validation based on previous jobs or the estimated quantity.


When all this is looked over you will be able to get cracking on using manufacturing execution.

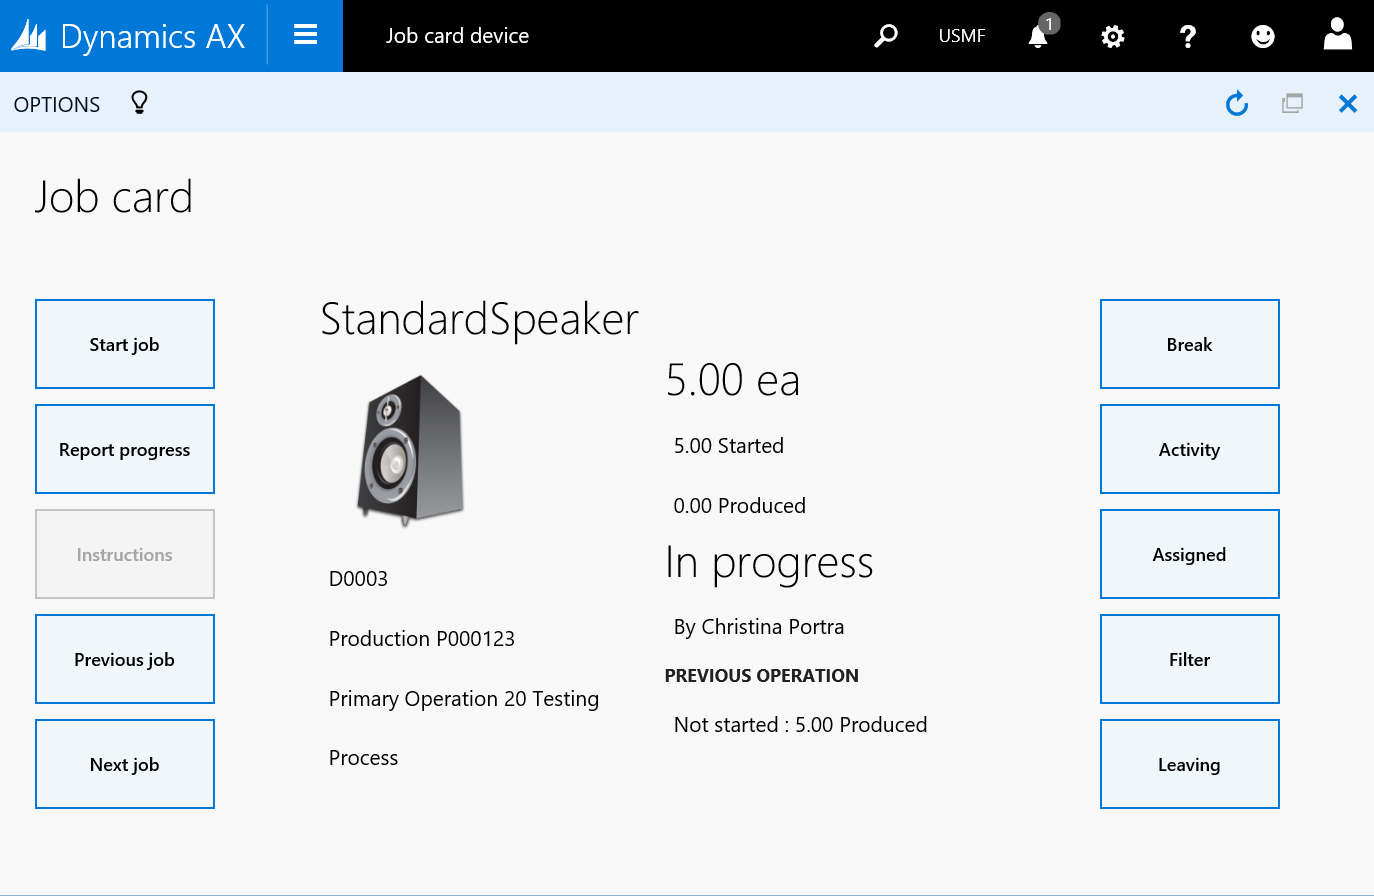
Releasing a production order with route will make the jobs available in Manufacturing Execution.

Start the Job registration form (Production Control > Periodic > Manufacturing Execution > Job registration) and have at it!

Time and Attendance (Special): Adding new menu items

As the JobRegistration form is pretty special and is über configurable, you have to do some magic to add new menu items to it.
Don’t just go ahead and add new buttons directly to the form it self as this can mess it up. You should to add the new buttons to the configuration tool so you can select them and handle them as any other configurable button.

Here’s the quick guide:

  • Add new element to Enum.JmgSignInButtonFunction
  • Add functions to Class.JmgRegistrationForm
Example for a menu item for printing labels:
AX2012_TA_Code_JmgRegForm
  • Create a new menu item that is to run the action
    (Remember to find a smashing icon to go with it)
  • In Class.jmgMESClientSelection
    • Add the enum element to case switch in buttonFunction2MenuItemStr
    • Add the new menu item in the case switch buttonFunction2MenuItemType
    • Add the method string return in menuItemStr2MethodName

Thank you Dag Arild for helping on this one.

Videos from Convergence 2015

If you missed out on going to Microsofts Convergence EMEA 2015, which is the annual conference where Microsoft and their partners gather to talk about Dynamics, you can always go to the Virtual Convergence afterwards and view a lot of videos to get up to speed.

Microsoft regularly updates their video libraries shortly after the conferences are held and you can bask yourself in a lot of new material.

Visit this site to view them all:
http://convergence.evo-td.com/VideoLibrary

Here are the videos regarding AX (EMEA 2015):


Resource feasibility

As AX 2012 has a great new way to maintain resource requirements, it can be daunting to keep up with the fact that your resource requirements might not always result in a match with a resource. To handle this we have now the “Route feasibility form” that is used to review this.

You can review each operation in a route by clicking Ax2012_ApplicableResources or for the entire route by clicking AX2012_RouteFeasibilityButton .
I prefer the “Route feasibility” function as this gives me a grand overview.

RouteFeasibility

The form will show if the route is complete and how many resources that apply. A great feature to keep up with the resource requirements. I hope in the future that this is a place where we can work on resource requirements, but for now it is just a place to get an overview.

Link: Info on the form on MSDN.

Maintain and update resource requirements

There is a great wizard/feature to do mass update to resource requirements on route operations in Microsoft Dynamics AX 2012. This is a great way to get from static resource planning (resource group or resource) to dynamic resource planning (capability, skill, certificate, title and so on) or to maintain and extend your static or dynamic resource model. For instance if you want to change a single resource in a static model to a new resource or if you want to replace a resource or resource group with a set of capabilities. It is the replacement scenario I will try to show you.

In any of the route forms you will find the “Update resource requirements” on the action menu.

Say you have a resource group that you want to replace with a set of capabilities.

1. Launch the wizard by clicking the menu item.
AX2012_UpdateResource_Wizard0
Notice the route has now route group “C1” as a requirement.

2. Click next in the first page of the wizard
AX2012_UpdateResource_Wizard1

3. Select the set of requirements you want to change.
AX2012_UpdateResource_Wizard2
Note that you can do and exact match or a partial match and be able to only select a single operation if you need to.

4. Select the action you want to be performed for the matches found.
AX2012_UpdateResource_Wizard3png

You can do a number of different operations like replace or delete either for only the matched or all requirements on an operations. The scope of the application of the action on what to update is also a very nice feature. You can even update production routes, product builder/configuration routes or hour forecast for projects! Great!

5. Select what to replace the selection with or add
AX2012_UpdateResource_Wizard4

6. Confirm the action before running it
AX2012_UpdateResource_Wizard5

Notice the number of actions that is to perform. That is the scope of the matched records that will be altered.

7. Review your changes
AX2012_UpdateResource_Wizard6
You can see that the requirement for resource group “C1” is now replaced with a set of capability requirements.


So if you want to replace, update, delete or alter any type of resource requirements any place in the solution you can use this tool. I think this is pretty awesome. Have fun!


Miscellaneous items and correct cost allocation

Using one generic item to represent miscellaneous purchased items is a common thing and I believe it is a smart thing to do in some cases. Some companies buy a lot of different items one time based on customer requests. With many people in an organization purchasing these items you still want to have strickt controll over your product registry. Using these items make sence.

However making sure your costing is correct is important. You can do this by marking your purchase to your sales orders or BOM lines. This is tedious work and some might slip through the cracks, falling back on your costing principle to take controll resulting in some serious costing issues.

A smart way to get this correct every of the time and use tracking dimensions that are financial stock active.

Here’s how to configure your item:

  • Tracking group dimension with financial stock active
    In this example we use serial number.

AX2012_TrackDim_FinancialInventory

  • Serial/Batch number with a number sequence
    This example is has one serial number created for each, but also has information about receipt date and lotID.
    AX2012_SerialAuto

Serial numbers are normally used 1:1. I don’t use the controll since the number group determin the serial number creation. Remember that you can use batch numbers to group receipts together and give them a common tracking ID. In that case you don’t have/want to use the number sequence on the tracking dimension group.

You can configure the rest of the item at your own accord.


After receipt on a purchase order with a quantity of 5, the serial numbers are automatically created.
AX2012_SerialNumbersCreated

Barcodes:
You can create a label that is printed at receipt to mark your items with a barcode. This barcode can be used when picking the item to identify it.

Picking:
Now when creating a sales order or production picking, you would be required to select one of these serial numbers effectively connecting the purchase order to the sales order and also the correct price. So even if you have a miscellaneous item you would still be sure that the cost is correct.

So instead of being required to mark the purchase order to the inventory issue, this is now automtically handled through the inventory process.

Have fun!