Once your base parameters are set, you can activate your workers (employees and contractors). This is done by going to the workers and selecting “Activate on registration terminals” under the “time registration” pane.
This brings up the dialogue for entering the basic parameters for your time registration worker.
Fill out at least the required fields (preferably as much as you can) and click OK.
Now let’s take a look at the user parameters on the worker card. I’ve marked the fields with green for the ones I normally set up.
Go to: Human Resources > Workers > Workers | Employment > Time Registration
Password has to be turned on in the T&A parameters to prompt the user. Can also be blank for some users. Great if you have issues of users typing the wrong user ID or pick the wrong ID card. This is to bring an extra level of accuracy, but is also used from a Security perspective. I always suggest to have this active on the supervisor users.
Pay ID overrides the employee ID in the case of exporting payroll transactions.
Badge ID is used as an alternative authentication method than Employee ID. You can only choose to use the one or the other. This is done in the T&A parameters.
Badge version is just an internal note for keeping up with the card version if applicable.
Activate the user by enabling the active checkbox and an Activation date. You can also deactivate users from time registration by unchecking this box.
Calculation group, Approval group, Standard profile, Profile group and Default calculation Group are required fields and must be entered.
New bundle is to set the default mode of working to either sequencial or task aggregated work. More on bundling later in the Manufacturing Execution part.
Category is the category that is standard for reporting i Projects.
Use Timecard is an option to activate the user to utalize the built in manual time sheet solution. More on this later.
Configuration is used to prompt the user with a specific desired job card terminal layout overriding the terminal standard.
Supervisor options gives the user the supervisor options menu at the time of authentication on a terminal.
Pay agreement should be sat for each employee. PS: The setting for pay agreement on the profile settings override this setting.
Seniority date is used by the pay agreements delimitation to calculate seniority. This is often confused with the seniority on the employee card.
Period code is the grouping on how often the user gets paid calculated.
Flex allowed needs to be activated if the user is to use a flex profile. You can also set rules and limitations for the flexi profile pr. user by entering a Flex Group ID.
Bulk update your employees:
Activating employees can be a tiresome task if you have a large organization that should be activated at once.
Use the Excel add-in and filter out the desired worker IDs in the hcmWorker table. Copy this to enter data into the jmgEmployee table.
Microsoft Dynamics AX 7 is being released today and I want to take some time to honor and reflect on the roots of this magnificent ERP solution. I’ve tried to color tag some elements of application, technical or global impact. I hope you enjoy reading it.
Brothers Preben and Erik Damgaard founded Damgaard A/S with the purpose of creating a computer based accounting software.
Brothers Erik and Preben Damgaard (Thank you for your contribution!)
In 1986 they released Concord Finance (Later named C4). The resellers and customers were able to do improvements to the code to tailor the solution to their needs.
In 1991 they released the Concord XAL business application based on the XAL Developer environment. Concord XAL had an open source code that made the resellers and customers able to create improvements, verticals and modules. Concord XAL quickly became the standard accounting software for Danish market and got foothold in many other countries.
In 1994 “Big Blue” IBM and Damgaard partner 50/50 to create Damgaard International A/S to focus on the international markets.
Concord crossed the millennium with a world wide customer base of over 75.000 installation in 29 countries. Read more here.
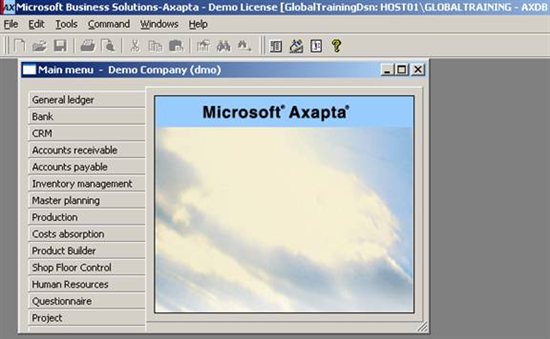
The first version of Axapta was mainly based on the Concord XAL business processes and covered Financial, Trade, Inventory management, Logistics and Production. It was created on a new and exciting object-oriented technology and was intended for midsize companies. It ran for the most part on Windows NT servers with Microsoft SQL Server 6.5, but also supported Oracle databases.
In November the same year, version 1.5 is released with support for Norway, Sweden, Germany, UK, Netherlands, Austria, Switzerland, Belgium and the European Union. Service pack technology is introduces along with Publishing manager and support for MSSQL 7.0. Damgaard buys out IBM and get exclusive rights for the Axapta software and brand.
Axapta Main menu
Version 2.0 of Axapta is released in July 1999 and brings with it the Project Accounting module, Warehouse Managment (WMS) module, ActiveX support, Open pack concept, COM-connector and the early version of the Axapta Object Server which was used for offloading tasks from the client to the server for processing.
Damgaard and Navision
The Millenium passes without any major issues and a lot of happy IT consultant receive their paycheck with a nice overtime bonus. Axapta 2.1 is released in January 2000 with support for the German, Austria, Switzerland and Spanish market. The first WebApp is created. The Customer Self Service which grew in to the Enterprise Portal. Axapta 2.1 also supported Microsoft SQL Server 2000 with database log.
The Application Object Server (AOS) was fully implemented with Service pack 3 and Axapta became a true 3-tier solution (Client, Server and Database running separately).
Damgaard merges with Navision and become Navision Damgaard A/S (Later Navision A/S).
In December 2000 Axapta 2.5 is released with improvements (ESS) to the Project module and a new Banking module. It had a full web application development environment and supported internal OLAP.
The “Market Pack” for Axapta 2.5 was released October 2001. It introduced the French and Italian markets and had the CRM module with the Commerce gateway. It also introduced the Product builder.
Microsoft running the show
It is 2002! The movie franchises of Lord of the Rings, Harry Potter and Men in Black all release their sequels, Eminem and Shakira sold most singles, The €uro replaces twelve countries currencies and NASA finds water on Mars. Microsoft buys Navision A/S in June this year and it joins among others the ERP solution Great Plains to make up Microsoft Business Solutions.
Microsoft releases Microsoft Axapta 3.0 in October 2002. It supported 17 countries (including Canada) when launched. The security model was renewed, license configuration was introduced along with Enterprise Portal. The Demand planner and inter company functionality was added.
Microsoft Axapta 3.0
In september 2005 Microsoft rebrands Microsoft Business Solutions to Microsoft Dynamics and their business applications is also renamed; Axapta becomes AX, Navision becomes NAV, Great Plains becomes GP and Solomon becomes SL.
This slideshow requires JavaScript.
With the new brand name in place, Microsoft Dynamics AX 4.0 is released in March 2006 with a brand new Service management module. The AOS as a true Windows service, CLR interoperability and the .net connector was introduced. It also supported full Unicode for the first time and the Application Integration Framework saw the light of day.
The user interface was redesigned for the main menu to fit the default Microsoft application layout. The general form layout stayed the same with grids and menu buttons to the right. The login screen disappeared as AD authentication was added.
Microsoft Dynamics AX 4.0
Microsoft sets the agenda
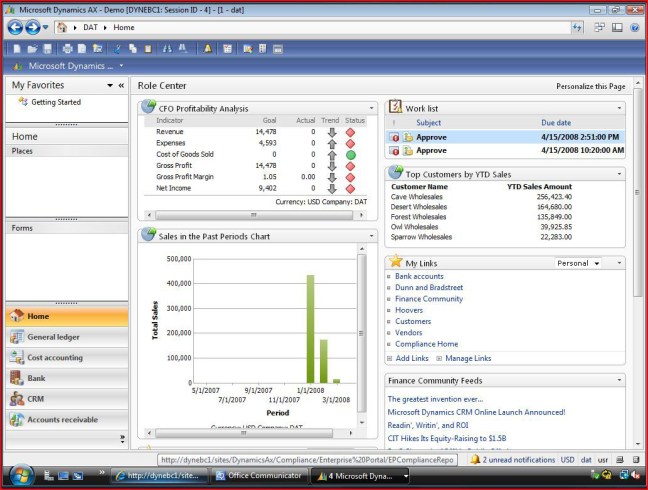
In the leap year of 2008 the Lehman brothers corporation goes belly up, Beyonce urges you to put a ring on it, Barrack Obama is elected the 44th President of the US, almost 11 thousand athletes travel to Beijing to compete in the Summer Olympics and in June this year Microsoft release Microsoft Dynamics AX 2009 (Version 5.0). It introduced the navigation bar, area pages and list pages to get the Office look and feel. This release brought A LOT of new features to the generic application and many of the different modules like the Global adresse book, Multisite functionality and Expense management to name just a few. There was a new Compliance module and the Role center for self service BI was introduced.
It was also a MAJOR technical update with a lot of Microsoft technologies being introduced. Workflow based on WCF, the reporting in SSAS/SSRS, Role centers based on SharePoint and X++ supported MS SQL statements. Batch server, Load balancing, AD import wizard, Code versioning control and many many more technical upgrades were in place.
Microsoft Dynamics AX 2009
Microsoft Dynamics AX 2012 (Version 6.0) released in September 2011 for 25 countries in 23 languages. The biggest release of AX thus far and introduced many changes and improvements both on the technical and application aspect of it and I can only list a few here, but you’re welcome to go and read all about the changes here.
Most profoundly for the end users was the changes in form design with ribbon menu, action panes, fact boxes as well as the experience of only using SSRS for printing as the X++ reporting solution was available, but to be deprecated. Role centers were improved and the modules got rearranged a bit introducing modules like “Sales and marketing” and “Procurement and sourcing“.
The licensing module was completely revised. It opened everyone to the entire application and licensing the users security access level instead of the functional modular way of the past. This meant customers could implement a broader set of features and would often look at and implement new functionality once discovered or required.
Building on the model of the global adresse book. There where many more global entities introduced like organization, workers and items that required a whole different way to interact with the application. You could for instance now not simply copy a company (now legal entity) anymore. Major changes where done to the database structure to support a “metadata” based model. General ledger, HR, Inventory managment was fundamentally redesigned.
A new product configurator was introduced based on the Solver foundation and so much much more.
Microsoft Dynamics AX 2012
On the technical side of things code was running in .Net (CIL) and the development environment was in a separate window. Many other changes appeared like the Role based security, a new Help system, Analytics in SSAS and redesign of the AIF to name a few.
The root for Life cycle services was also released. Rapid Configuration Service was introduced for the US market.
The journey of AX 2012
The AX 2012 party didn’t end there… During the next 5 years the application would grow immensely introducing more modules and even architectural changes.
The “Feature pack” for AX 2012 was released early 2012 and included the first version of the Retail module.
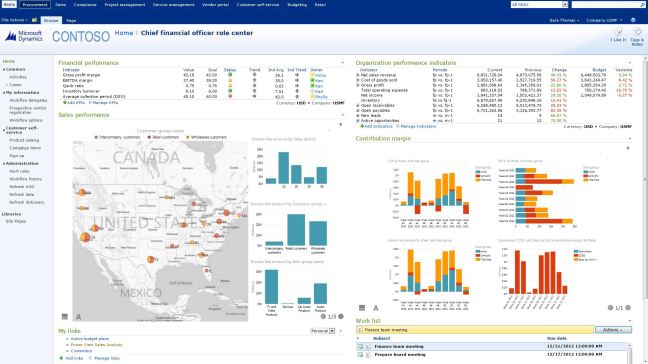
Microsoft Dynamics AX 2012 R2 was released in December 2012 which intailed database splitting and partitioning, new BI cubes and Retail e-commerce and many improvements to the existing business logic and processes. Role centers supported Power BI and got a nice face lift. Many modules got big upgrades like the Project module.
Microsoft Dynamics AX 2012 Enterprise portal Role center with PowerBI
Microsoft released many cumulative updates for R2 in the following years, both increasing functionality and features.
Companion applications where created to bring AX in to the Windows 8 eco system.
On May 1 2015 the Microsoft Dynamics AX 2012 R3 was released with a wide range of new modules, Warehouse management and Transportation management being most prominent. Existing modules got a major overhauls as well; The Retail module got impacted the most. There was also many system upgrades as well like Azure deployments, Cloud support and even more BI cubes.
Satya Nadella has turned the Microsoft super tanker on a sorely needed new coarse. A more transparent and engaged company will today introduce a paradigme shift in the ERP world. Living up to Nadellas “Cloud first-Mobile first” mantra, the new version of AX (Version 7) will be just that.
Cloud first: As it is only available to run on Azure (On-prem comes later)
Mobile first: As it has only a web interface that can be consumed on any device anywhere in the world (Desktop client with Cortana comes later)
I will be up in the early hours of the night here in central europe to follow this event. I hope you will join me.
Most often there are differences between employees within an organization like additional bonuses should be triggered if something happens or an extra pay type should be triggered for all working hours for some users. There are SO many different ways of giving payment it is some times overwhelming. I believe that this is where the AX solution shines. You can create any type of delimitation rule to solve any issue. Please challenge me if you have a nut to crack.
By using pay agreements delimitation you can create common pay agreements that can fit the entire organization, but keep a good record of what you are doing as these can grow to be pretty big. This is how I do it. If someone has an input on the matter. Please share! 🙂
The reason why I like to create one pay agreement for the entire or at least the majority of the organization is that often there are some common denominators and these might be changed now and again. So if you have one pay agreement you only have to change this once and not replicate it to the entire organization. I would love to see the opportunity of adding multiple pay agreements to a user in the future.
So I use the pay agreement to mainly work for the entire day (No time entered). Then I use the configuration of the profile and/or worker to trigger the different agreements.
I’d thought I would go through each of the parameters and give an example to what it can be used for, but you have to open your mind to the possibilities here. Often combinations of more then one delimitation can be used for the wanted effect.
There is a button on the form called Delimitations which get even more Advanced. I’ll go in to those in another post later as the functionality does not seem to be finished at this time.
Factor:
Use this to add more or less than one pr. each working hour. I had a case where they needed to add 25% more hourly pay if the user worked flex hours. I used this on the Flex+ type with 0,25 of the standard hourly pay type.
Times:
If the times only apply during a certain time span. I don’t use these and let the profiles control the triggering.
Criteria:
This is often used if you only want to trigger the pay type from, to or between between a given interval. For instance a bonus is paid if the worker works more then 12 hours. You can easily create a stair case modeling of pay types by using this delimiter.
Date Interval: If you have pay types triggered differently between certain periods like summer or winter you can use this. This is not for Public holidays or Things like that. That is what the “special” day is used for.
Seniority:
The seniority is calculated based on the seniority date on the employees time and attendance settings. The seniority date can differ from the hire date and is not a mandatory field, so make sure to fill this out before you use this feature. I believe the fallback will be to the employement start date.
Round off:
Pretty common stuff, but I have never used it. In Norway we normally don’t round off until the payment is done.
Count unit:
These are measures that are counted within a period. Meaning it is set to zero at the start of each period. If the count unit is between the min and max values the pay type is triggered. This is mostly used to limit the amount of transactions within a period.
Switch code: This was mentioned in the Profiles setup as well. These are codes that are triggered by the users and can be used to switch to a secondary profile type. It can also be used to select what type of pay type to be triggered. I use this often for building up a “time-off” account (as opposed to using flex time) when the user should not have overtime but is outside the normal working hours. I then put this delimiter on the overtime records to get this to trigger. Often used in conjunction with a “Count unit” and a secondary factor if for example they get 1,25 for each overtime hour worked, but only up to 5 hours pr. week.
Delimitation
Operations:
I use this A LOT! This is the manufacturing operations. If a user should get a premium for each hour he does an certain operation, then this is triggered. Customers love this as this is normally solved by using extra time sheets, and with this it just works by it self.
Project ID and activity:
I guess this could be used for standardized internal projects or if a customer pays extra for a special Project, but if a type of Project Activity or category should give a premium as standard across multiple projects; then the “Advanced delimitations” must be used.
Activity:
This is the indirect activities of type “Jobs”. For instance some companies does not pay for union meetings.
I had a customer who would not allow contractors to have their time be posted to the systems waiting job. So they said that for all Contractors the Activity: “System job” should deduct 1:1 hour pay. This really increased the accuracy for their time registrations!
Absence code:
I use this a lot because some rules for payment of absence types often only apply to some types of workers. I use this as opposed to use the pay type settings directly on the absence code. I often use the “Advanced delimitations” for this as I can then trigger on a group level.
On Call Activity:
These are indirect activities of the type On Call. I use these for the Forman or Team leader permiums to be triggered if someone not normally in this position has to fill in during absence. The On Call is active for all working hours within the profile. I also use this when a person triggers his own permiums like emergency call outs, but then often with a fixed quantity.
Profile:
I use this to trigger shift premiums for night or evening shifts. I often use “Advanced delimitations” if more then one profile triggers the same pay type.
Skill (with leveling):
Skills are set on the individual employee. I use this for Premiums related to a skill some times.
Certifications:
I use this for individual separation and multiple grouping of employees. You can also use skill for this purpose. The difference is that skill is leveled, and certifications can expire. I separate the worker types and special Premiums for this. So a user can for instance be a part of the manufacturer, hard laborer and forman, while another might not have the forman or hard laborer active. Both on the same pay agreement, but different terms.
Special day:
In the profile calendar you can determine special days. This does not need to trigger the “special pay agreement day type”, but could be a special Tuesday for some reason… Thus giving a special premium for that particular day.
Invert sign:
This gives a negativ amount of the pay type triggered.
Cancel payment:
If this checkbox is active the system post the cost, but does not create a pay transaction. So this is just for a costing perspective. As I don’t use the costing in time and attendance this doesn’t apply to my setup.
Hour rate / Piece work:
You can select both or one or the other.
Profile type:
I use this actively as I differentiate between 100% or 50% overtime payment in my profiles. You can also create your own type of profile types. I have had an example where the users working Friday after lunch got 1,25. In that case I used a special profile type of the type work and added a pay type with 0,25 extra for each of the hours worked on this profile type.
The initial page triggers at three different instances:
Opening your AX URL with no menu item attribute defined (?mi=””)
Closing all open forms in the application (Esc * n)
Clicking the ‘Dynamics AX’ button in the top left corner
The default is sat to your Default Dashboard which shows an overview of your available work spaces, but did you know that there are three more options?
Pay agreements are the settings for what pay types or cost elements that should be generated based on the workers approved registrations, profile and calculation parameters.
Pay types:
First you have to create the Pay Types (Time and attendance > Setup > Payroll > Pay Types). If the ID in AX differs from ID in the external payroll system you can enter External Pay Type to translate the pay type to the correct type. You can also have to pay types in AX become have the same External pay type.
You can set up generic rates for the pay types by clicking Rates in the menu.
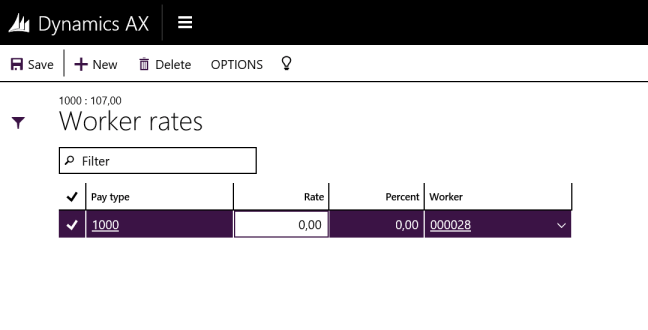
You can also go even more granular and set a rate for each worker by clicking Worker rates from the rates item.
The worker rates are in relation to the pay type generic rate.
You can use percentage variance from the generic pay type or set a specific rate.
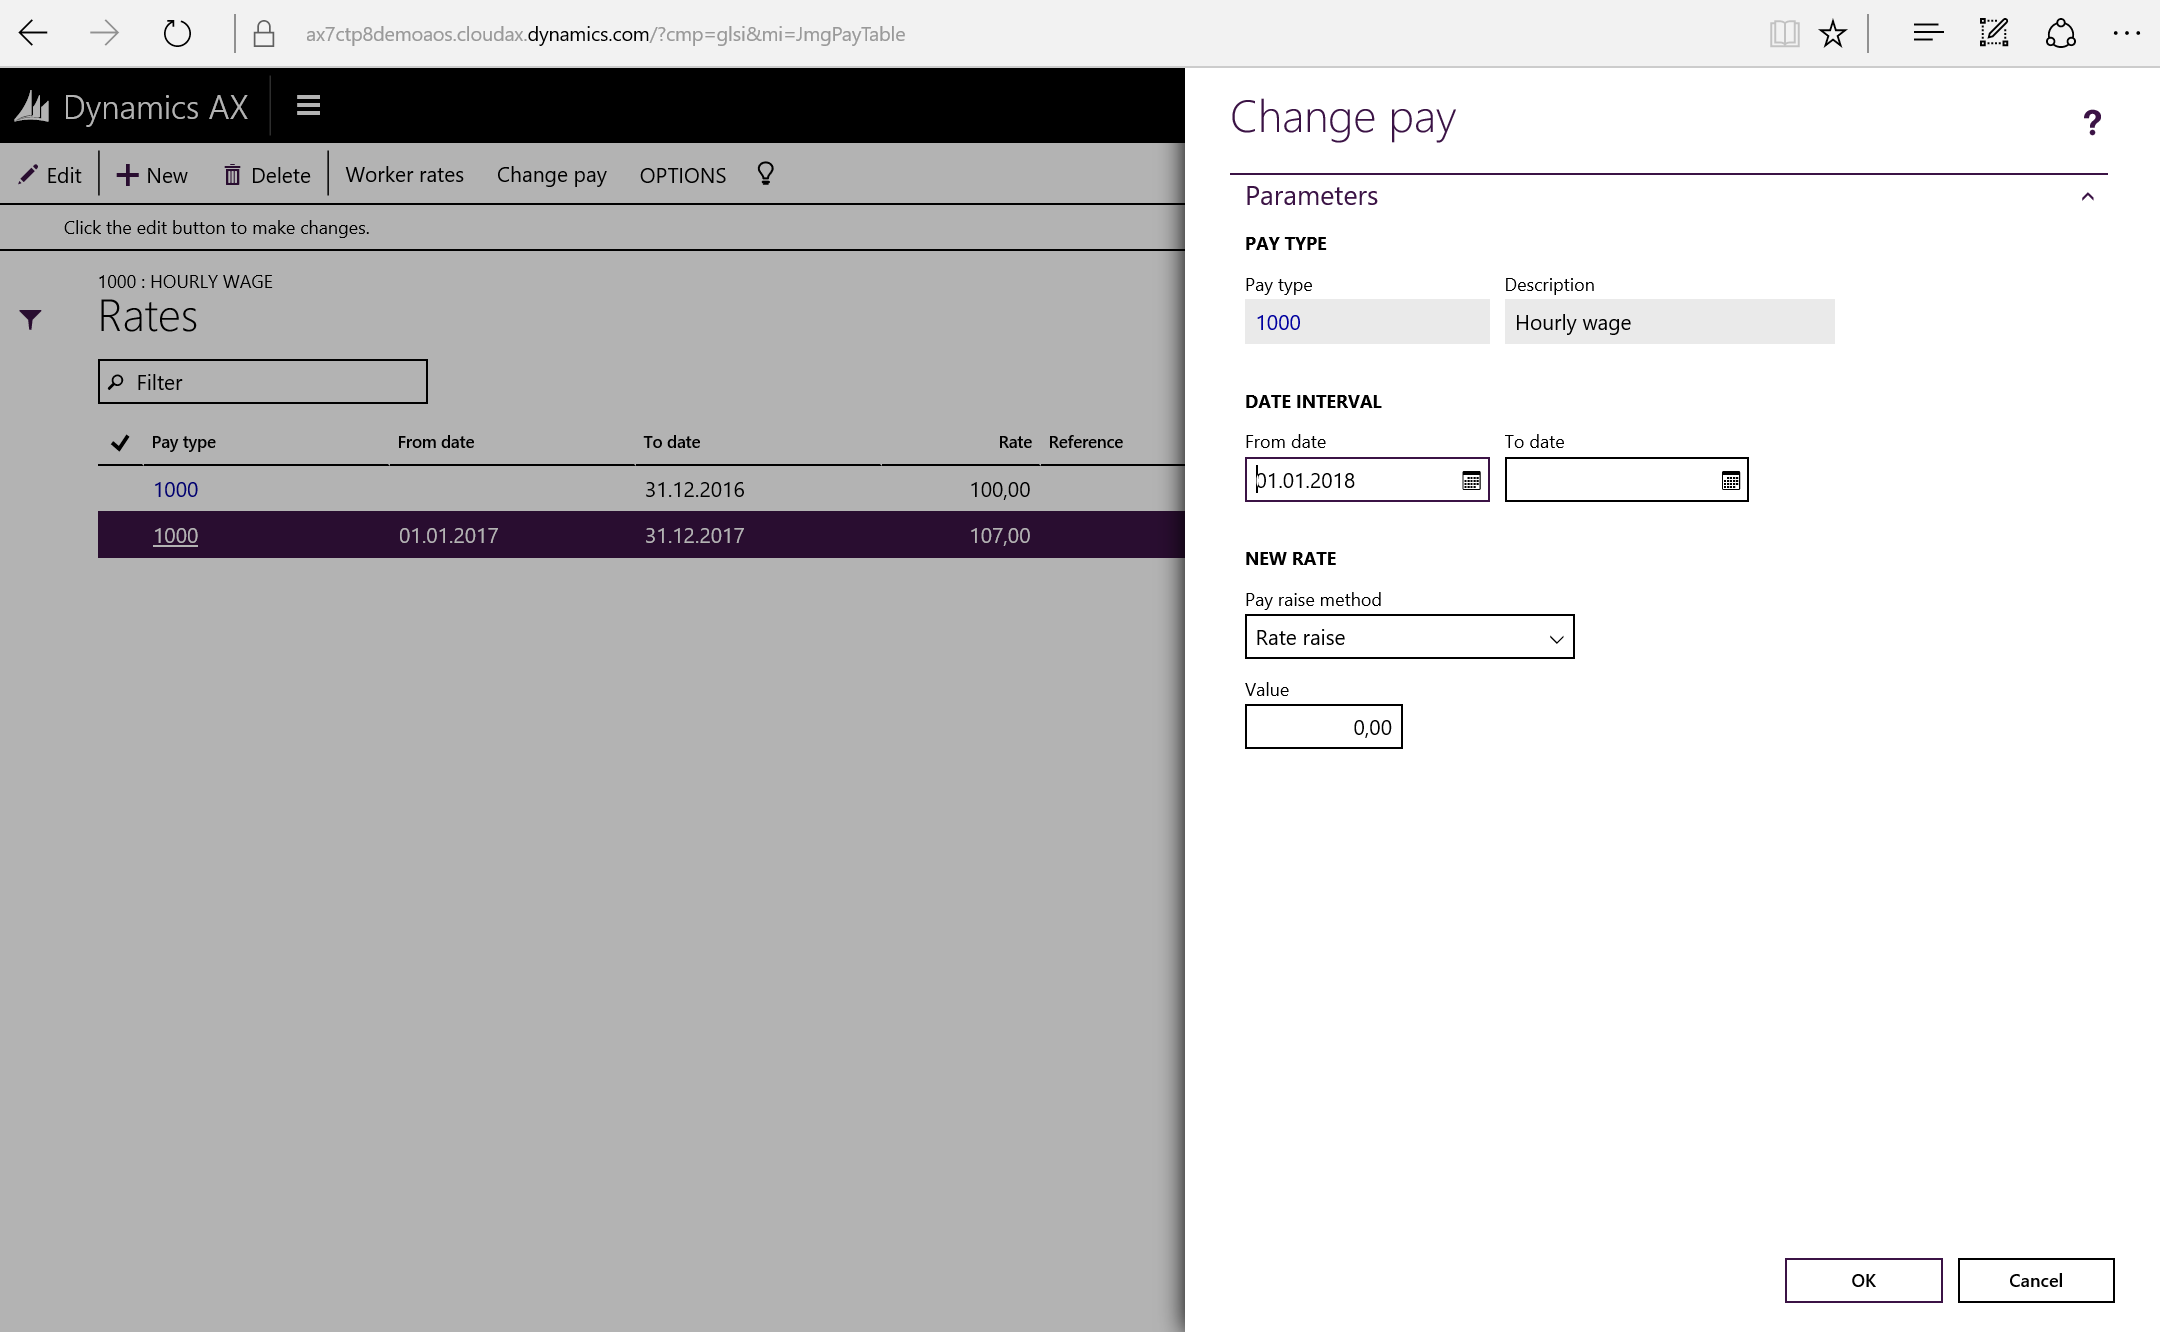
There is also a job on the pay type rates form to do an all over pay increase (“Change pay”) by setting a percentage, amount increase or a direct new value. Running this will update the generic and corresponding worker rates.
Pay agreements:
The pay agreements are a header/line type of configuration. I try to keep as few pay agreements as possible. Preferably only one. I rather use delimitations to restrict for each employee grouping within the same pay agreement. The reason for this is that if you need to apply a new rule for everyone you just need to do it once.
Go to Time and attendance > Setup > Payroll > Pay agreement to create a new agreement.
You need to put in a valid period in the header to be able to use the pay agreement.
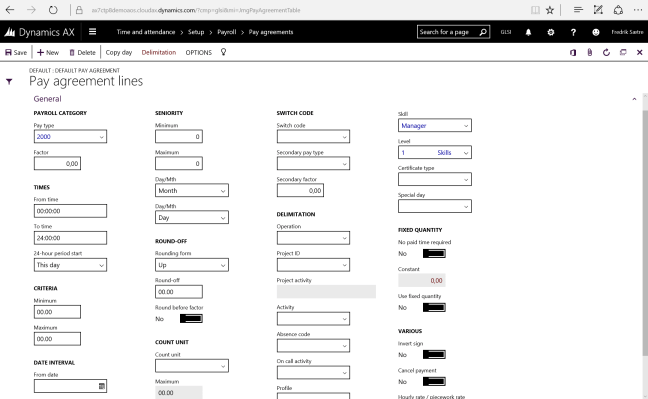
Pay agreement lines: Keep in mind that the registered time and the profile limit the range of the payment type. So entering records should be taking in to account and cover all the different profiles. In the example below the pay type 1201 is generated for all standard time being triggered.
There is a section for filtering each wage type (Sat to “Standard time” in the example above). The relation between these and transactions from the profile calculation is set in the calculation parameters. Keep in mind that as a part of the standard configuration; overtime also triggers standard time. If you don’t want to do this, you can change this in the calculation paramters (Time and attendance > Setup > Calculation parameters).
The pay agreement lines has a day by day setup as well as a “Special day”. This is a setup done in the profile calendar that defines if a day is a special day. Christmas might fall on a Tuesday, so this is pretty important to notice.
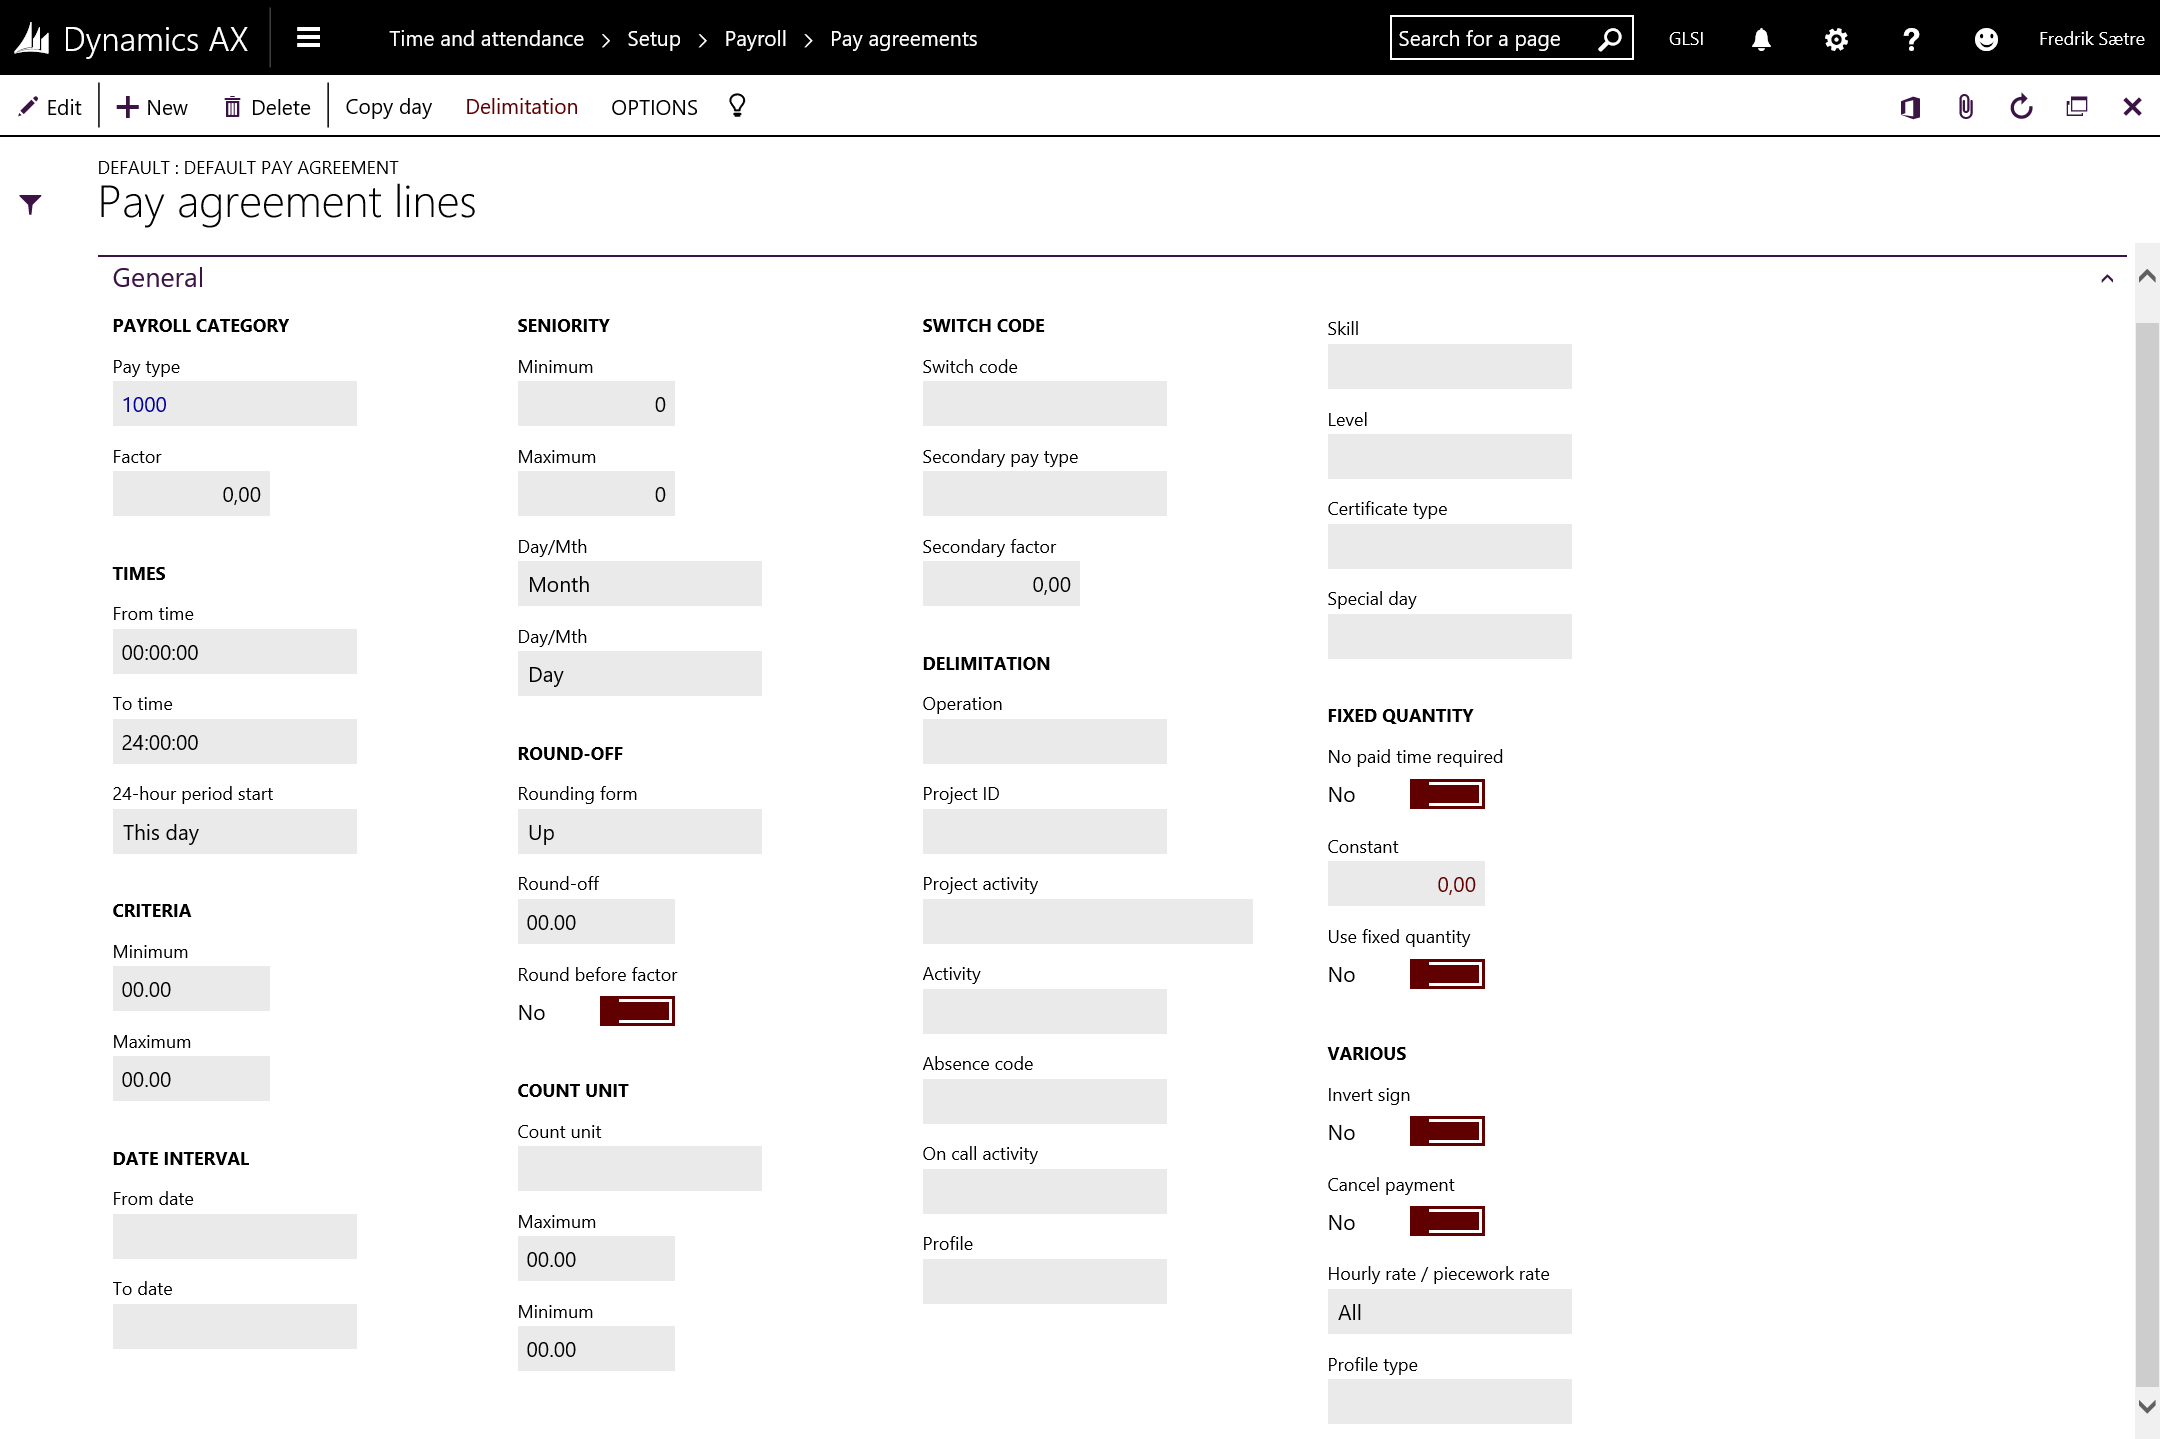
Pay agreement lines delimitations:
As you can see there is a wide range of delimitations you can do and I’ll run through what I normally do in my next blogpost.
Indirect Activities is used for all other job types that does not involve absence, manufacturing execution, projects or project activities.
You can set up all you need for general tracking by just creating indirect activities. It is possible to set up costs for the different indirect activities. You can even set your own GL posting and financial dimensions, so you can get a lot of good financial data out of this. For instance this can be used to run costing for departments where you have people moving between departments and doing different work. It works very well, but I would recommend using the projects accounting module for proper internal cost tracking, as it is a lot more configurable and able to handle more aspects then just the employee hours.
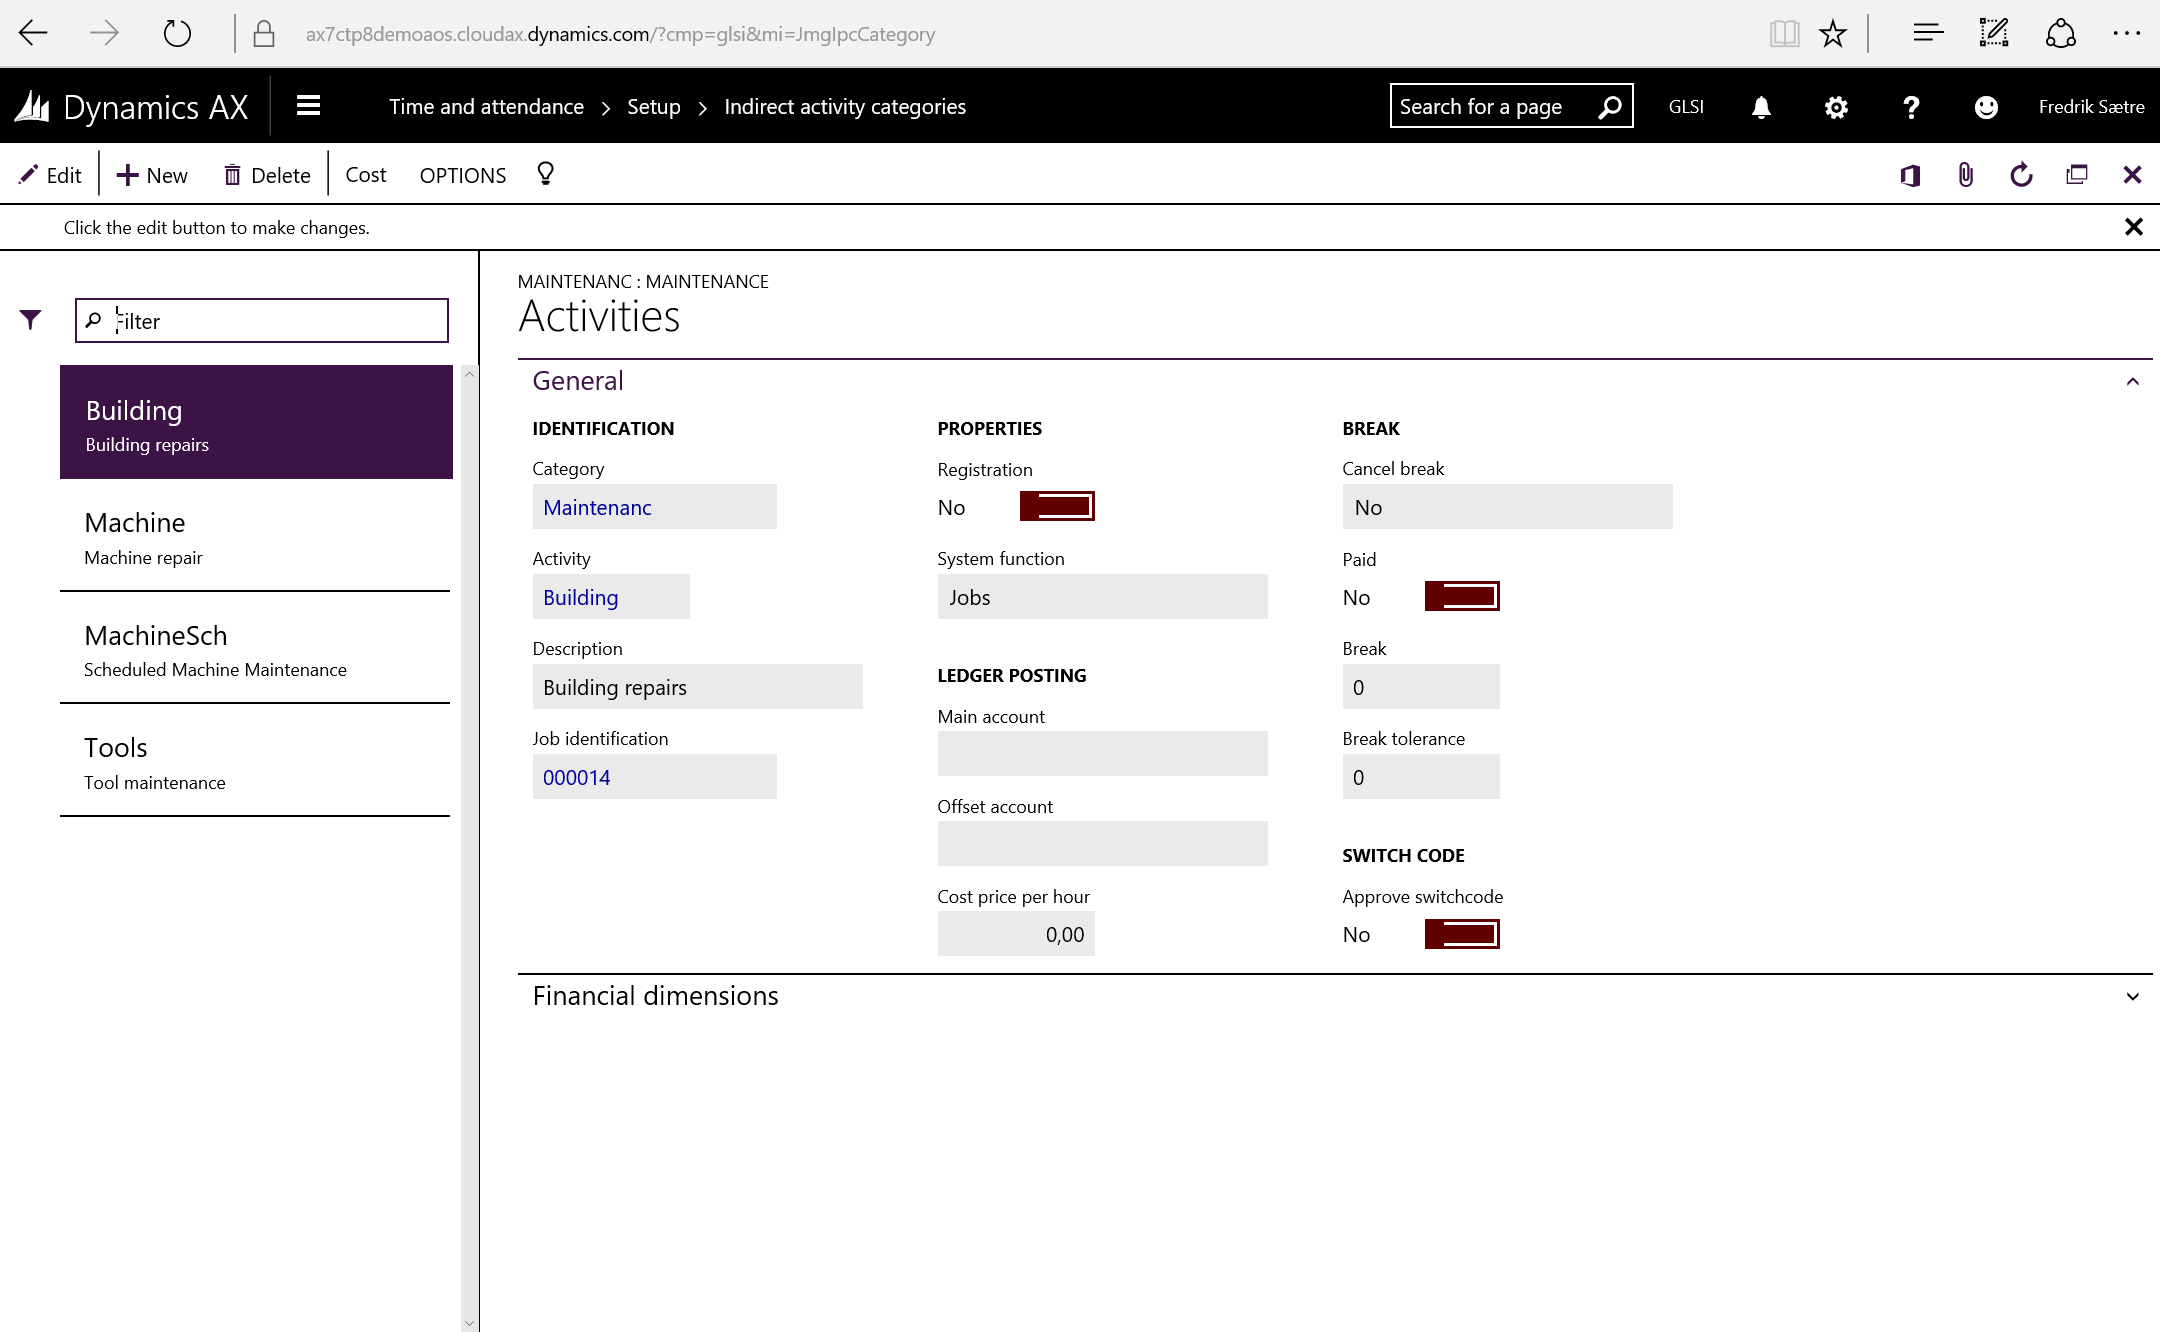
First you need to create the categories. You can access these in Time and attendance > Setup > Indirect activity categories.
There are four types of indirect activities:
Job (General jobs and system tasks)
Break
Switch code
On Call
You can only have one type of activity within each category and each type activate/deactivate different parameters in the setup. You can also allow registration on the category by activating the registration for Time and attendance.
In AX7 you can also maintain all activities in a flat structure in the Indirect activities form (Time and attendance > Maintain indirect activities > Indirect Activities)
Job Activities: There are some job activities created by the configuration wizard. These are the system specific jobs that are connected to a system function other then the type “Jobs”.
The system jobs are:
Clock in
Clock out
Start assistance
Stop assistance
Change pilot
Submit registrations
Clear
System waiting
Stop break
Info
Switch bundle mode
If you are missing any of the system tasks, you might want to create these in the indirect activities Group called “System” (Created by the wizard) later on.
Other then the system jobs, you can create a job of type: job… Which is simply just a way to handle your internal costing. These are the jobs that will contain miscellaneous type of work like machine, equipment or building repairs, meetings or other type of work performed that need tracking.
Break activities: You can either create default breaks in the profiles, but you can also set it up, so the users them selves can select when they take a break and how long it should be.
You can create different types of break activities that will holt the cost allocation to the operation beeing executed on.
You can choose if the break is a paid break and to set a timer for the activity. If the user does not punch a cancel break activity within a given time frame (with tolerance settings) the break will turn in to an unpaid break activity.
You can activate the “Cancel break” to create activities that cancel an active break. This can be different types of cancelation reasons like if there is a machine issue, you would like to track that as opposed to user related cancelations (like if they just wanted to go back to work).
Switch code activities: Switch codes are used to toggle different types of pay agreements and profile types in the profile.
I use these to mostly toggle overtime and toggle flex vs. overtime for flexi time users.
If you have a special type of pay account build up as well you can use this parameter to toggle this on or off.
You can demand an approval of a switch code. Like in most cases you would not approve overtime automatically, but you need an extra action to do so.
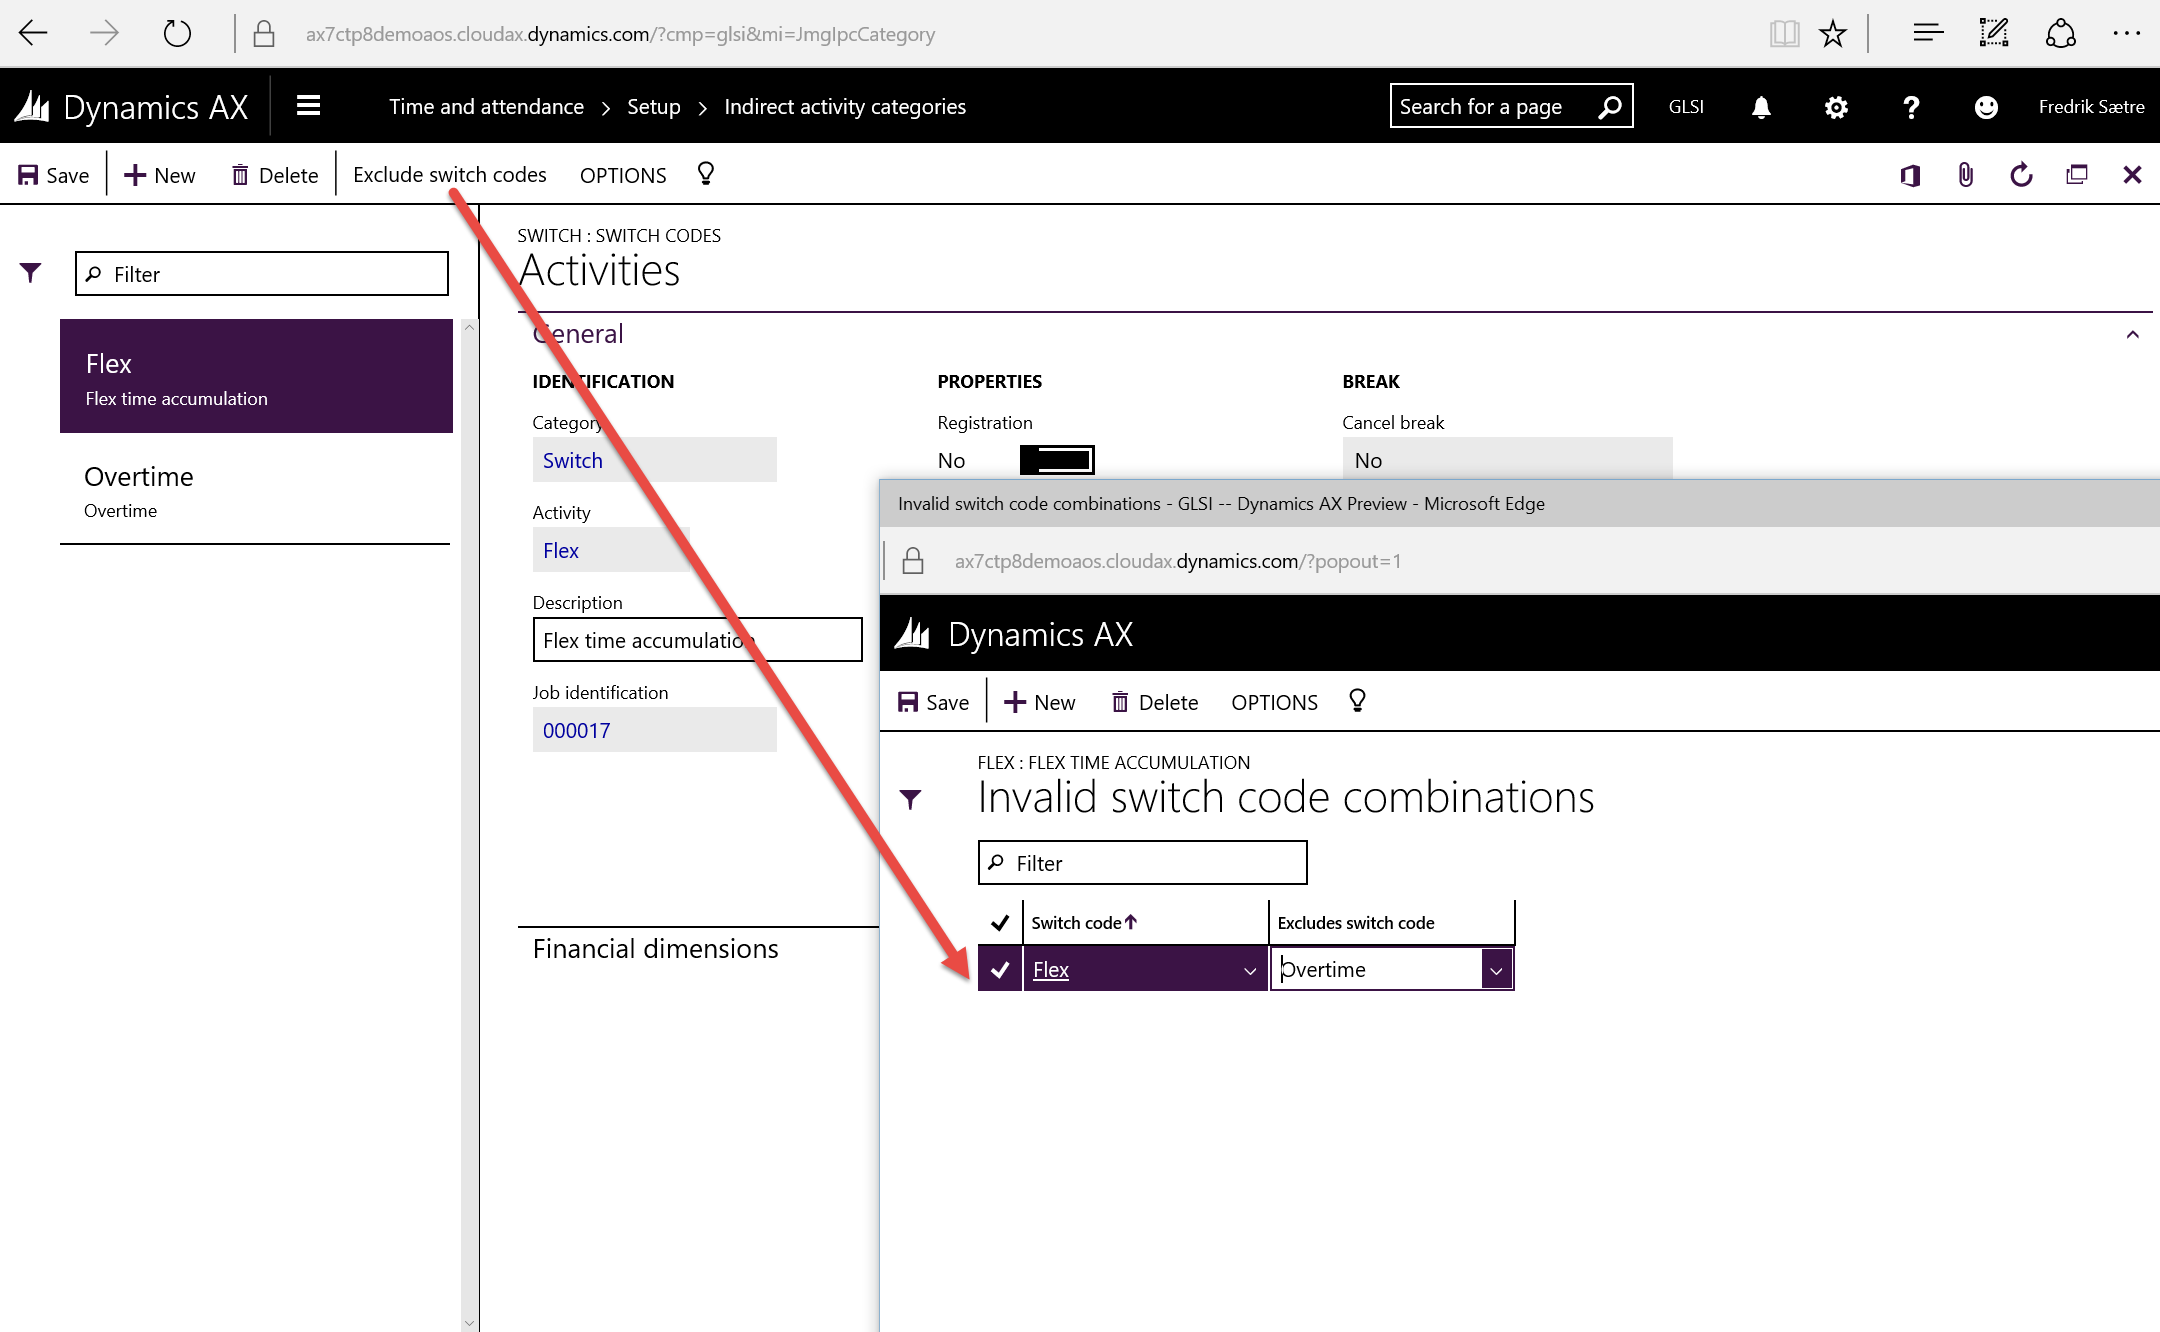
A switch code can also cancel or exclude another switch code, so for the overtime scenario you will also want a cancel overtime activity that negate the overtime switch codes.
On Call: The on Call activity is a special activity that is called once for each shift (the time between clock in and clock out).
If the user triggers this at any time durring a shift, the entire work time will be “marked” with this On Call activity.
So you can use this as a to trigger where the user gets a special added pay type to each working hour.
I use this for triggering self-managed bonuses. For example if a worker needs to go to jobb in the middle of the night because a machine has stopped or something.
Absence registration can be done by the time registration users them selves. If the clock-in or clock-out does not match the expected user profile, the user is prompted with an absence dialogue and can register either the reason why they are late or the reason why they are early.
In 2012 there where several separate ways to handle absence. Which I talked about in this post: Two (three) different absence solutions in AX? I suspect there are some improvements as there seems to be a parameter missing concerning this interaction in the general parameters that are missing.
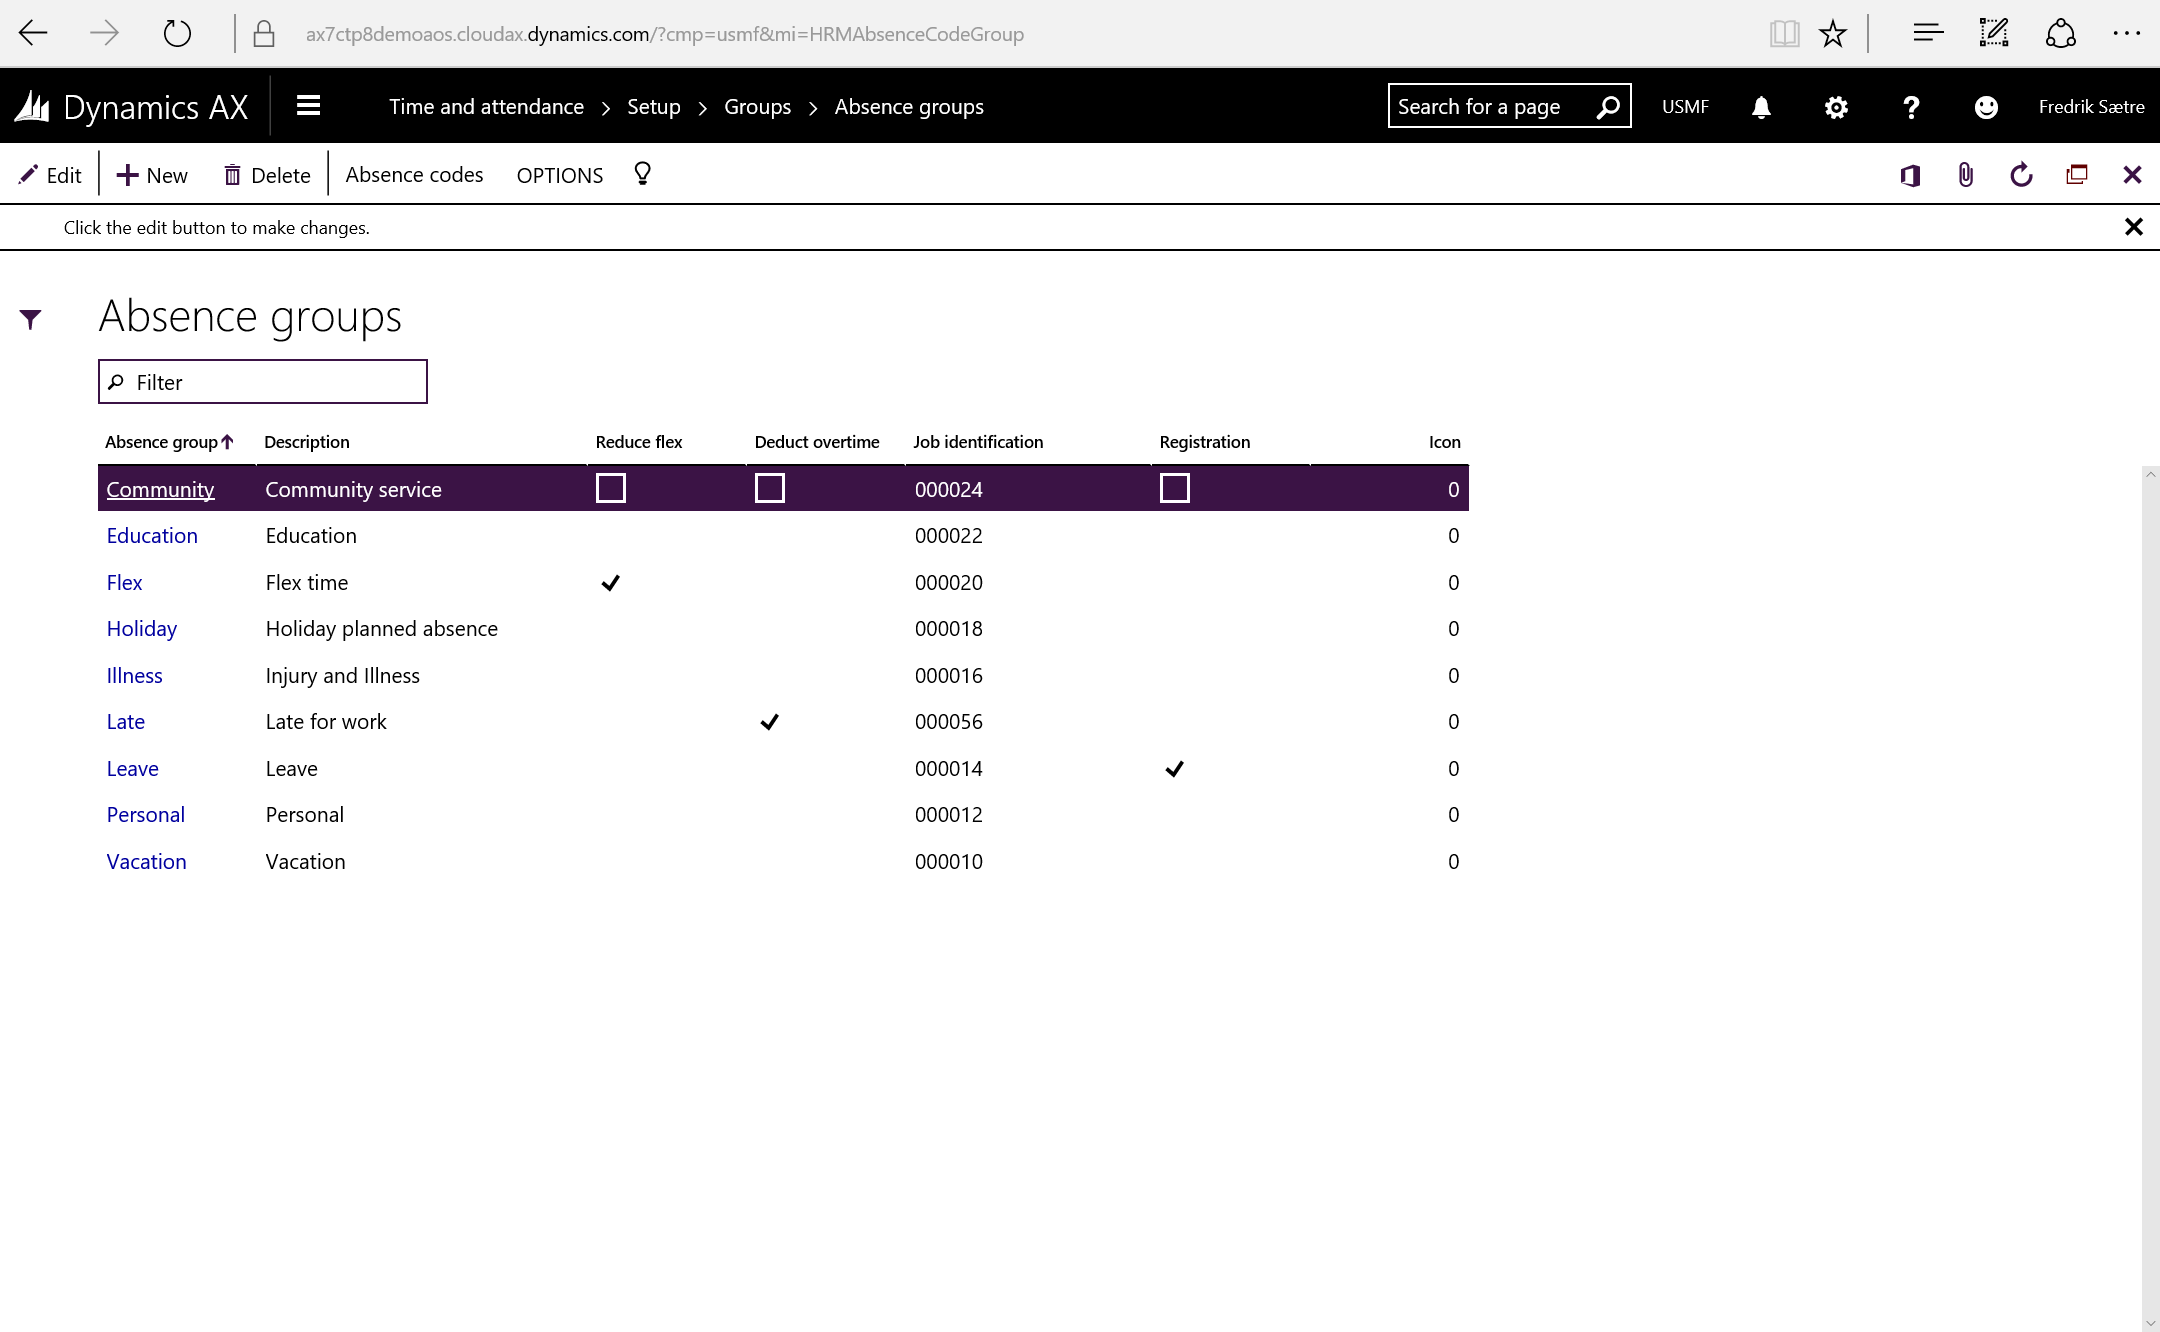
To configure this go to Time and attendance > Setup > Groups > Absence Groups.
Create the groups with payroll in mind. For instance paid, unpaid, vacation and so on. This can make the payroll setup easier later.
After creating groups you need to create the codes. Click Absence codes in the menu.
Make it available for the time registration user: The setup for absence codes are the reasons for why the employee is not present. Not all the codes are natural to have in the terminal Interface. To make them available. Set “Registration” to “Yes” under Time and attendance fasttab.
The icons are embedded resources in 2012, but I’m not sure how you find them in AX7. I’ll figure it out and replace this paragraph on how to do it.
Continued or not: The parameter “Continue absence” determines if the absence code should be active until next clock-in by the user (“Yes”) or only until the next expected clock in stated in the profile (“No”).
Post pay types: If you want to make the absence post a pay type to payroll you can add a pay type to the record as well. You can do it here if it is the rule for all employees. If they differ for some employees you can do this in the pay agreement setup later.
Absence method:
For absence like Vacation that should result in a full day. You set the “Days” parameter to 1. You might be tempted to try out the Hour/Day toggle in “Method”, but that only works with the Human resources type of absence. Keep it to hour.
All done!
Now… Try clocking outside the expected profile times and see the nice interface pop up.
In earlier versions of AX you could store queries you did in forms and then add them to favorites to be just one click away from a filtered form.
Did you know that you can do the same thing in AX7?
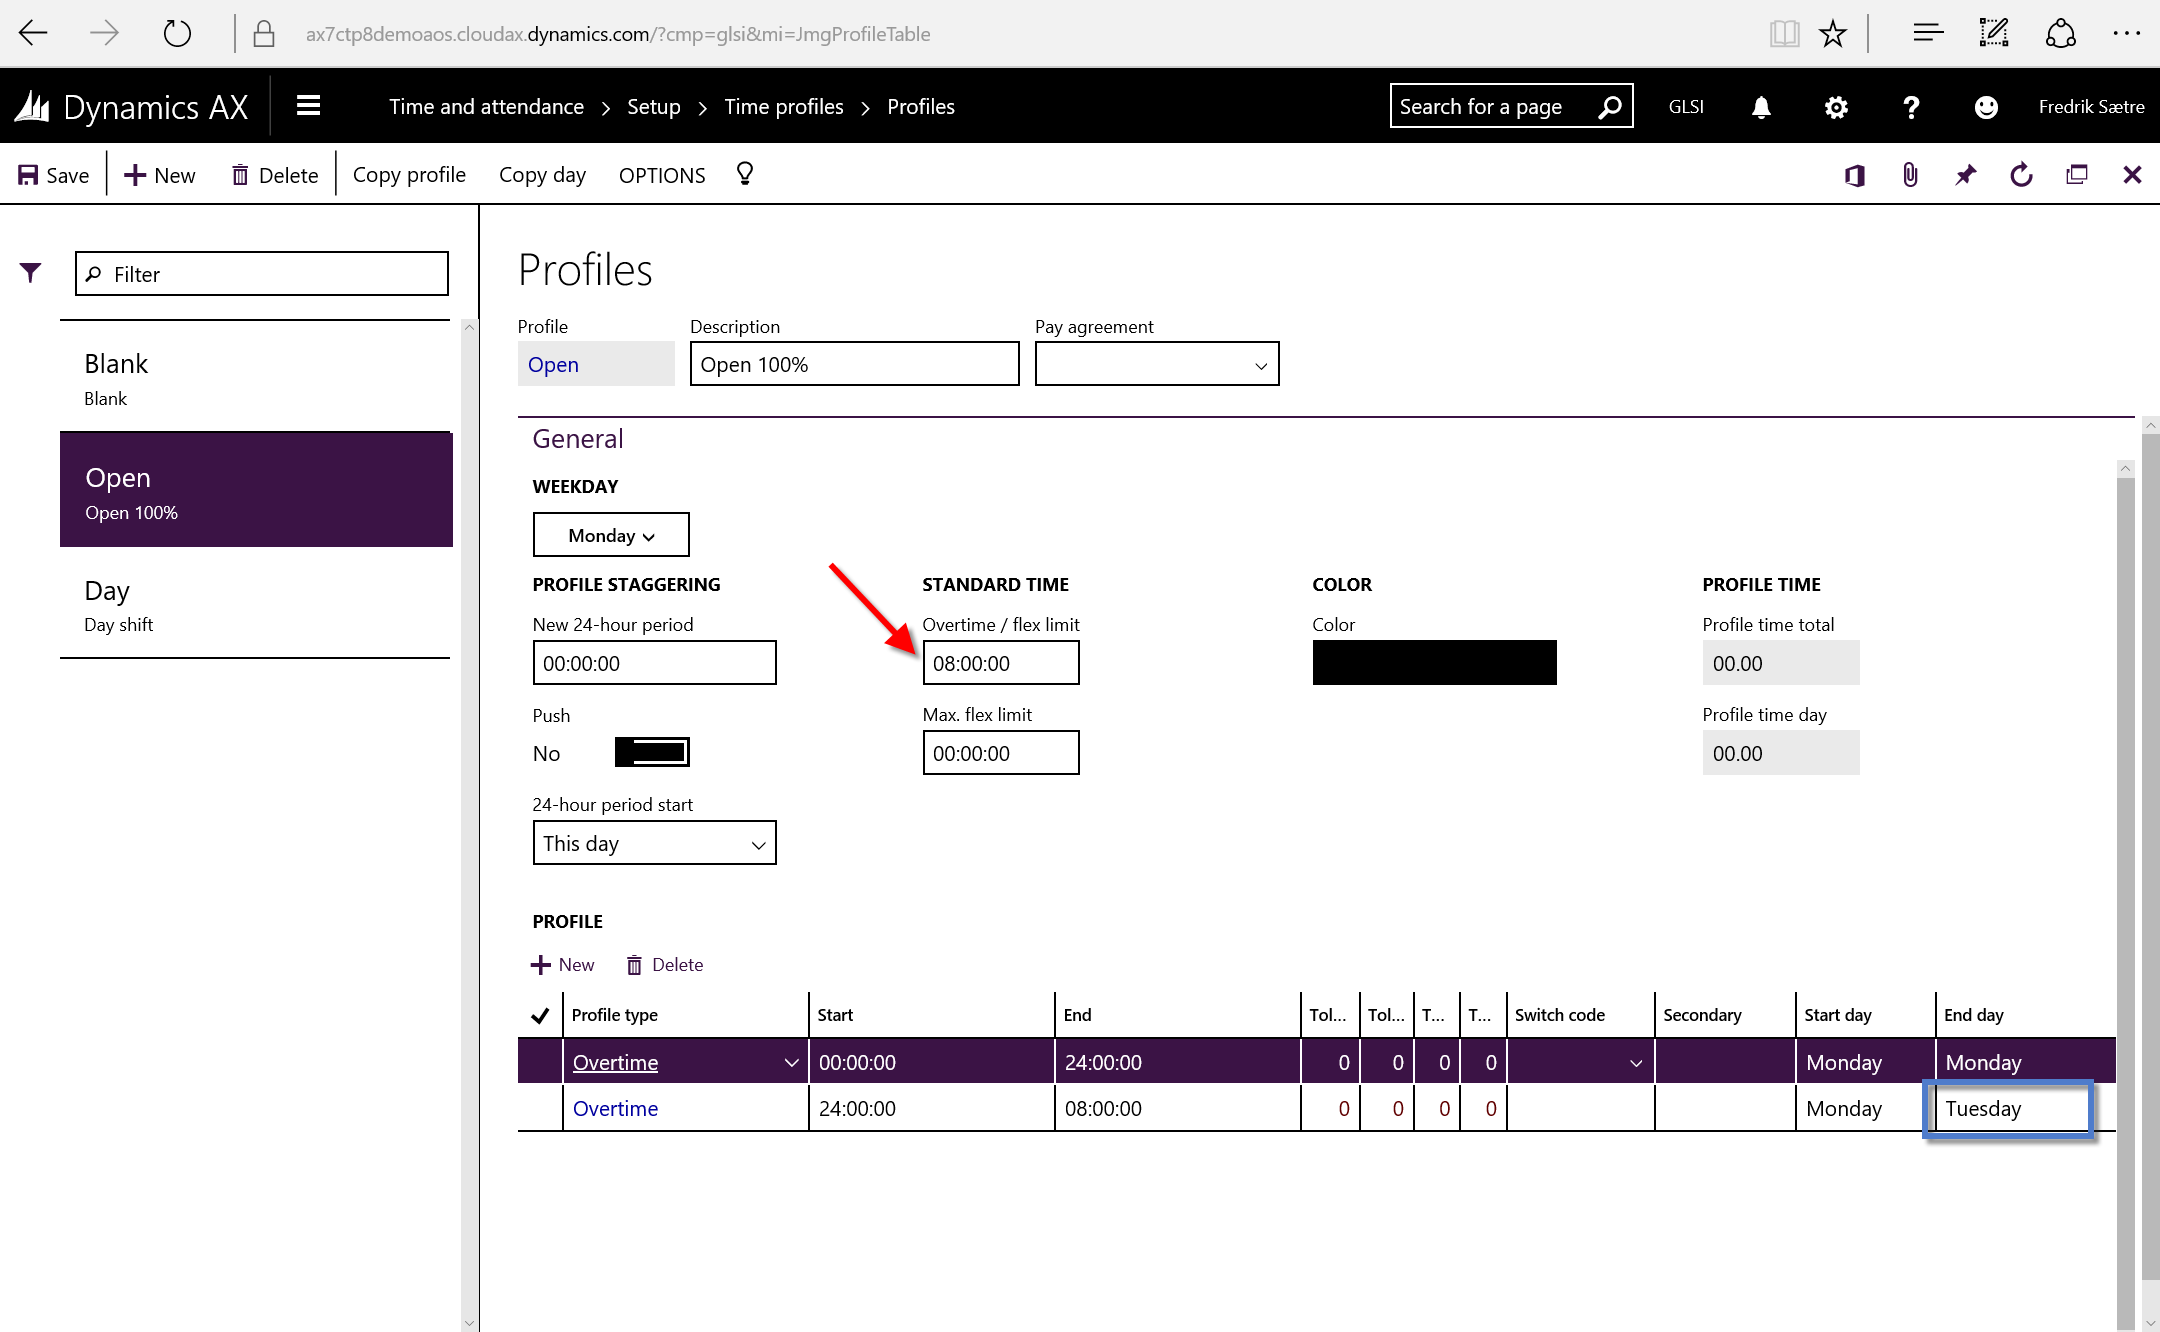
You create profiles to determin the users actual working times (Time and attendance > Time profiles > Profiles). You can do this in so many different ways that it is could be a dauntfull task to attack. I’ve got my own way of doing it and I’ll show you my way and some other methods of creating this. There is a lot to say here, but jump to: “Create a standard profile” and do that to quickly get started or read all to become a wiz.
Note: Name these based on function or department (Production, Administration, 50%, Day Shift, Night Shift, Flex daytime…) and not on users(eg. Jhonny, Frank, 105, FRS…).
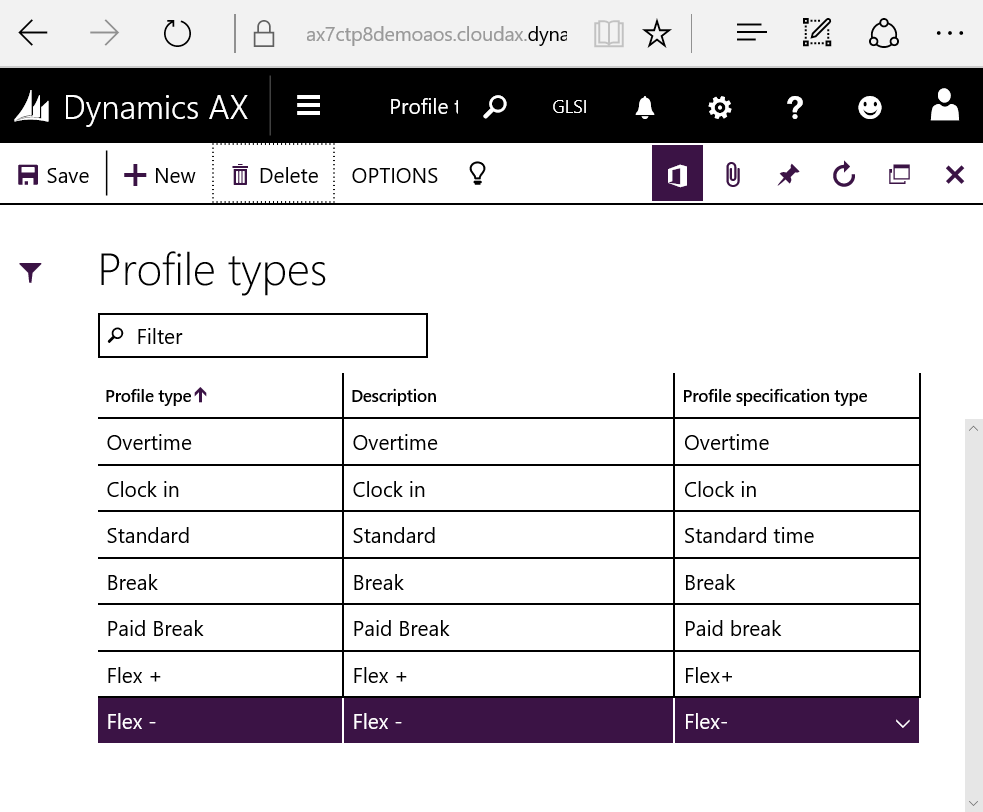
Profile types:
You can configure the profile types at Time and attendance > Time profiles > Profile types. Durring the wizard execution we got some standard profile types, but to get the full functionality you will need atleast:
Break
Clock in
Clock out
Overtime
Paid Break
Standard Time
Flex +
Flex –
Create a standard profile A standard profile has expected clock-in and clock-out records and could looks like this:
Profile type
Start
End
Start day
End day
Overtime
00:00:00
07:00:00
Monday
Monday
Clock in
07:00:00
07:00:00
Monday
Monday
Standard
08:00:00
09:00:00
Monday
Monday
Paid Break
09:00:00
09:15:00
Monday
Monday
Standard
09:15:00
12:00:00
Monday
Monday
Break
12:00:00
12:30:00
Monday
Monday
Standard
12:30:00
15:30:00
Monday
Monday
Clock out
15:30:00
15:30:00
Monday
Monday
Overtime
15:30:00
08:00:00
Monday
Tuesday
Before 07:00 the user gets Ovetime. After 07:00 they have standard time untill a paid break for 15 minutes at 09:00 and a break at 12:00 for 30 minutes. The clock out is at 15:30 and time after this is overtime. The profile has tolerances for 5 minutes before and after clock-in/out making the rounding within the clock-in/out times.
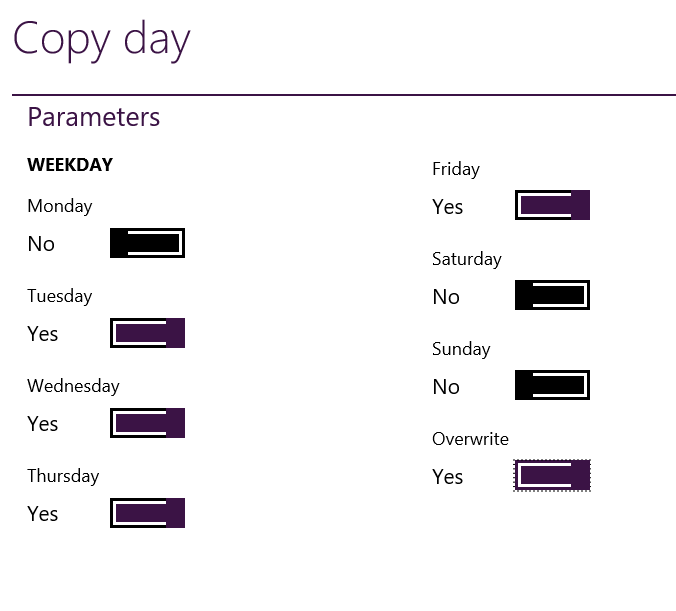
After creating one day, you can copy this to the rest of the days in the week by using the copy function.
Note: Always check the “Profile time day:” to see the total work hours for that day and “Profile time total:” for the entire week after copying is done.
Microsoft has some great information and examples on this on MSDN for AX 2012 that still applies: Click here
Profiles that need overtime approval As I don’t want the system to automatically give the users overtime if they register before or after clock-in/out because this has a great economic impact. I use switch codes and secondary profile type to introduce a approval step for this action. The user can clock in early, but they have to enter a switch code to get the overtime. The switch codes are set up with the approval parameter active and available to be registered on.
You can create new switch codes by going to the Indirect Activity Categories (Time and attendance > Indirect Activity Categories) and adding a group and corresponding activities.
Then add a switch code to the line.
I use Break as the default profile type, because this has no payment associated with it. So if the employee works after 15:30 without registering overtime. No payment will be triggered after 15:30.
Note: The final record goes past 24:00 on to Tuesday because a user can then work past 24:00 and still get paid. The calculation is for the profile date and it only looks at the day it is activated. It does not look at the next day after 24:00.
Create a profile without clock-in/out constraints The simplest profile type is the one without clock in or out times. This solution is pretty quick to set up and covers anyone who clocks in at any time of the day. It is mostly used for “Contractors” (external workers/hired help) and part time workers that is paid hour by hour. It will not prompt the user for absence codes.
Note: This type require users to register in and out from breaks. These can be added to the profile if needed, but are then static.
Punching in and out of breaks require the right Indirect activities system jobs to be created.
Notice that the lines are chronological, and since the first line lasts untill 24:00 the second line last untill 23:00, but on the day after. This way anyone can clock in durring the entre day from 00:00 to 23:59 and work untill 23:00 the next day without any issues. It is important to check the “Profile time day:” to controll this.
Same type with approval for overtime:
Flex time profiles: We will cover is in Flex time section later.
Prepair for work planner: While creating profiles. Select a color for the profile. Try grouping them logically, so you can look at the color and kind of an impression on the type of profile.