Time and Attendance (Part 25/31): Work planner

Work planner is an excellent tools to handle your workers profiles over time and work efficiently with the profile calendar. It basically is a visual representation and painting tool (Yes…) of your profile calendar and the reason why you want to have some logical coloring of your profile settings.

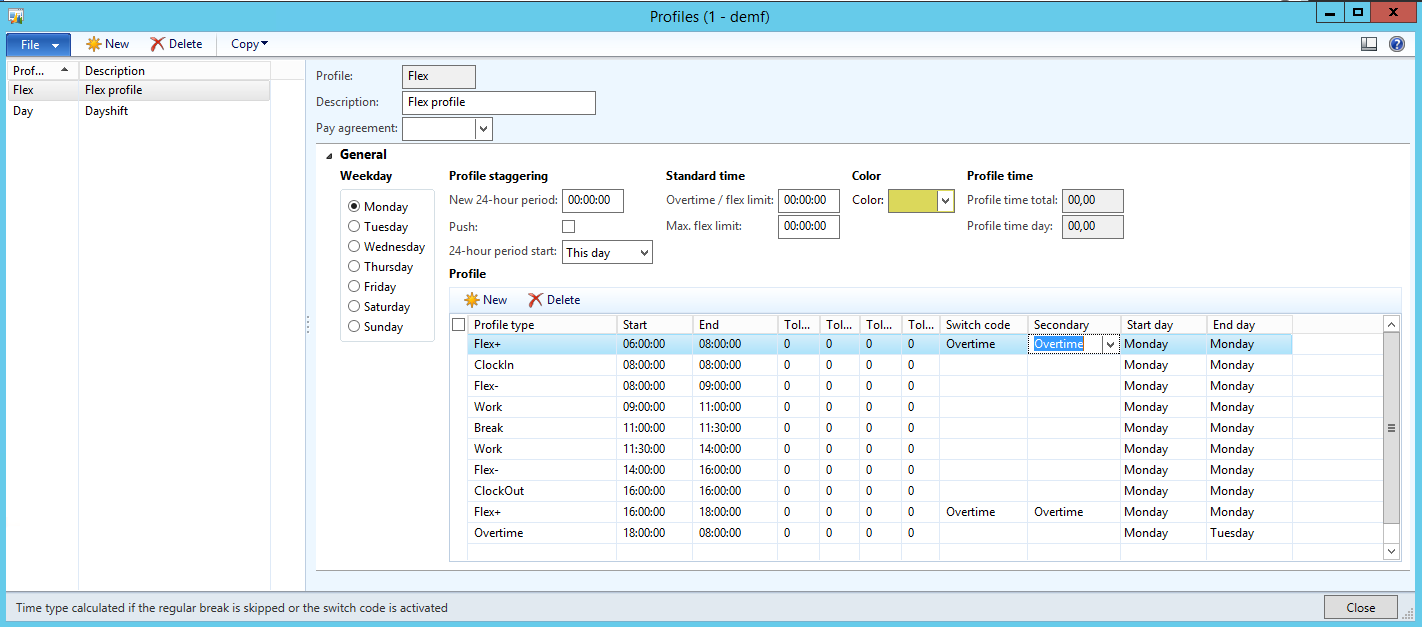
My customers use it to do shift planning and make those off-weekly-work-profiles work (like someone having half day two days a week, but not the same days next week and free every third Friday after a full moon and such). To set this up you need to add a color to you profile. Check out my post on profile configuration for more information on that.

Using the Work Planner:
Human Resources > Periodic > Time & Attendance > Work planner

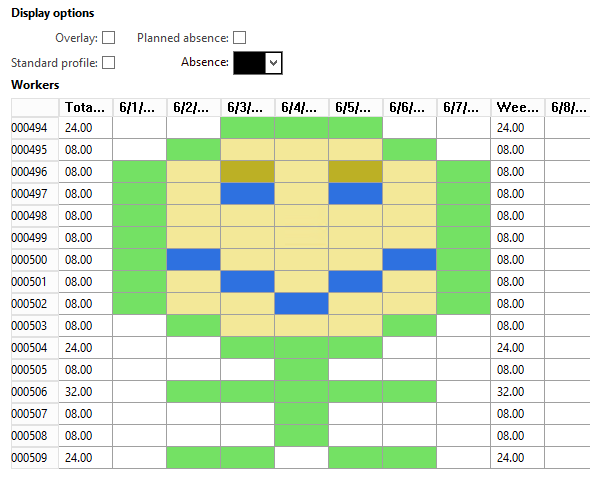
When the form opens it gathers all the data from the profile calendar and creates an overview in the form.

Work Planner

Right area of the form:
There are two panes:

  • “Period” is one row per user
  • “Profile Group” has a section for all and a section with rows per profile group.

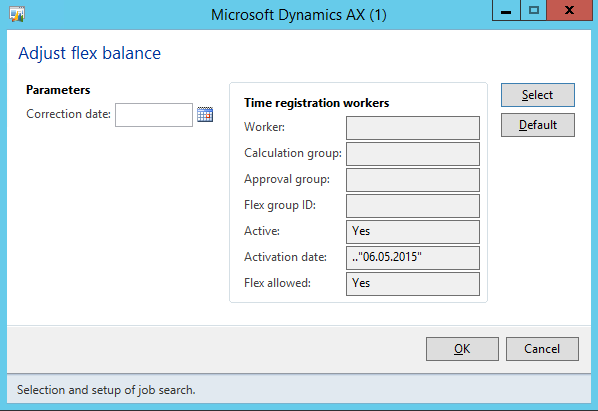
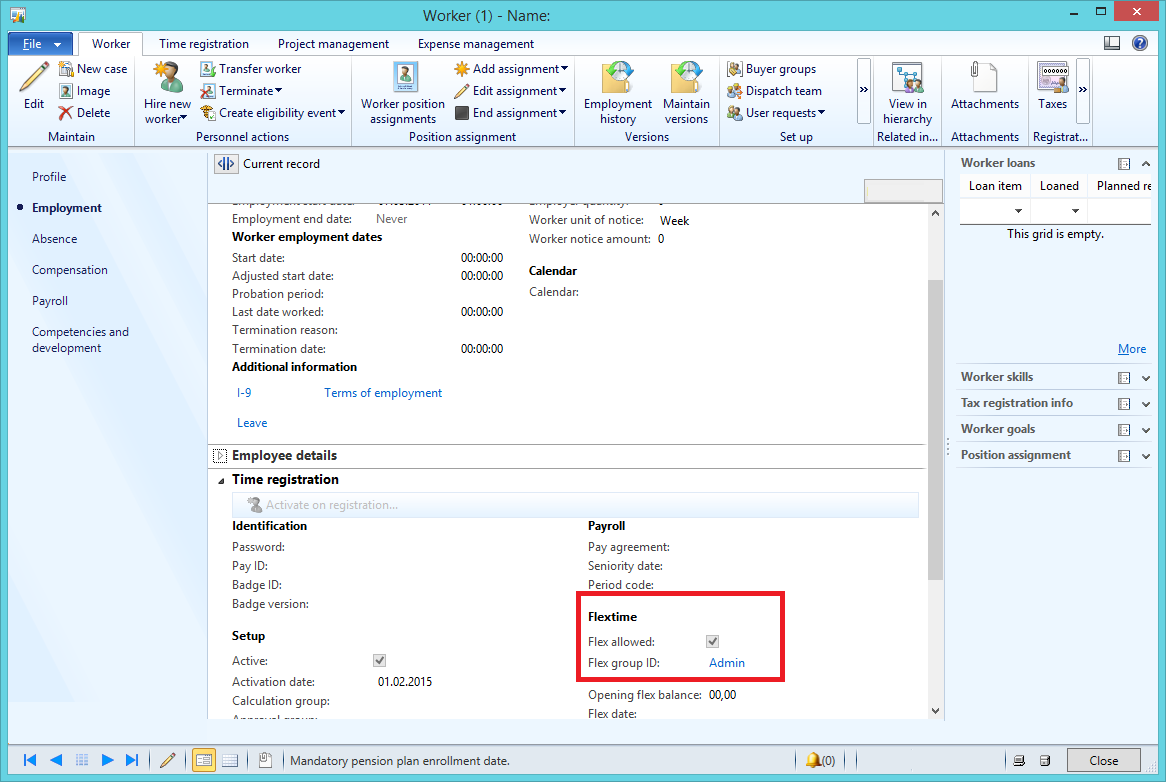
You can filter based on calculation group and/or approval group. The Display options are layered and shows the profiles in the way the profile calendar is querried from the Time Journal creation. You can activate them at will by clicking the check boxes. “Overlay” will show the profile group and all, Standard profile is the default profile on the workers employee settings and then you have “planned absence”.
The absence can be shown and you can pick the color it shows in the grid.

One layer overrides the other:
1. Absence
2. Profile calendar: User
3. Profile calendar: Group
4. Profile calendar: All
5. Default Profile

Left area of the form:
Here you can pick the date interval for the form and clicking “show weekends” gives a grey color on saturdays and sundays. The Profiles are listed and shows in the color as set on the profile. You can filter down the profiles by using the profile group. These will then show only the profiles in the profiles relations for this group.

Select one of the profiles in the list by clicking it and then draw these profiles on the dates for each user or group/all based on the pane you’re on.

Check the clear profile and draw if you want to delete/remove.

After you’ve finished you’re work planning. Click “Save” in the top menu and the profile calendar is updated with the new data.

Have fun!

AX2012_TA_WorkPlannerSmily

Adding your own entities to Case Management

Case managment is a generic cross module solution where you can log cases with or without a defined process and keep a information. A case can be related to a number of various entities in the solution.

There are 9 case categories where you can group processes:

  • General
  • Sales
  • Purchase
  • Service
  • Project
  • Production
  • Collections
  • Audit
  • Human Resources

You also have 22 entities you can associate the case with:

  • Lead
  • Opportunity
  • Customer
  • Vendor
  • Prospect
  • Project
  • Sales order
  • Purchase order
  • Worker
  • Service order
  • Item
  • Customer transaction
  • Expence report
  • Expence report line
  • Venrod invoice
  • Vendor invoice line
  • Purchase order line
  • Returned order
  • Case
  • Product
  • BOM/Formula
  • Route

Both categories and entities can be extended.

Working with manufacturing companies we quickly came in to a lack of entities that our customers often wanted to associate a case with. Mainly Production orders and tracking data like serial and batch numbers. We also added a lot of other entities to our standard expansion solution to our customers.

How to extend the entities?

1.  Add your entities to the Entity type BaseEnum (CaseEntityType).
PS: Remember to add 100 to the last enum in the list.

2.  Make the Assiciation link class (smmAssociationLink) be able to look up the data for the new entity

  • entityType2FieldId
    entityType2FieldId
  • entityType2FieldName
    entityType2FieldName
  • entityType2TableId
    entityType2TableId
  • performJumpRef
    performJumpRef
  • performLookup
    performLookup
  • tableId2EntityType
    tableId2EntityType

3. Create relations from the case association table (CaseAssociation) to the new entity tables
Set the parameter “UseDefaultRoleNames” to “Yes”.

4. Add the dynamic lookup to the Case form (CaseDetail)
CaseProductionOrderExample

4.1 Add the entity tables as Data Source
Use the following parameters:
CaseDatasourceProdTable

4.2 Duplicate CaseMoreInformation node and add the fields you want to look up
You will find this under:
Forms > CaseDetails > Designs > Design > Tab > TabPageDetails > TabHeader > AssociationsTabPage > Group_MoreInformation

This example is for Production orders as shown above:
CaseMoreInformation_Production

4.3 Edit the dynamic switch for the display.
Edit the class: showMoreInformation located in methods on the root of form:CaseDetail.

  • Add a new boolean in the top
    Case_moreInfo_boolean
  • Add the boolean to showMoreInformationGroup
    case_moreInfo_switch
  • In the bottom part of the code add a new if statement
    case_moreInfo_if

5. Add the form actions to create and view related cases
Open a form in the AOT with these methods (like the salesTable form) and drag the wanted sections to the form you want. Result might look like this:
caseCreateLookupFormButtons

If you copy from the Sales order form you might want to change the “MenuItemName” parameter to a generic or production (in this case) to get the right category.

Remember that you can extend any type of entity to be a part of the case managment. Hope this post helps you to use it even more.
For more information about case managment check out MSDN:
https://technet.microsoft.com/en-us/library/hh242147.aspx

Two (three) different absence solutions in AX?

To answer the title: “Yes”. There are several places to maintain absence in AX 2012.
Working with Absence managment in AX 2012 you’ve probably come across this. The moment where you understand that there are multiple feature sets on Absence managment that don’t work together. Human resouces (HCM) and Time and Attendance (JMG) both use Absence codes, but the features in them are a bit astranged.

The reports in Absence managment in Human resources based on the absence journals are very good. That is why you set up the collumns and “include in report” on the absence codes.

You can transfer the absence registered in Time and Attendance into Absence journals in Human Resources if you’ve activated the parameter to do so.

AX2012_TA_AbsenceHCM

Absence codes is a common concept and is used both in Time and attendance and Human Resources, but there are some places where you might fall in to a hole and the only way out at the moment is creating program changes.

Issue number 1: Absence applications from employees
You have the register absence under HR > Periodic > T&A > “Create planned absence”, create this through the attendance form (HR > Inquiries > T&A > “Attendance”) or do this through the T&A pane on the worker (HR > Common > Worker).

So far it looks to be working together, but what happens when employees need to register absence for approval. The employees can use Employee services in Enterprise portal to let your employees pre-register absence that is to be approved, but this doesn’t have anything to do with Time and Attendance.

Absence detatched

A way to resolve this would be to add a function to class when approving absence that also updates the planned absence in time and attendance.

Issue number 2: Resource calendar updates
If a person is absent and this person is also a resources (for projects and manufacturing) it would be nice to mark this resource as absent as well. This has to be maintained manually today by “Calendar deveations”.

AX2012_WrkCtr_CalendarDeveation

A nice way to automate this process is to add a new field to the abcense code with lookup to calendar. Then on the “Planned Absence” create and update classes create some business logic that also creates and updates calendar deveations for the resource.

Summary:
The features are all there, but they just don’t work together as I would have expected. I hope this post helped clear up some questions you’ve had and nudged you in the right direction. If you’re in the same situation you’ve probably got a partner with a skilled developer who can help you sort his out quickly.

Production planning with multiple resources (Dynamic resource management)

This is a tough one, but it is worth the read.

Some times you need more than one resource to perform a production operation and maybe these two resources can be used in other combinations to perform other operations. To get an optimal production plan that takes all this in to account is important, and with AX 2012 this is achievable.

To solve this, we use the secondary operation type in the routes to handle multiple resources and competencies to make resources work across different tasks/jobs with variation in properties.

Take for instance a simple production line with welding and assembly.

You have:

  • 5 workers (2 can assemble, 2 can weld and 1 can both weld and assemble)
  • 4 assembly stations
  • 3 welding stations
  • 4 welding torches

How do you set this up?

Resource groups:

  •  Factory workers
  •  Welding tools
  •  Welding stations
  •  Assembly station

Note: I’ve only created generic groups even through not all Resources within a Group is eligible for an operation. If you have multiple sites you might want to create one factory worker group for each site and added resource group to your requirements. As these might not be swapped around within a day. If you want to move a resource from one site to another it is easily done. For instance if you need a resource to be moved from site 1 to site 2 for a couple of days to fulfill some big orders.

Capabilities and Certificates: To be able to dynamically plan resources between different tasks and still be able to group them we need to apply some type of data. This is done by using capabilities (can be shared between any type of resource) or HR properties like competencies, skills, certification and so on. In this example we use a weldig certificate as a requirement for beeing able to plan a resource on a welding job. Read more about setting up capabilities

Note: On resources that can perform multiple tasks it is smart to use prioritization on the capabilities to ensure that they don’t move around too much and is put to work where the perform the best.

Route setup:
Routes would with the old model contain two operations (10 Weld – 20 Assemble) and two lines.
10 – Weld
20 – Assembly

In the dynamic model we will have two operations (10 Weld – 20 Assemble), but we use five lines.

10 – primary – Welder
10 – secondary1 – WeldTorch
10 – secondary2 – WeldLoc
20 – primary – AssWorker
20 – secondary1 – AssLoc

Resource requirements:
Operation: Welder
Resource type: Person
Certificate: Welding

Operation: WeldTorch
Resource type: Tool
Capability: Weld

Operation: WeldLoc
Resource type: Location
Capability: Weld

Operation: AssWorker
Resource type: Person
Capability: Assembly

Operation: AssLocation
Resource type: Location
Capability: Assembly

Notice that I didn’t allocate a specific resource group or Resource.

The planning engine will now take in to account all my resources and dynamically assign my Assembly/Welder where he is needed most.


Give your planning engine the information that it needs to give you the best suggestions for operations. Use multiple resources where applicable and Dynamics Resource planning for optimal results.

Dynamic resource planning

The resources in AX 2012 have properties that can be used to differentiate them from each other making for a much better and precise resource planning.

The different choices when selecting Resource requirements are:

  • Resource Type
  • Resource Group
  • Resource
  • Capabilities

Then you have the properties only related to human resources/personell:
To add these to a person, go to the worker card > Competencies and development > Competencies

  • Skill
  • Courses
  • Certificate
  • Title (Added on the worker card > profile)

Setting it up:
Resource type, Resource group and resource speak for it self.

Capabilities are new to AX 2012 and is a great functionality. This property can be shared between all types of resources. There is also a capabilities map to view resources and I encourage my customers to use this widely throughout their production planning to increase precision.

To set this up go to: Organization management > Common > Resources > Resource capabilities

AX 2012 Prod Resource Capabilities

A capability is connected to a Resource. It can contain an expiration date if a resource should loose the capability at a certain date.

Level can be defined on the route operations resource requirements and works so that a resource can have higher og equal level to the requirement, but not lower. Example of use can be a physical restriction capability (like weight/length/width…) where an Assembly station can not exceed the limits given on the operation.

Keep in mind that production planning always select the resource first by alpha numeric order. Priority can be used to break this and select a resource that is most suited. Example of use can be where two human resources can perform two tasks, but one is better than the other at one capability and the second is better at another capability. This really elevate resource planning within a resource group to find the best suited resource for the job.

You can also set the capabilities for a resource:
AX_2012_Prod_Resource_Capabilities_setting

HR competencies:
There are four types associated with human resources. These competencies can be tracked through goal oriented management and you can create a road map and track progression.

Title is used for multiple purposes. One of them is purchase requisition monetary approval limit. So be aware of this when using this.
AX_2012_Prod_HR_Title

The three  other is found under Competencies and development.

AX_2012_Prod_HR_competencies

Skill has the ability to have levels like capabilities. Only higher or equal skill level apply. You can create the rating type Your self like (Good | Normal | Bad), (Very high | High | Normal | Low) and so on. These can also be approved, but that is not required to be included as a viable resource.

AX_2012_Prod_Skill

Certificates have the great feature that they can expire. You can track expiration on them through reports and make sure that your resources have the right papers to perform their job. If the certificate expire the resource will not be available for planning.

AX_2012_Prod_Certificate

Courses is a pretty big feature in HR, but let me just scratch the top here. You can create courses that the employees can attend. They can also apply for participation through enterprise portal. After completing a coarse they will get a record entry in the courses table. You can also add them manually.

AX_2012_Prod_Course


To use this in a route.
Just find the property under the resource requirements on the operation.

AX_2012_Prod_Resource_requirements


So don’t get stuck in the old ways of joining a route operation directly to a resource or resource group. Expand your vision and get creative.

Time and Attendance (Part 24/31): Flex time administration

All the menu items for handeling flex for a worker is located on the workers form (Human Resources > Common > Workers > Workers)

AX2012_TA_FlexWorkerMenu

Opening flex balance: You can set the Opening Flex balance of a worker if the worker allready had some time built up at implementation or as a transfer from another company.
Flex: Recalculate the workers flex balance.
Flex balance: Shows an overview of the workers flex account balance chronologically through time. A new record is put in to this table each time the user has a flex transaction at calculation and the flex balance is recalculated.

AX2012 Flex Balance

Flex corrections:
You can do adjustments manually by clicking “Flex correction”

AX2012 Flex Adjustment

In the example there is also a pay transaction for -14 of pay type 10000 now waiting to be transfered to payroll.

This flex correction can also be performed by the system.
The balance for a worker can exceed the limits of the Flex group settings.

Some just want to report on the issue and make sure that the users get back within the limits them selves or you can run the flex correction job to reduce or increase the balance for the user like the manual example above.
Based on the flex group settings you can replace these with pay types for each flex time unit adjusted. This is configured in the flex group. Check out the setup guide for this here.

The periodic job is found at Human Resources > Periodic > Time and Attendance > Flex > Adjust flex balance.

AX2012 Adjust flex balance

Worker account balance:
The worker can check their flex account balance in the job registration/terminal window.

Flex balance for worker in terminal

Time and Attendance (Part 23/31): Flex time Profile setup

Flex time is added before and after the clock in and clock out. Flex within work hours (after clock in and before clock out) is regarded as “Flex -” and flex outside work hours (before clock in and after clock out) is regarded as “Flex +”.

The flex time intervals does not have to be proportional, but it is recommended that it is atleast similar for each of the end points of the work day (clock in/out). You can have +2 hours and -1 hour at clock in if you want. Example: “Flex +” 06:00 – 08:00, Clock in at 08:00 and “Flex -” 08:00 – 09:00. However the profile will look at the total hours of work (from clock in to clock out) to determin when to start flex time calculation. So in that case you should have -2 hours and atleast +1 hour at clock out.

A standard flex profile might look like this:

Example of a flex profile


Some times a worker want to register overtime instead of building flex, then the switch code “Overtime” is registered and this will then swap the Flex + for Overtime profile type.

Time and Attendance (Part 22/31): Flex setup

Flex time is often used and is a pretty concrete concept. You have core hours that the worker has to work and hours that vary from the clock in and clock out hours are posted to an balance that you can monitor. But I use this as a tool to monitor minor worker deviations as well. Even for workers who doesn’t have flex time.

My view on the matter: You don’t want to set up the system to be too strickt as this makes for a tight regime and a lot of input needed. I use this as a method of monitoring the small deviations that occur daily in all companies and simply letting the employees them selves be in charge of their work times and by the end of the week or month make sure that you have a balance around 0. Hours owed are deducted and hours earned are reset to 0 and lost. Use a small flex window like 30 minutes to handle the smaller deviations, but keep track of the hours. So the cronic late commers will owe and be deducted at month end. I’ve convinced many companies to start using this concept instead of the old ways because this is a win win win concept. Even in old school manufacturing companies where they used to alarm bells to ring in the shift have been converted to a more dynamic environment for the employees. Increasing the productivity, vastly reducing the amount of absence occurances and manual controls, boosing moral and thus making the recycling of employees lower.

Basics

What the flex functionality basically does is to maintain a flex balance. It can also use this as a pay type to keep an overview in an external payroll system.
Workers are a part of a flex group that sets boundries, but the boundries can be broken. It can adjust the flex balance to fall back within the boundries of the flex group by running a job which may or may not create pay transactions (either positive or negative). The adjustment is normally performed right before payment transfer is executed.
You can get reports on people working outside their flex boundries for manual Control as well.

Setup

The setup for flex Groups are located at Human Resources > Setup > Time and Attendance > Groups > Flex Groups

Flex Group

The categories Flex minimum and Flex maximum contains the settings for the boundries of the flex account.
If “Adjust flex max or min is activated the system will increase or reduce the account balance and pay the pay type assigned. You can use a Pay type factor to get more or less for each hour flex.
Setting up Flex balance pay types is used to be able to have an overview of your flex balances in your payroll systems.

User setup

After the flex groups are created you add it to your workers information.
Go to Human Resources > Workers > Time registration workers | Employment > Time registration > Flextime
AX2012_TA_FlexWorkerSetup

When “flex allowed” is checked and “Flex Group ID” is selected you will be able to use profiles with flex +/- in them for this worker.

Next we’ll look at how to set up a profile with flex.

Time and Attendance (Part 21/31): Payroll transfer and export

After pay types are created and approved there will be payment lines ready for transfer. The records for payment lines are created and there is a flag on each post showing weather or not the transaction has been exported. When transfering payments from AX we use a periodic grouping by the means of period types. This is a shared feature between many different modules and situated in the Project module. You can create your own periods and can choose from a set of different types of period intervals. I normaly use the ledger type, but have created some weekly or monthly offset types of payment periods. Workers can be grouped to different payment periods. It is then possible to do different exports for different workers, so in some cases you might even have similar period types with different names (for instance if exported to different systems, but in similar periods). AX2012_TA_Paym_Periods After creating a period. Make sure to generate the periods.  A period has a from and to date and a nice name to go with it. AX2012_TA_Period_Trans The path for the exported file is set up at in the general Time and Attendance parameters. To execute the export go to: Human Resources > Periodic > Time and Attendance > Payroll > Transfer to Pay AX2012_TA_Transfer_to_Payroll Select a payment period and put in a pay date. The export will do an export for the period which the day resides, so If you Select 04.01.2015 and the period is a Monthly type. It will export all transactions within 01.01 to 31.01. You can even retransfer transactions. This will ignore the “Transfered” flag on the payment line. The result of this is a comma separated file. The framework is made so that you can create your own type of exports.

Note: Only the pay types that are checked to be included in the export will be transfered.

Time and attendance (Part 20/31): Advanced pay agreement delimitation

You want to create as much automation in creating payment lines as you possible can and in some cases it does get quite complicated.
As covered earlier in “Time and Attendance (Part 8/31): Pay agreements Delimitation” you can do standard delimitations on one or a combinantion of several different types of parameters like profile settings, job settings, employee compatancies, time and attendance parameters and more. But in some cases you need more then one or an and/or scenario of delimitations or in some cases you want to use other parameters from the referenced post like the absence group or Project type. That is where the Advanced delimitations come in to play. Using this there are virtualy no limitations to the configurations you can do.

You can find the “delimitations” setup under the pay agreement lines form at the top.

AX2012_TA_Advanced_Delimitations_button

There are eight different types of classes for delimitations available and you can create you own or update these if needed.

  • Certificates
  • Skils
  • Absence codes
  • Aktivities
  • Profile table
  • Activities in Projects
  • Projects
  • Operations

You can create combinations of multiple delimitation classes for one pay agreement line.

First pick the class you want in the overview grid.

Then in the conditions at the bottom of the screen you create your own little set of Advanced conditions. The example I’ve created here is based on the Absence class.

AX2012_TA_Advanced_delimitations_conditions

Pick from any of the transactional data or the referenced post, so there are A LOT of options here.

AX2012_TA_Advanced_Delimitations_Proj_Example