Time and Attendance (Part 28/31): Supervisor options

The idea behind the supervisor option is that the shop floor supervisor shouldn’t have to retreat to their office to do the most frequent tasks. This includes reprioritize work, control worker attendance, report absence and change feedback as well as report on manufacturing execution tasks themselves.

When authenticating on the time and attendance registration form, the supervisor will be prompted with a supervisor dialogue where they can quickly jump to the desired task.

AX2012_TA_SupervisorDialogue

The supervisor can change between different resource, groups and production units to do Job registrations.

Change Feedback

The “Change feedback” option gives an overview for feedback from the selected resources.

AX2012_TA_SupervisorChangeFeedback.png

You can select multiple records and click the “Update Feedback” button. This launches the feedback wizard form which I normally don’t use because you can not access the picking list. This is a simple way to perform feedback.

AX2012_TA_SupervisorUpdateFeedback

After the supervisor has updated the feedback and clicks “Finish” the journals and jobb is updated.

This is a great feature as it allows the supervisor to reactivate jobs that has been reported as completed, but should have been reported as stopped. Earlier this gave a lot of headache because you would have to go into the AOT to fix it or create a job that could do this for you.

Attendance

The supervisor can quickly access the Attendance form (which you also can do from the terminal directly) from the supervisor options to report absence or check the worker attendance.

After selecting a calculation group,

AX2012_TA_SelectCalculationGroup.png

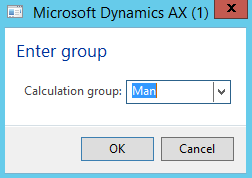
the supervisor will see the attendance overview.

AX2012_TA_AttendanceOverview.png

Here the supervisor can print the attendance form, clock out a selection of workers or register attendance directly.

Clicking on register attendance for a worker the supervisor is presented with a absence registration form with a start/end date and time based on the planned work profile and can input an absence code.

AX2012_TA_SupervisorAbsenceRegister.png

This is done without even leaving the shop floor. When the forman is going to calculate the absence registered will be used and he/she won’t be bothered with roaming the workforce to find out who knows why anyone wasn’t clocked in that day.

Edit job list

“Editing job list” is used to reprioritize the sorting of the jobs on the terminal for the resource.

AX2012_TA_SupervisorEditJobList.png

Selecting a job the supervisor can move it up, down or to a specific sequence number. It is also possible to move the work to another resource as long as it is within the route operations requirements.

Making the job High priority will force the resource to work on this job next. It will be the only job that the resource can start working on and will be notified if he/she tries to start another job.

There are also a lot of other information like capacity overviews, materials and general information about the production order and/or job.

Activation

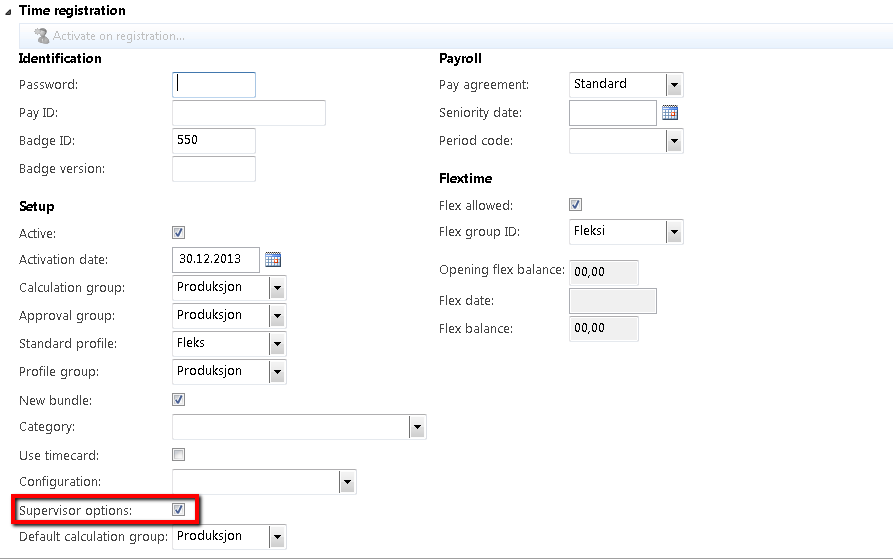
To activate this feature for the terminal user. Go to Human Resources > Common > Workers > Workers | Employment > Time Registration > Supervisor Option and check the box.

AX2012_TA_SupervisorOptionActive

Have fun!


“Number sequence ” does not exist”

You might see this message when posting in manufacturing execution, but where do we start looking?

Well often it is due to some issue with number sequences on the journals, but I don’t know why this happens.

What I normally do is try to figure out what type of journal it is trying to post and renew or change the journals voucher series (Number sequence).

Go to Production Control > Setup > Production Journal Names and you’ll find the number sequence referred to there.

AX2012_MissingNumberSequence.png

Good luck and if you’re looking for more on Time and Attendance or Manufacturing Execution. Check out my Time and Attendance guide.

Happy new year 2015/2016

It has been a long year for us working with Microsoft Dynamics AX. The Microsoft team has been busy working on the next version and we have been waiting in anticipation. Along the way there has been some events and I wanted to just list a few of my highlights. Please feel free to comment with your highlights and anything I’ve missed out on.

Release of AX 7 (Technical preview)

AX7_DefaultDashboard
The release of the new AX is enormes! AX as a service, the new HTML 5 interface, general platform improvements and the opportunities and edge this as AX users and provider gives us.
I can’t wait to get started!

Life Cycle Services 2.0

lifecycleservices

Life Cycle Services (LCS) has been in the makings for quite a while, but it was in 2015 it really took shape and became the tool we where looking for.

The tools available is very useful and give great insight into statuses, features and other stuff you didn’t even know was there as well as keeping tabs on project progress, support issues (both your own and every one else), business processes, licensing and so much more.

The hotfix solution where you kan pick individual hotfixes and package them together is a great tool for technical consultants.

The Azure integration is just amazing and provide a quick solution both for development, debugging, testing and more.

The new version of seems to be even more integrated with LCS and I’m looking forward to seeing what comes in LCS in 2016.

It is awesome to be able to collaborate with co-workers, other partners and customers in this tool that serves as the hub for the customer solution.

Release of AX 2012 R3 CU9

Though not a very large improvement in contrast to the to the AX 2012 CU8 update, it marked the final feature set of the next AX version.

That meant that we could do potential upgrade scenarios and actually already at this point map out a solution map for the customers.

New man on top

Microsoft had a major reorganization of many key divisions and the Dynamics division has been moved under Cloud and Enterprise (Nadellas division before he was CEO), which makes perfect sense.

Kirill Tatarinov left the helm (sad to see him go) and Scott Guthrie is now the main man. Christian Pettersen is still in charge of AX.

I believe that this will in the future be a BIG benefit for the Dynamics solutions as the strategy of the technology developed for Cloud and Enterprise now will take Dynamics in to account at the get-go instead of being an afterthought.

On a personal note…

I decided to start sharing more of my knowledge and did a blog series on Time and Attendance which has been a great success. A lot of hits though out the year all over the world. Great fun!

Blogg2015.PNG

Looking forward to the new year and hope to see you back here! 🙂


AX7 – Personalize forms (First look)

Updated: (24.12.2015) Found out how to add a new field!

In the interface you can personalize how the fields and menu items in the form. You access the options by right clicking on the field or menu item you want to personalize and selecting “Personalize: “.

AX7_Personalize1

This pops up a configuration windows that is tethered to the field you want to personalize.

AX7_Personalize2

You can rename the field, hide it, skip the field in the Tab sequence and select if it is editable or not.

It is possible to move the field right or left. In a structured form setting (not grid).

AX7_Personalize3

You can move a field anywhere in the Tab, but it is restricted to the confines of the Tab.

AX7_Personalize4

The “Clear personalization options” resets the label and check boxes to standard, but it does not put the field back in it’s place. Then you probably would need to delete your user form data or reset the entire grid.

Adding a new field

This took some figuring out, because I clicked in the fields and wanted to add a field, but that didn’t work. To find this option you have to click to the right of the form or on the checkbox on the table header.

AX7_Personalize10.PNG

Click the “Personalize: Grid”. This opens a dialogue on the top of the form. It overshoots my screen by one field, but this is the “Hide” field, and you probably don’t want to click that anyway.

AX7_Personalize11.PNG

Clicking the “+ Add a field” opens a dialogue to the right of the page.

AX7_Personalize12.PNG

I added a field from an added data source and not the top table. This issue had a weird effect in AX 2012, but it seems to work in this version. Nice!

AX7_Personalize13.PNG


Form information

Clicking “Form Information” opens a dialogue box to the right of the screen with some info.

AX7_Personalize5

One of the nice things is that you can see the SQL Query in this form.

Sharing between users

There are some interesting import/export options here which are used to share configurations between users.

The user sets up a form the way they want and exports this. The result is like this:

AX7_Personalize7

The XML contains all the changes to the form. This is then imported by another user and the changes are applied.


AX7 – New general filter box UI

I stumbled upon this nice UI for filtering when in the Purchase order receipt and follow-up workspace.

There is a single filter field which can search for multiple data/record types.

AX7_Newfilter

When trying to find a purchase order and you want to search by vendor name, you simply just start typing and are presented with different data types to search by.

AX7_Newfilter2

I used the down arrows to select my preferred data type: Vendor Name.

AX7_Newfilter3

I clicked “Enter” and I got the list of orders for the vendor in a flash.

AX7_Newfilter4

Simple!


AX7 – Mobile experience

One of the obvious benefits of AX7 is off cause that the user interface is based on HTML5, which can be accessed using any recently (last couple of years) updated browser. My first thought was that it would be excellent to use a phone or a tablet to work with AX and I tried it out for quite a while on my Lumia 950XL.

It is great to be able to work on a phone to access your AX, but there are some areas in the standard forms that can be improved. However it gives a great platform to create an excellent mobile experience if you want.

The start page view is pretty good and it removes any unnecessary objects that are not all that important for daily use.wp_ss_20151220_0001.png

So the design of forms are mobile responsive. Elements move off when not necessary and even working with both header and line forms.

Working with a data rich form in a mobile view isn’t close to a large screen, but it is good enough if you reduce the amount of fields to the absolute minimum.

wp_ss_20151220_0005

Flipping to landscape does help.

wp_ss_20151220_0006

Only thing I would like to see is that the wizard dialogue in the right side of the screen would go full screen if the resolution is low enough. There is no reason to not in my opinion.

wp_ss_20151220_0003

You can do any function on a phone that you can do in the desktop. Which gives GREAT power to the user. Access and do anything, anywhere!

I tried to print and that worked wonderfully.

wp_ss_20151220_0011

The one screen made for tablets is just a tad small for phone, but I bet it is awesome on a tablet.

wp_ss_20151220_0012

All in all this is a fantastic opportunity to make a great mobile experience for the end user. It is quick, responsive and looks great. Imagine all the power of AX on your phone. AX7 makes this happen!

AX7 – Task Recorder

I am not a big fan of the previous versions of Task Recorders. A big deal for me is that you have to have a perfect run through for the task to be valid. You get a lot of nice screenshots, but there are better tools to do that with then Task recorder 1 or 2.

The new AX has a great task recorder that is very easy to work with brings a very easy way to create interactive user guides called “task guide”.

1. You find the task recorder in the settings menu (the gear icon) to the right on the top menu bar.

AX7_Task1

The task guide pops up a bar to the right in the window.

2. Give the new task a name an description.

AX7_Task2

A bar on the top is shown and the bar on the right is ready for your input.

AX7_Task3

3. Go click around and the list starts filling up.

AX7_Task4

4. Click add sub task if you need it.

You can add multiple sub tasks, but only in one level.

AX7_Task5

5. You can also delete steps that are unnecessary.

This is for me probably the biggest improvement. You can also undelete them until you save it.

AX7_Task6.PNG

6. You end your recording by clicking “Stop” in the top menu bar.

AX7_Task7

You can then download the task, save it to LCS, export as a word document or save it as a developer recording.

Post editing

After recording and saving a task, you can go and edit the task by clicking “Change recording text” from the main task recorder menu.

You can also download the file to your PC and I guess there is an editor there somewhere. The file format is “.AXTR”, so you can probably do some type of transformation and then upload it back onto the server.

Exports

Developer recording

During the recording you can put in developer place holders. I’m unsure what the developers process will be, but I believe that you can download the xml file after completed recording and send it to your developer to run through it. Nice!

Word export

Export of the word document is still here, and it is much simpler then the former task recorders. It does not contain the screenshots that it did earlier and some of you might miss that, but this task recorder is much more generic and using screenshots is kind of not generic if you do the recording on non demo data. The task guide weigh up for that anyways…

AX7_Task8

Task guide

The task guide is an interactive user guide where the user is guided in the interface to run through the process. It shows a step by step process. You’re prompted with an overlay task. When complete, the box wobble and then move/transform to the next action. AWESOME!

AX7_Task9

Summary

All in all the task guide is vastly improved.

You can edit, delete steps, download, upload and do developer commentary.

The task guide is awesome and brings a whole new paradigme to end user training.

The word export has now actual numbered list which bothered me endlessly in previous versions, but you don’t get the screenshots.

I can live with that. Two thumbs up!

AX7 – Employee self service Workspace

Gone is the old and dreaded Enterprise Portal. We welcome the new Employee Self Service workspace!

It is pretty nice and gives a great overview of all your needs and requirements.

AX7_EmployeeSelfServiceWorkspace

It looks nice and is a very informative dashboard experience.

It shows a picture and some contact information to the far left. You can also here enter your own information and keep it up to date. Addresses, Contact information, Picture, Personal contacts (ICEs ++) and identification numbers like Social security numbers and so on.

AX7_EmployeeSelfServiceEditContact.PNG

Under the section of My information you find:

  • Work items assigned to you.
  • An overview with a small status update on your expenses with a quick add function.
  • Your Timesheets.
  • Certificates that are about to expire
  • Internal discussions and meetings
  • Performance goal status and tracking
  • Latest updated skills
  • Compensations has a nice show/hide function in case a co-worker is looking over your shoulder.

Under Company information you’ll find the company directory with all the contact information to your co-workers and an overview of open jobs within the company which one could quickly apply to.

Under Additional information there are links to several more forms regarding you as an employee.

This looks very nice and will move a lot of data entry work from HR to the employee them selves.

Trigger workflow manually

Ever been in the situation where you’re running a demo and suddenly you run in to a workflow that is required and you have no idea if the workflow batch processing is running or how to move?

Well I’ve got the answer for you!

  1. Go to development by clicking CTRL + D.
  2. Go to the forms node and expand
  3. Find the tutorial_WorkflowProcessor
  4. Right click on it and select “Open”
  5. Click “Start” in the dialogue.

WorkflowProcessor.PNG

Tada! Workflow processed!

Time and Attendance (Part 30/31): Document groups

When working on a terminal with manufacturing execution AX 2012 can offer up documents to the users that are attached either to the item or to the production order.

This is done by adding records in the Document Groups (Production Control > Setup > Document Groups).

Simply add a new record, select the documents and add the users who will view the different documents.

AX2012_TA_DocumentGroups

You might want to create different Document groups for different individuals.

Selecting “Reading required” in the document types section will prompt the user with a dialogue when starting the production.

AX2012_TA_DocumentGroupsDialoge

The user can also manually open the attachments by clicking the attachments icon.

AX2012_TA_DocumentGroupsAttachments

This is a great feature and not very well documented one. Hope it helps you out. 🙂