Time and attendance (Part 19/31): Electronic timecard setup

Timecards are used to manualy enter time and to let the users change their raw registrations.

It can be entered in three ways:

  • From/to timestamps
  • Elapsed time
  • Net time

You can also select if the from and to dates should be shown if work normaly goes on for several days.

Setup for the timecard is done at Human Resources > Setup > Time and Attendance > Time and Attendance parameters | Display options > Electronic timecard.

AX2012_TA_Timecard_options

Activate the user:
Check the timecard checkbox on the workers time and attendance settings under employment.

AX2012_TA_Timecard_activate

Now the user can use the timecard features.

Time and Attendance (Part 18/31): Switch codes

Switch codes are used for swapping different pay types in pay agreements. Most often used to switch between flex and overtime or no pay (break) and overtime or some pay account build up.

A switch code is set up as an indirect activity in a group marked with the switch code type. This is found at: Human Resources > Setup > Time and Attendance > Indirect Activities

Switch codes can be used together like overtime before and overtime after profile time. You can also set them up to cancel one or more other switch codes. For instance if the user has descided to apply overtime to his work after regular profile hours, but then descide that he wants to do a flexi or work account build-up. In that case the user register a “build-up switch code” which cancel the earlyer registered overtime switch code.

Time and Attendance (Part 16/31): Planned absence

For long term absence and vacation planning I would recommend doing the absence registration as early as possible.
To create absence for a worker you can click the menu item as showd below:
AX2012_TA_Absence_Registration_menus

You can view, delete and create new absence for the user in this form.

AX2012_TA_Absence_registrations_overview

Create new and select the from and to date as well as a absence group and/or code.
Ticking the “Interrupt” check box will cancel the absence the next time the worker clocks in canceling the rest of the absence. If the absence is interrupted the Interrupted flag will be tagged making this absence not active anymore.

Bulk creation:
You can also do quick and bulk updates of absence. This is good for doing vacation planning.
Go to Human Resources > Periodic > Time and Attendance > Create planned absence

AX2012_TA_Create_absence

Select the from and to date for the intervals and select the absence job. REMEMBER TO SELECT THE WORKERS by clikcing “Select”.
Ticking the “Interrupt” check box will cancel the absence the next time the worker clocks in canceling the rest of the absence.
Ticking the “Compose” check box will create one line for each day for the durration of the absence.

Messed up?
If you some how create absence for to many users (forget to limit the filter) there aren’t a way to see absence for all users as a menu item. Then you would need to open the JmgAbsenceCalendar table and work in that one.

AX2012_TA_Absence_Edit

You can arrange the absence to be automaticaly transfered to Human resources Absence journals by ticking the check box in the time and attendance general parameters. Make sure you have an open absence journal to make sure that the data has a place to go. Go to: Human Resources >  Periodic > Absence > Create absence journals to create these tables.

The planned absence will be filled as absence for standard work time for users when applicated.

Time and Attendance (Part 15/31): Profile group Profile relations

Profile relations:
The profile relations can be used to dynamicaly change between profiles based on the time when the user clocks in. I use this for shift workers and also where they don’t have flexi hours but can work either from 5, 6 or 7.

ProfileRelationShift

ProfileRelationFlexAlternative

The profile relations override the standard profile for the user.

Time and Attendance (Part 14/31): Profile calendar

The profile calendar is used to make planned changes to the default profile that is used for calculation. When doing the profile calculation the system checks the Profile calendar to override the default profile and this is loaded as the profile for that journal. So you can predetermin the profile that the user is going to have at calculation by creating a record in the profile calendar table. You can set this up for special work days that deviate from the standard work hours, but it is also a very nice tool to handle complex profiles where the profile changes from week to week. Go to Human Resources > Setup > Time and Attendance > Time Profiles > Profile Calendar to add new records.

AX2012_TA_Profile_Calendar_2

You can do changes for entire profile groups or for all workers as well by changing the Profile calendar code collumn to Group or All. Use special day collumn to trgger the special day in the pay agreement. For instance if a Monday is Christmas Day and if someone comes in and does work, they will get the special day pay instead of a simple Monday.

There is a great graphical tool for handling profile calendar which is called job planner. I will look into that later.

Time and Attendance (Part 13/31): Approval

After calculation is done the next step is to do an approval. This is found at Human Resources > Common > Time and attendance > Approve. All the time registration workers are members of an approval group and this should preferably be grouped at a management or executive level.
The approval process is very much like the calculation process and the approver can also perform the calculation steps on the approval form. Smaller companies might only use this level of control and skip the calculation process all together.

The approval action is:

  • Controll if the correct pay agreement is set or change this to another type or override it.
  • Create and approve manual premiums
  • Perform the Transfer of the time registrations to payroll, projects and Production. (This might be a step of its own)

AX2012_TA_Approval

You can click the approve checkbox on the time registration journal line to perform an approval for one single worker or click Update > Approve in the top menu to do it for the entire approval group. If some lines are not calculated the calculation action is automatically performed.

After the Update > Approve action is performed you can also filter out the journals with errors in them to by clicking Display errors in the top menu.

Override of the pay agreements can be done. Check Part 12, Calculation for more information on overriding.

Premiums:
The Premium transactions can be created manually or could be generated from a pay agreement.
You want to create as much automation in creating payment lines, but it’s not always possible. So for that rare event that creates some type of special payment this kept track of manualy and then entered in here. You could add it in the payroll system, but I believe that everything should be created from AX Time and attendance. Nothing should be added in the payroll system.

AX2012_TA_Approval_Premium_lines

Transfer:
When the time registration journals are approved the next step is to transfer. This action transfers the changes in time journal lines to the perspective production orders and create the Project time journals as well as create the payroll pay type transactions.

You can click the transfer check box on the time journal header for one worker or click Update > Transfer in the top menu to perform the action for all the workers in the approval group. If journals are not calculated or approved yet, these actions will be performed as well. Clicking the transfer check box (or any of the calculate or approval check box) after it has been checked will reverse the previous actions.

When transfer is performed the lines of the journal dissapear from the form. No worries. You can view them by clicking Inquiry > Transferred registrations in the top menu.

AX2012_TA_Approval_TransferReg

You can also check the pay types generated by clicking Inquiry > Pay items.
The Pay items are created, but not yet transfered to the Payroll system. This is done in a separate action. When transferred the pay items are checked with the “transferred to pay” flag.

AX2012_TA_Approval_Pay_Items


Time and Attendance (12/31): Calculating

Time registration workers are grouped to calculation groups. These should (in my opinion) be grouped as low as forman or team leder level. Offcause every user has to have this (also formen and team leaders), so I normally illustrate this as a hierarchy even though it is a flat table.

The calculation action is:

  • Define the work profile
  • Approve switch codes (for instance Overtime)
  • Define missing or redefine absence reasons

You can configure the group with a password which the user is prompted at opening the form with a specific group if you need to restrict access.

Start the Calculation form by going to Human resources > Common > Time and Attendance > Calculate.

AX_2012_TA_Calculate_login

You can do this week by week for a single user or day by day for the entire calculation group. Select the week or the day at login. I like doing this on a day by day for entire group. Probably since this is the way it has been done before. The week view is new in AX 2012. Click the day field to go into the day mode or keep the week setting to go to week mode.

Calculate

Once the form is opened AX looks through the raw registrations and create these time journals.

You can look through the lines and do amendments to them if you want. There are different icons for indirect activities, Project and production tasks. You can go back to the original raw registrations data. If all fails. Delete the journal header. Go to the next day and go back.

You can run calculation for everyone in the list by clicking Update > Calculate from the menu or click the calculate check box on the line.

If you run the calculation for everyone you can click the “Display errors” to only display the records that didn’t go through.

If the line goes in to an error you can view the error message by clicking the error pane.

Calculation error

If absence is missing you can go to the absence tab and define the absence. You have to go there. You can not to this direcly on the line below.

Define absence

Another common error I’ve run in to is if you’ve edited the lines you might have chronological issues. Especially if you have transactions going on till the next day. Profile day has to be the same day as you calculate and not the next day even if the job starts the next day. Check the times and dates on the lines to get the right. You can not be on different types of jobs (Indirect, Project, Production) at the same time.

When the calculation is completed you can go and check the times that are calculated.

Control times

Approving absence is often alot of going back and forth, so I normally do an amendment on the form to not go through all the panes. An amendment by a developer might look better, but this takes about 30 seconds to do.

Calculate amended

Override profile:

You can change the profile for any worker before you calculate and you can even override the profile for a unique day if there is a “once-in-a-blue-moon” event.

By clicking Override and Profile you can change the profile for that particular user for that day.

AX2012_TA_Calculate_Override_profile

You can load the existing profile as a template by clicking “Retrieve profile” and start changing that one or create each line from scratch. You create this the same way you would a standard profile.

After the override is done the line will have the “Override profile” flag activated.

Remove the ovverride by clicking Delete override in the Profile override window.

Overtime allocation:

You can allocate the overtime for each of the jobs that has been worked on durring the day. Select the percentage of overtime hours to each job.AX2012_TA_Overtime_allocation

Clock in/out:
You can also do clock out workers from the calculation form. You can do a selection of the users that are not yet clocked out and do a clock out for each user.
The clock out time that the user get is the one sat in the profile, even if the clock out happen at a earlier time.

Time and Attendance (Part 13/31): Approval


Time and Attendance (11/31): Basic usage

There are several two ways to start the user interfaces/terminals.
Production Control > Periodic > Manufacturing Execution > Job registration start the terminal in the default configuration sat in the terminal form. If it is the first time started it will be prompted for a configuration.
Home > Common > Time and attendance > Clock in/out (Punch clock). This launches the terminal in the clock in/out only mode sat in the terminal configuration.
Or atleast they should… There are some bugs you should be aware of.
The first is that there is a caching issue when starting the client. This results in the client authenticating as the AOS server the first time the job registration form is opened. There is a fix for this (KB 2970350). 
Another thing is that the clock in/out menu item does not work properly wither. Might be some coding that’s missing. I have not gone through the work of figuring this one out.

Once started the terminal shows the authentication screen.

attendance screen

User logs on with worker ID or Badge ID and password (if active).
System finds the active profile (profile calendar (User > Group > All), Profile relation for the Profile group and finaly the default profile for the user). If the clock in time is after the clock in time for the profile (if there is any), the user is presented with the absence form to explain why they have been absent.

If all is okay the user is presented with the default interface for the terminal configuration or the configuration sat for the worker on the worker employment settings.

AX2012_TR_Termina_Touch

Navigating:
There are several areas the user can look for jobs to work on. These are toggled to with menu buttons.
* Selected jobs
This is used for bundeling work and checking the jobs that are selected. If a barcode is scanned and the user is in bundle mode this screen is shown.
* My jobs
If the resource is connected to an employee that is logged on the user can be presented with work only for that user.
* Production
All production orders. Can be limited to only show for a production area, resource group or a single resource.
* Project
All project and project activities that are active
* Indirect activities
Shows all the indirect activities that the user can clock time on.

After a job is selected the user clicks start to make the job or jobs active.
Instead of navigating around the user can use the JobID and feed it in to the barcode area either woth a keyboard or preferably by barcode if this is activated on the terminal setup.

Feedback:
If the user is not in bundle mode and active on a manufacturing job the user will be prompted with the feedback dialogue (Either grid or wizard type). The user can also do feedback directly by clicking feedback in the menu.


There are three status updates to be given for the jobs on feedback.
* None – User continues to work on the item. Not optional if not bundeling.
* Stopped – The user stops working on the job, but the job is still available later.
* Finished – Job is marked as closed and not available for further work.
If he user presses finish by mistake the Supervisor can override. There is also the option for quantity validation before closing.

The user can also make changes to picking lists at this point if needed.

After feedback is given the form is closed by clicking close.

The terminal returns to the authentication screen.

Time and Attendance (Part 12/31): Calculating

Time and Attendance (Part 10/31): Terminal setup

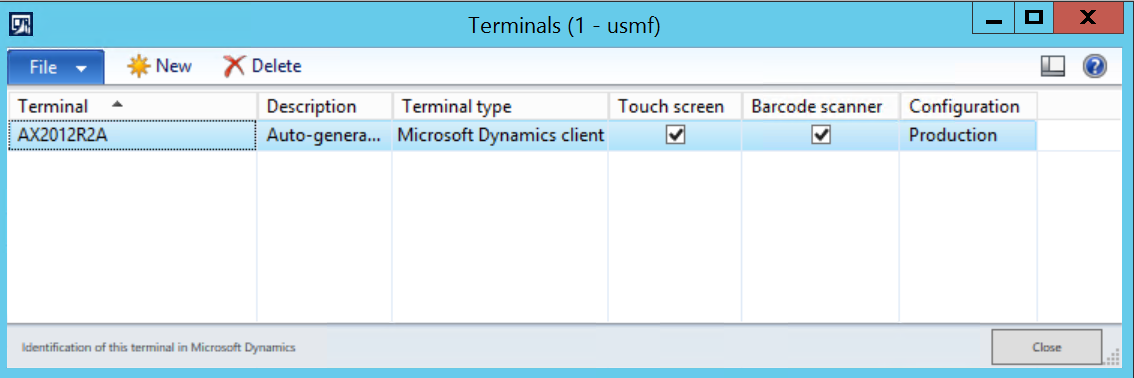
You can define a configuration (Project, Manufacturing, Punch clock) to a terminal. Terminals are identified by machine names. So if you want different modes between two terminals, you will need two different machine names. I have had some challenges with this and loadbalencing on terminal servers and citrix… But it is possible.

When a machine launches job registration for the first time in an AX environment the system prompts the user for a configuration.

AX2012_TA_Configuration

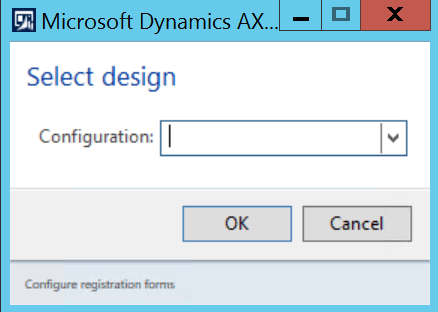
This creates the record in the terminals table with the description Auto-generated. The configuration can be changed at any time, but require a restart of the job registrations form.

AX 2012 Terminals

There are two paramters that are not checked by default when the terminal record is created.

Touch screen:
When this is activated the terminal changes layout for better touch interaction. The text get bigger and the menu buttons are moved to the bottom of the screen. There are also on screen numeric pads popping up where ever you need to do feedback.

AX2012_TR_Termina_Touch
Touchscreen and Barcode active

Desktop mode
Touchscreen and Barcode not active

AX2012_TA_Terminal_Login_Touch
Clock in screen with touch screen activated

Barcode scanner:
This activates the barcode scanner field in the top of the terminal interface. After the user logs on with their credentials, the barcode field is in sat in focus (prompt in the box/you don’t need to click it/is ready for feedback) and you can directly scan a barcode.

Terminal configuration:

You can personalize any form in AX, but the job registration form is one of the most configurable interfaces except for the retail POS terminals. You can configure the buttons and fields by using the terminal configuration (Production Control > Setup > Terminals > Configure registration forms). The configuration wizard create some default terminal settings as shown here. Feel free to make you own.

AX2012_TA_Terminal_Setup

The Action pane parameter defines the configuration of the buttons and panes. You can configure these as you wish. More info on that below.

The Start page parameter defines the first page you are taken to when logging on. There are six options to choose from here.

  •  None
    Returns to the logon screen. Used for punch clocks
  •  My jobs
    If the employee is connected to a resource, the terminal filters project activities and production jobs that are planned on this resource.
  •  Indirect activities
    Displays the available indirect activities
  •  Project
    Display projects and project activities
  •  Current Activities
    Shows a list of jobs the user has activly selected.
  •  Production
    Shows production jobs

Feedback input method determin the way that the user is working with when doing feedback. It is either the standard grid solution which is a table grid list of each job the user is working on or a more guided wizard dialoge with one page for each job the user is working on.

Use actual login time defines if you want to use the time the worker clocked in or the actual time where he selected the job and approved/started.

Disable close disable the windows to be closed by any default windows interaction. You need to press CTRL + Q or quit the application all together if you want to close the window.

Report qty at clock out gives the user a dialogue for feedback when clocking out. Even on the punch clocks.

Job list check checks if the job fed in to the barcode field is available on the list displayed. This way the user can not start another job then is on the filtered list.

Lock employee means that the user can authenticate once and start and report on the terminal without being presented the login screen again. They have to manually click the switch user icon. Then the terminal is brought back to the login screen.

Prompt for production area gives a dialogue at start up to select the Production area, Resource group or resource and filters the production jobs accordingly.

You can show, minimize or totaly hide Messages, Status, Clock and Preview pane.

You can select the setup for the Indirect activities, Production orders and Projects. You can configure these and choose what fields to be shown in the grid collumns and the preview pane.

Select fields:
Click “Setup of grids” in the action menu on the terminals configuration to launch the setup.

AX2012_TA_Terminal_Setup_Grids

Choose the fields to be displayed and select if they are to be shown in the Columns or Preview pane.

If you want to do add new fields to the forms, you should add it as a selectable field in this list and not fool around with the form directly.

Configure the Action pane:
Click “Setup of Action Pane” in the action menu on the terminals configuration to launch the setup.

AX2012_TA_Configura_Action_Pane

You can configure the buttons based on the displayed tree.
There are four levels: Root, Pane, Group and the actual Button.
You can rearrange the function buttons as you want.

The system will display an irritating error message if you leave a button without a function. So if you create a button to much. Put a value in and then delete it.

If you want to create a button function of your own. Use this paradigme to create the amendments. Don’t mess around with the form layout in the AOT.

Time and Attendance (Part 11/31): Basic usage

Time and Attendance (Part 9/31): Employee setup

Once your base parameters are set, you can activate your workers (employees and contractors). This is done by going to the workers and selecting “Activate on registration terminals” under the “time registration” pane.

AX2012_TR_Activate_workers

This brings up the dialogue for entering the basic paramters for your time registration worker.

AX2012_TR_Activate_worker_dialogue

Fill out atleast the required fields and click OK.

Now let’s take a look at the user parameters on the worker card. I’ve marked the fields with green for the ones I normally set up.

Go to: Human Resources > Workers > Time registration workers | Employement > Time Registration

AX2012_TR_Employee_paramters

Password has to be turned on in the T&A parameters to prompt the user. Can also be blank for some users. Great if you have issues of users typing the wrong user ID or pick the wrong ID card. This is to bring an extra level of accuracy, but is also used from a Security perspective. I always suggest to have this active on the supervisor users.

Pay ID overrides the employee ID in the case of exporting payroll transactions.

Badge ID is used as an alternative authentication method than Employee ID. You can only choose to use the one or the other. This is done in the T&A parameters.

Badge version is just an internal note for keeping up with the card version if applicable.


Activate the user by enabling the active checkbox and an Activation date. You can also deactivate users from time registration by unchecking this box.

Calculation groupApproval group, Standard profile, Profile group and Default calculation Group are required fields and must be entered.

New bundle is to set the default mode of working to either sequencial or task aggregated work. More on bundling later.

Category is the category that is standard for reporting i Projects.

Use Timecard is an option to activate the user to utalize the built in manual time sheet solution. More on this later.

Configuration is used to prompt the user with a specific desired terminal layout overriding the terminal standard.

Supervisor options gives the user the supervisor options menu at the time of authentication on a terminal.


Pay agreement should be sat for each employee. PS: The setting for pay agreement on the profile settings override this setting.

Seniority date is used by the pay agreements delimitation to calculate seniority. This is often confused with the seniority on the employee card.

Period code is the grouping on how often the user gets paid calculated.


Flex allowed needs to be activated if the user is to use a flex profile. You can also set rules and limitations for the flexi profile pr. user by entering a Flex Group ID.


Bulk update your employees:
Activating employees can be a tiresome task if you have a large organization that should be activated at once.
Use the Excel add-in and filter out the desired worker IDs in the hcmWorker table. Copy this to enter data into the jmgEmployee table.


If you’ve followed the blog series from the start, you should now be able to start using the solution with time registration. But I have so much more to tell you!

Time and Attendance (Part 10/31): Terminal setup