

Setting up the Print management for sending documents by e-mail is a very manual process in most implementations I’ve seen. It takes a user quite a lot of steps to set up a the system for sending documents on e-mail and getting it wrong has grave consequences (It actually stops your sending the invoice process, while still having the invoice posted!). I’ve dove down in to some data and found a smart way to dynamically set this up so that you only have to tag a e-mail address on the customer with a role and you’re done. This will also work with other documents like packing slip or customer statement and should eliminate the setup issue.
Let me show you how to do it!
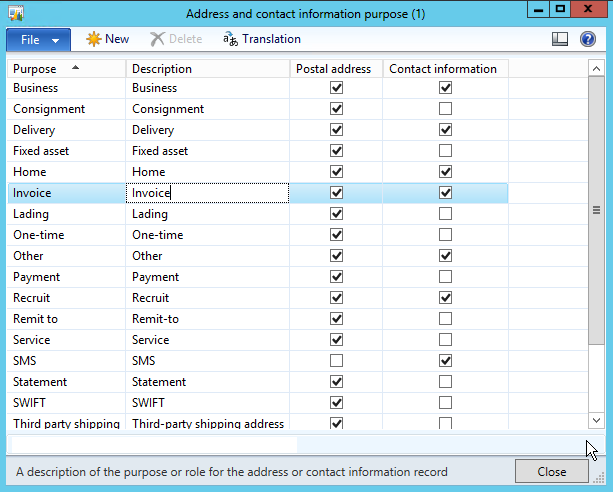
Step 1: Set up a new contact purpose for the document.
You could use the default ones, but in my experience you should differentiate pr. document type.
Go to: Organization administration > Setup > Global address book > Address and contact information purpose
Add a new type and tick both Contact information and Postal address check boxes.
Step 2: Set up the Print Management
So selecting what customers should receive require you to specifically trigger the customer either by filtering by a parameter or setting it up by hardcoding the customer level print management setup. My idea is to dive down to see if the customer has a contact e-mail that is tagged with the “Invoice” role (Step 1) and trigger based on that.
To set up general print management settings, go to:
Accounts receivable > Setup > Forms > Form setup | Print Management
Create a new print setup
Click the original node and setup the default printer settings and then add a new node on the original node.

Give the node a name (Like “E-mail”) and set up a condition for the query/filter. When the filter is true the invoice follows this setup. If not it will default back to “Original” setting.

The query needs to be extended to get the required data available. You extend the query by right clicking the node and select a 1:n or n:1 relations.
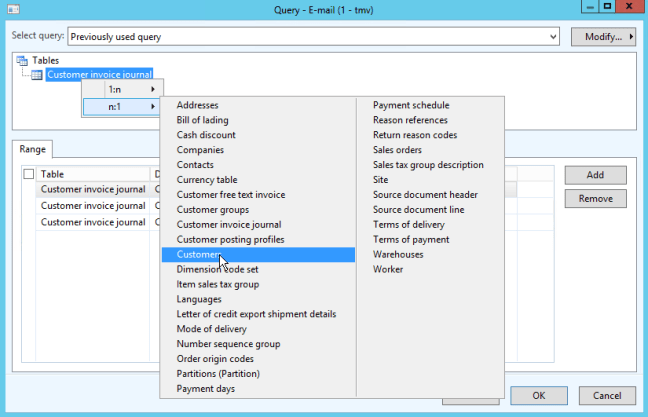
- n:1 > Customer
- n:1 > Global address book
- 1:n > Party location relationship
- 1:n > Locations
- 1:n > Communication details
- 1:n > Contact information and role relationship
- n:1 > Roles
That should give you a query like this.
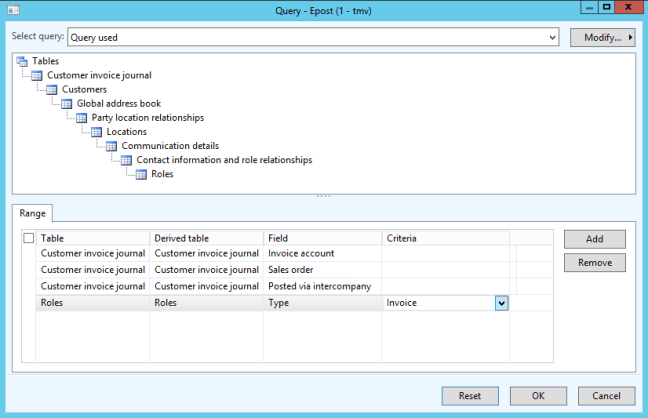
Then add the “Roles” table, “Type” field and select the desired Criteria (Like “Invoice”). Click OK to close the criteria dialogue.
Setup the print to e-mail
Now set up the printing settings by selecting the arrow at the end of the “Destination” and select “Printer setup”.

Notice that you can add a preferred footer for the invoice.
Select “E-mail” in the left column. Then on the “To” line select the “Edit” and in the Customer purpose field select the role you created in Step 1 (Like “Invoice”).

Now add a subject and select the desired format (I prefer PDF).
Click OK on the Print destination setting and close the Print management form.
Step 3: Setting up a customer
This is the final step and the only one you need to repeat when you now want to add a new customer to be emailed the invoices.
Create a new email address or use an existing one on a customer.

Now select the “More options” menu and select “Advanced”.
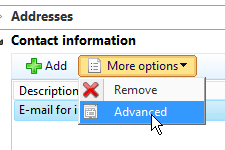 Select the “Invoice” role (or another if you created a different one in step 1) on the “Purpose” drop down. You can even have multiple roles selected if you want, so if you do a multiple setup with different documents you can add multiple roles/documents to one e-mail address.

Setup is done!
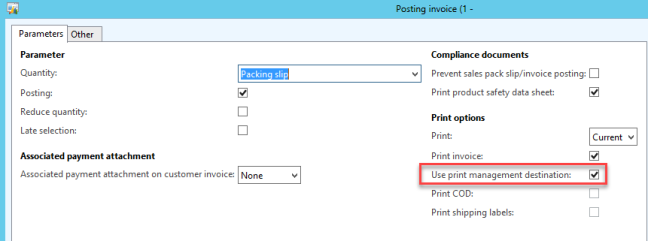
So now all you have to do is to remember to tick the “Use print management destination” check box when posting an invoice and all customers with this role on an email will get an email instead of going to print.
Oh… You’re welcome!

Good article Fredrik.
It has alot of similarities to my own article from a year back: https://dynamicsaxtips.wordpress.com/2015/04/20/advanced-print-management-using-purposes-and-tokens-to-define-e-mail-addresses-for-print-management/
If you follow my link above, you will also find a solution for automatically sending these emails based on the setup just created.
Hi there,
The functionality is written about many places. The thing I tried to convey was the query and how this simplify the setup. You don’t have to do all the work under “Do the same procedure for the Customer invoice purpose:” in your post…
Without the query you would still face the issue of a customer being tried to email and the printing process crashing, leaving you with many unhandled (but still posted) documents.
Great stuff Fredrik. Never really thought of using it this way.
Hi,
Thanks for the post.
I wanted to use this functionality to send out Vendor Payment Advice. Is there a way in OOB, to configure email body also on the email sent to the vendor.
Thanks in advance!
I wanted to use this functionality to send out Vendor Payment Advice. Is there a way in OOB, to configure email body also on the email sent to the vendor.
Thanks in advance!
Hi Zalak,
It should be possible to do it in the same way as you see here. 🙂
Hi,
Thanks for the post.
I wanted to use this functionality to send out Vendor Payment Advice. Is there a way in OOB, to configure email body also on the email sent to the vendor.
Thanks in advance!
Hi,
You could hack the change classes and add a body, but not through config.
In F&O it could be fixed through GER.
Hi,
Great post.
Can you use this feature to send a PO automatically to a vendor?
Yes. 🙂
Hi
Is there a setup for sending muliple invoices in one e-mail
Hi Hanne,
I think you might. I don’t think you can directly in the execution, since this is per document, but you can aggregate multiple transactions into one document by setting summary update correctly.
Is there a way to set the query to recognize when an email has been sent so it doesn’t send multiple times? Our users also use Print Management to re-print copies after an invoice was posted so we don’t want to email our customers again when this happens.